Tired of drowning in LinkedIn DMs? Same.
So my teammate Max and I built Request Router—an AI-powered LinkedIn messaging assistant with a human-in-the-loop approval flow.
Built with:
- Unipile to send/receive LinkedIn messages
- Slack for human approval + message editing
- Notion as the brain for routing and smart context
No more guessing who to forward messages to.
No more wasting time on cold outreach.
Just clean, scalable, human-approved AI replies - tailored to your org.
👀 Behind-the-scenes build with Max: https://youtu.be/3LEm9bTXtvw?si=QwapUj4YPYW0DVFx
💾 Download the Request Router template: https://n8n.io/workflows/4889-linkedin-auto-message-router-and-responder-with-request-detection/
Want to connect? Find me on social media and reach out to me directly:
- LinkedIn: https://www.linkedin.com/in/angelgmenendez/
- X: https://x.com/djangelic
0:00 – Intro: The Problem
0:33 – Demo: AI Inbox in Action
2:10 – How It Works (Slack + Notion + Unipile)
3:58 – Setting Up the Workflow
9:50 – AI Agent & Directory Logic
15:02 – Slack Button Actions + Advanced Routing
16:44 – Wrap-Up & Template Info
Оглавление (7 сегментов)
Intro: The Problem
So, Max and I cooked up a crazy idea. What if AI can answer your LinkedIn messages for you? This started as a jam session with Max, the original flowmer, where we basically vibecoded our way through a working MVP. If you want to see how it came together, Max made a behind-the-scenes video worth checking out. We were both overloaded with LinkedIn messages and internal requests. And we thought, man, there's got to be a better way to handle this. So, here's what we built. a LinkedIn request router that uses UniPile to handle messages, Slack for approvals, and Notion is the brains behind the scenes. We're actually using this ourselves. This isn't just a demo. Let me show you how to set it up.
Demo: AI Inbox in Action
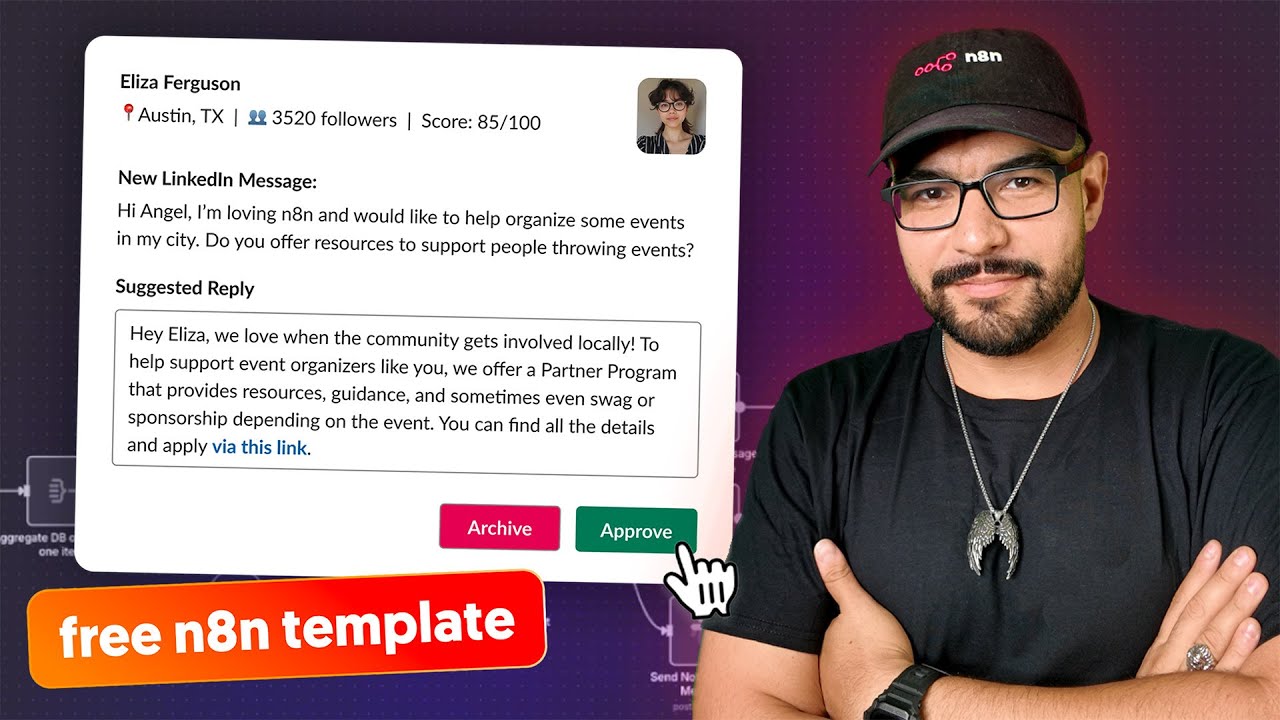
Let's start by seeing a demo of this in action. The way this works is we utilize Slack as our interface for human in the loop. To do this, we've created an app called Request Router. Request router acts as a messaging cue for you to process your incoming LinkedIn messages. Now, because we don't fully trust AI and because there are some instances where the AI just cannot answer with the context that we have, we want to make sure that these messages go through us first and we're able to edit them before we send out the AI responses. So, to do that, I'm going to go ahead and trigger our web hook here on the Unipile side, and I'm going to trigger a sample message from LinkedIn. So, we'll give it just a few moments for it to run, and then we should see it moving smoothly through this process here. And there we go. So now we've triggered the workflow to run and as you can see it's running through the workflow and there we go. Now if we make our way back to request router we can see we've received a message. It's very well formatted using block kit and we have a few useful links here. We can link directly to the person who messaged us LinkedIn account or we can link directly to the LinkedIn message itself and respond via the website LinkedIn. But what's most useful here is that the message has already been preformatted and preset up. All I have to do is come in here and make some changes if I want to and hit approve and it will send that new updated message out to this user via LinkedIn message. Now this message here of course we're is a sample message so we're not going to utilize this right now but as a cue what we can do here is if we don't intend to message this person back we can just hit archive or we can hit approve to send the message for this one I'm going to go ahead and archive it for now. Now let's see what happened on the back end. So here what has happened is we have received the
How It Works (Slack + Notion + Unipile)
message from LinkedIn through unipile which is a third-party service that acts as a relay for the LinkedIn API. It is a paid service. However, it is well worth the cost as it makes working with LinkedIn's API very easy to do. So the message comes in via UniPile. We check to make sure that we were the one that sent or received this message. Then once we check, as we can see here, it's someone other than ourselves that sent this message. So we're going to go ahead and route it here. If it had been us responding to the person, that message would have gone down this path because we don't want it to take action on our messages, only incoming messages. So, the message comes in, we do some checking on LinkedIn to find more details of the user to get context of that user in LinkedIn, things like followers and connections and even where they're from. Additionally, we will then check our notion database. This notion database acts as a directory. This directory allows us to route messages, hence where the name request router came from, to the right department. Cuz many times the problem is we don't know who needs to get a particular message or even if we do getting the URL or email address of the person that needs to be contacted can be difficult or timeconuming at the very least. So here what we've done is we've created a standardized database that we're going to look at here in a moment to feed the AI with context to generate the message appropriately. This also has a little bit of memory so that it keeps track of the separate conversations and gives it more context when it comes to responding in real time. Next up, we will then send one of three different messages. As we saw here, there's actually two different types of user within LinkedIn. So, you can get a message from an individual user or organization. So, here what we're doing is we're checking to see if we find the user. If we can't, then we search the organization endpoint and if we can't, we have a fallback error message. And this error still generates a Slack automatic message, but it doesn't have the contextual details for the user or
Setting Up the Workflow
the organization. Let's go ahead and walk through setting this up. I've done my best to color code these to make it easy to deploy. So to do that, we have the red items here, which are web hooks that need to be updated. One here on UniPile, one here in Slack, and then the yellow for logic or credential updates that need to be made to make sure that this works correctly. Everything else should be able to be left as is. So, let's go ahead and start by updating the UniPile web hook portion. To make this easier, I've included a link directly to the UniPile dashboard to where we need to go. So, what we're going to do here is we're going to set up a new web hook. So, I'm going to call this something along the lines of NAN web hook. I'm going to set it to only trigger on messages and on any new messages. That's what's going to trigger the web hook. Now, this is important. If you manage a business in LinkedIn, you will not only receive messages sent to you, but also to your organization. any organizations that you manage or are owner of, they're going to trigger this workflow as well. And when you respond as that organization, it will trigger it as well. So, we're going to need to update the logic to take this into consideration. So, here's where we put our callback URL. That's pretty straightforward. We're going to go into the web hook. We're going to copy the production URL and we're going to paste it right here. Now, I'm not going to do it in this case cuz I don't need more than one here. So, as you can see, mine's already set up. This is what yours should look like, and you'll be ready to go. The next portion of setup is the logic. So this right here is as I was mentioning is your LinkedIn user ID. Now I don't believe this is LinkedIn's actual user ID. This is Unipile's version of your LinkedIn ID. So the best way to do this is to send a message to someone on LinkedIn while this is active. Maybe turn off the Slack portions or all the other portions here at the end by hitting the little power buttons here. When the message comes in that you know that you sent, this will fill in with your user ID. So just copy this directly into this portion. Same goes for if you send or receive a message from your organization. The organization that you manage, go ahead and update it here. If you don't manage an organization in LinkedIn, go ahead and delete this and you'll be in good shape. From there, we're going to want to update the credentials inside of your Unipile HTTP request. So again, I've tried to link it to make it a little bit easier to the Unipile site. What we're going to do here is we're going to generate a token. We're going to give it messaging and account scopes. I'm also giving it web hook scope. I don't believe it needs it, but it's best to have it just in case. We'll call this NAN credits, and we'll go ahead and generate and make sure that expiration date is set up correctly. Now, I'm going to delete this here in a moment, but I did want to generate it so that you realize that there are two things that need to be updated. The first is the URL. You're going to copy this URL here. You're going to go into here and make sure that this portion right here reflects that same URL for UniPile. And then the second portion is the API key. So, we're going to go ahead and go into the Unipile account here. We're going to copy that API key. Easier to just copy it here into this value. Now, you will want to use the X-API- key in all caps exactly as we see here. And don't forget to give it a name. So, here I'm going to leave my old one in place. I'm going to come back here and hit done. And I'm going to go ahead and delete this one. Right now, once that is updated, you will need to make sure that you do that for all three of these. So, this one as well as this one. These three all have the Uniile login and they will need to be updated. Next up, we're going to make our way into Notion. Now, the Notion portion already has plenty of documentation and I don't have the ability to generate API credentials on my Notion account here. What you're going to want to do is follow the documentation internally by clicking docs and following the instructions. But more importantly, change this out for whatever service you use. You don't have to use Notion. You can use something as simple as Google Sheets, rather. If you do change this, make sure that you change as well the outputs here. So you may get under the schema, you really want to get a name, description, as well as an action. Make sure to click and drag these here to map them correctly into this single object. And then from there, the rest will be updated automatically on the AI agent side. Next, we're going to go ahead and update our model. So if you're going to use Open AI's chat GPT, it's as easy as opening this up and updating your API keys here. Again, this is very well documented. I'm not going to dive into the documentation for this portion, but if you are unsure on how to set up credentials for this, go ahead and hit docs and you'll be good to go. It'll walk you through it. The Slack portion can be a little bit more work, but I've tried to make it as easy as possible. What we're going to want to do is make your way to the Slack API portion under api. slack. com/apps. And it should look something like this. And what you're going to want to do is create a new app. Now, I have included the app manifest here to make it easier. You're going to click here, select your organization, and make your way to the template page that's provided in the link, and head down to the Slack setup portion and copy this app manifest in order to copy and paste all of the scopes required for this app. Now, I did not put in a web hook URL. So, you're going to want to replace this with your web hook URL. We're going to go here and go into production URL and replace it with your Slack URL. this once you've pasted it in and created your organization or your Slack app. You're going to go into request into the app itself and you're going to go into interactivity and shortcuts and just make sure that web hook URL is set here correctly. You may have to update it and hit save and it should then start working. At this point, both sections are then going to be active. Make sure that you of course update your credentials here as well. They should update automatically once you create the credentials here, but if not, double check it and ensure those are up to date. Now that we've set up both portions of the workflow ready to start working, let's go ahead and dive through each portion. This portion of the workflow receives the message and isolates some variables in order to make life a little easier. We've already talked a little bit on how to update this portion. Not going to dive too deeply into it. And the message comes in and is then checked to see if we can find more details on the user. That information can be found by opening this up. And as you can see, we have the data on the right with the information of the user. If it's not found, it will then try the organization to see if it can find it. Once we get that information
AI Agent & Directory Logic
we're going to get our directory. This is where a big portion of the power of this automation lives. AI is wonderful, but without guard rails, AI can quickly start hallucinating responses that we may not want. To that end, we've created a little database internally for our team. You can think of this database as almost a standardized procedures database that allows us to route the answers to the correct department. For example, if somebody wants to become an NADN ambassador, they need to visit a specific web page. That web page is now preloaded. So, if the message comes in saying, "Hey, how do I become an NAND ambassador? " Typically, I'd have to find the owner, get the information from them, get the URL, and then send it to the person via LinkedIn. In this case, that information is already included in the database. So, it will generate a response that includes that URL. That makes life a lot easier. Things like as well, how can I become an expert? Here, as you can see, we have the NAND experts page. This allows us to quickly route the message to the right person. Not only that, but we see who the owner is. We're able to standardize our internal processes and use that standardized database not just for manual use for someone like me that might be new to be able to figure out who to send requests to, but also for our AI to automatically generate responses. This is really powerful if you create a subworkflow of the AI portion of this and use that subworkflow not just for LinkedIn but also for maybe your email inbox to instead of generate the responses and send them via email but to generate responses and set them up as a draft email attached to that thread. There are many uses for this and it doesn't have to be notion. It can also be something as simple as Google sheets. The other thing that we can do is conditional responses. This is really powerful because one of the things we're getting here via LinkedIn is how many followers and connections a particular person has or organization has when they message you. For example, on my end, what I've done is I've created a conditional message that if somebody messages me and they have over 5,000 followers on LinkedIn, I immediately will give them my booking link. This is great because I can see that this person is an influencer, this person is wellconed, and maybe they can help our organization internally in terms of our outreach. Now, if they're under 5,000, we can give them a warm, polite decline. So, thanking them for their interest, let them know that I'm currently heads down or unable to meet. Thanks so much for this kind message. Really appreciate it. At this moment, I'm heads down, not taking on new meetings. Letting them know, hey, I'm sorry, I'm a little busy right now. These kinds of messages tend to flood my inbox. And so, this has been a wonderful way to be able to quickly decide whether or not I should reach out to someone or not. Now that you have a better understanding of the directory database, let's head back into request router and move on to the next step which is the AI agent. This is where the AI magic happens. There are two inputs here. We have our user input which is the context of the message. Here we have the name of the sender, the message themselves that was sent and my name in this particular case. And here I might replace this with Angel. And you don't have to give it this context, but it helps especially if you're utilizing this workflow across several different users. And then here we have a little bit of a prompt. to found the LinkedIn profile will be below. Pay close attention to the number of followers and connections. This is important for that conditional responses that we mentioned earlier. And then the most important part is here the actual system prompt. You can think of this as the AI's personality. So here we're telling it what it is. Smart professional assistant designed to help generate smart personalized responses in LinkedIn. We give it an idea of what it's going to be provided with and then our objective. The first objective is to look inside of our directory database which is included below to see if there's any potential responses to their answers in that database and then if nothing is found generate a thoughtful response from its own training. This makes it faster to respond because this at least takes care of the pleasantries within the message response cycle. At the very least all I have to do is go into Slack and edit just the content itself but the beginning and end is usually well thought out and ready to go. We also give it a nice tone. So, friendly, confident, and professional, lightly personalized, doesn't sound like a sales pitch, and keep the replies concise and natural. We want to make sure to acknowledge the sender's message, add a relevant or helpful comment, and keep the tone warm and open-ended. Only the output of the message should be sent to the user. And here we have the actual directory database. We give it the context needed to respond correctly. And then the format we expect it to respond in. We also have that format set in the output parser right here in order to double check to make sure that the output is correct. Once that is done, because we are setting a response type and that is set a little further earlier on here on the type. So here we're either a user type or we're an organization type or if not either of those then none. Here it routes through one of these two and if it can't find them then it sends this type of message. As you can see here, we sent this kind a user message and we've mapped in all of the relevant block kit needed to ensure that the message looks nice and is contextual. And we've also included the button block kit here that embeds the uniile message ids and chat ids in order to store this inside of Slack almost as a database item. When we hit the button, it sends this data back in the bottom part of this workflow to quickly route the message as needed. Let's take a look
Slack Button Actions + Advanced Routing
at that portion. When we hit one of the buttons, it sends it down to this web hook. This is used to verify that the web hook is still active in case Slack sends a challenge message. Normally, this will not be used other than whenever you first put in your web hook URL in the Slack app. And then here, we check for users because we want to create the least amount of apps possible. What we can do is we can use this as an organization. Here, what we're doing is we're checking to make sure that my Slack user ID is set. If I'm the one that presses the button, my Slack user ID is included in the payload user ID and it routes it through my response type. But if, for example, my colleague Max presses the button on his, but he's using the same Slack app, it gets sent to the same workflow. What I can do is send that payload to his workflow in N8N and have him take care of the logic on his end to customize what happens when the button is pressed. Here, as you can see, if the message is mine, I'm going to isolate the message and payload. Here, we're going to check to see if we approved it or not. And then here, since we have stored the message and chat ids, we're going to go ahead and send it to this channel ID, the message. And here is the message itself that we're sending this as the response. And then from there, we're going to go ahead and delete the message from Slack in order to keep our queue nice and clean and keep that human in the loop process active. That is the whole process. Now, this can be adapted in many different ways. You can adapt this for this portion right here to be its own subworkflow that then can be used both for LinkedIn or for emails. Whenever an email inbox message is sent into a shared organization email, you can use the same subworkflow to ensure that only one place needs to be updated across multiple workflows and you have the same consistent output across all of
Wrap-Up & Template Info
them. And that's request router. Simple, human in the loop and built using tools you probably already have. If this sparked any ideas or you want to build your own flavor of it, hit me up via LinkedIn. I'd love to see what you come up with. I'm including the template file in the link below. And again, don't miss the behind-the-scenes video Max made of the original session. Catch you on the next one.
![n8n Quick Start Tutorial: Build Your First Workflow [2025]](/thumbnail/4cQWJViybAQ.jpg)
![One Click Connect n8n to AI Tools [Instance Level MCP]](/thumbnail/JihC9nR_DqQ.jpg)
![Building AI Agents: Chat Trigger, Memory, and System/User Messages Explained [Part 1]](/thumbnail/yzvLfHb0nqE.jpg)