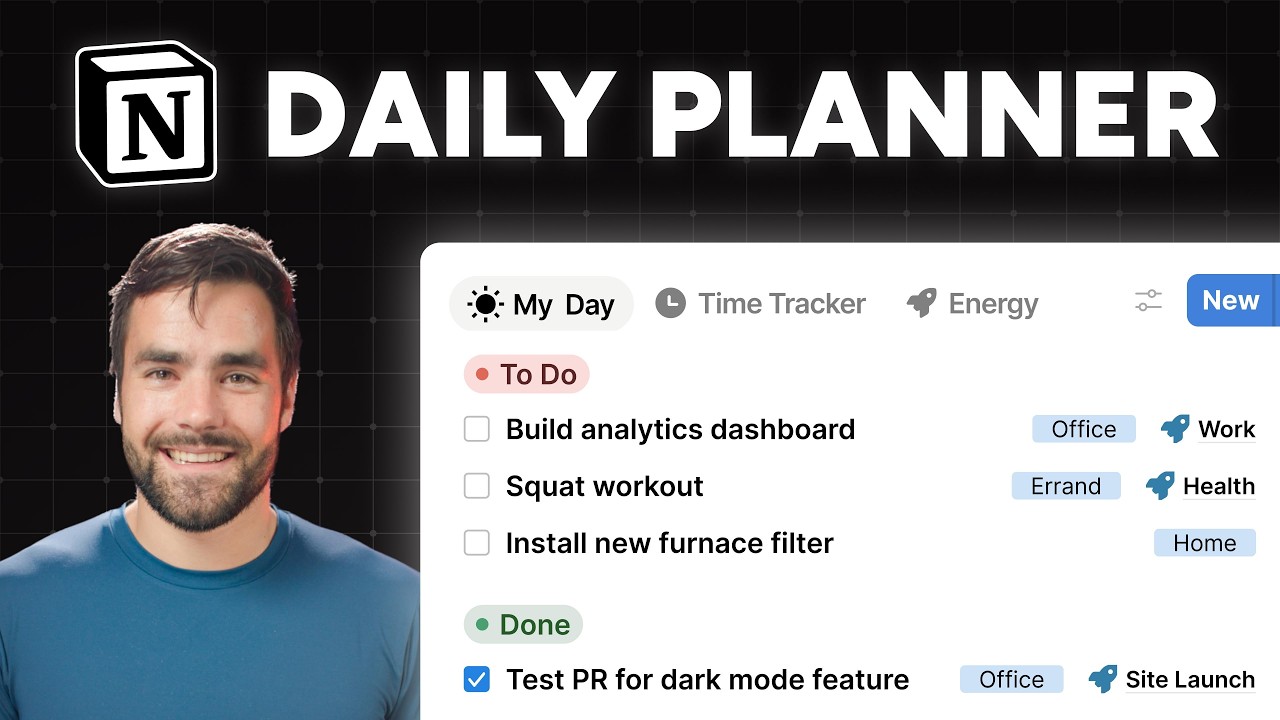
Today I'm going to teach you how to build a really useful daily planning dashboard inside of Notion. This is something that I built for myself about a year ago. I've used it every single day since then, and I legitimately think it is the most useful thing I've ever built in Notion, at least for me. So, here's a quick look at what we're going to build today. This is a page called my day, and it is essentially a hyper opinionated daily planner. It has three sections. One is called plan. This is sort of our traditional task manager views. We have our due today view, overdue views, inbox, everything else. We have a section down here called execute, which is the most important section, and then a section down here called wrap up for wrapping up your day. And essentially, the way that you work with this dashboard is that you work through this three-step process. First, in the morning, or perhaps the night before, you plan what you're going to work on. And you'll see there's this little check box over here called the my day checkbox. When we check it, we add this task down to the execute view. So the idea is that execute starts blank every single day. We add tasks deliberately to it and then instead of looking at our bigger task management views or perhaps looking at a due today view where a bunch of tasks are overdue all the time, we have this really clean, really tight list of deliberately chosen tasks that we think we can actually get done today. And then at the end of the day, we actually clear it. So down here in wrap-up, we have a button called clear my day. that will actually make the execute section empty once more. And if we need to, if we added tasks to the system or to the daily plan that need to have their project edited or their due date changed, we can make those changes from here. And you can essentially run your life from a page like this. But it's this execute section right here that is the most important because when you have clarity, when you know what to work on next, you actually get to work faster and you get a lot more done. So, I'm going to show you how to build this page. We're going to build off of my free task management template and basically add this in. I've made a whole video on how to build a task manager from scratch. So, either go through that or grab my free task management template in the description down below. It's called Ultimate Tasks. It looks just like this and we're going to be building on top of this. I will also note before we get started that my day is a feature that comes inside of Ultimate Brain, which is my whole life organization template for Notion. If you just want this done for you, you'll find that in the description down below. If you want to build it from scratch though, and uh I would because I'm a builder. I'm going to show you how to do that in this video. And we'll use my actual my day page here as our sort of example. So the first thing we're going to do is start from a ultimate tasks slate and rather than a blank slate. A lot of my YouTube tutorials, I start from a completely blank page. Here we want an underlying task manager to build the my day page on top of. And the reason for that is the ethos behind my day. The whole idea is that we are using our traditional task manager, but we're taking a look at it each day and we're creating a sort of separate list that shows just the tasks we're going to work on today. And I've already made an entire video about why this is so important and given a whole tour of the my day sort of uh dashboard and everything about it. But to um sort of summarize that video really quickly, you can kind of do this in any system. Even if you're using a different task manager, uh you could look at that task manager and you could write out what you're going to do today on a sticky note or on a whiteboard. The most important thing here is that you're creating a separate list of tasks that you're planning to work on. That list is deliberate. It's small and that's what you look at while you're going through the day. So, if you don't want to use Notion, you don't have to. I think it's pretty useful to use notion though because unlike in many other task management systems in notion we don't have to duplicate from one system to a sticky note. We can just check a box like that. It goes to execute and then we can check it off in execute without having to duplicate effort. I really like that and it's been super duper useful for me. So starting from a position of ultimate tasks again you can get a free copy of this ultimate task manager in the description down below. Uh, what we're going to do is build a page called my day. So, in my little nav section, I'm going to open this up. This is typically where I keep all the pages inside of the system. I'm going to go ahead and hit the plus icon here, type slashpage, and create myself a page. I'll call this my day. And we're basically going to build this off of my page here as the example. So, we'll give it a nice little sun icon like that. Let's go with blue. I'm going to make this a full width page. So, up to the three dot menu, I'm going to go let's go ahead and do full width. We'll customize the page as well. Take off the back links. We're going to turn page discussions and table of contents off. We'll set inline comments to default. This is basically my default suite of changes that I use when I'm building a dashboard style page, a page that's almost like a piece of software rather than a note or task. And that gives us our sort of blank canvas that we're going to work from. And in this tutorial, we're going to do a good bit of copying and pasting database views
Segment 2 (05:00 - 10:00)
instead of having to build every single one of them from scratch. And uh if you build notion systems in any form, I think if you don't already know how to do this, it's going to save you a lot of work. So let's go back to ultimate tasks here. Uh the plan section, like I mentioned before, is literally just the task manager itself. If we look at the my day page here, again, the idea is that we look at plan, we go through all of our tasks, and we hit the myday checkbox on the ones that we want to do, that sends them down here. And it's not that it really transports them. It just makes sure that they fit the filter criteria of this view here. And if you don't know what I'm talking about, if the word filter is confusing you, this is going to be a tutorial that's really centered around databases. So, you might want to go watch my Notion databases for beginners video as well. I'll link that in the description in case you haven't seen it. So, the first thing we're going to do is make the sections for our my day page and we're going to port the traditional task manager that we already have into the plan section that we create. And since we're already on the ultimate tasks page, here's how we can do this. We can literally just click the six dot menu next to the existing task manager view we have. This is called a linked database block. That will select the block. I'm going to go ahead and just click off. That keeps it selected. If I copy it to my clipboard now, I'll be able to paste the exact set of views. So, let's go back into our my day page. I'm gonna enter down. Let's do a heading one. Call it plan. And right beneath plan, we can command V. We do not want to paste and sync because we are going to make a couple of changes here. Uh, so we'll hit dismiss. And just like that, we have our traditional task manager on a new page. It's just a bunch of database views inside of a linked database block. and we can copy and paste them to our heart's desire. Now, one thing that we are missing which is crucial is the my day checkbox. So, looking back at the actual my day page in my brain system here, we've got this checkbox on the right. And when we check this box, it makes the task show up in the execute section. We need to add this checkbox right here. And you'll also notice we have this little my day label. The only reason we have that there is because it makes it more clear that this checkbox is something different than this checkbox over here. I do wish notion gave us the ability to have checkboxes have different shapes or um basically introduce something that would allow us to do something like that. Uh but in the meantime, I just sort of keep them on opposite sides of the task to differentiate them. So let's go ahead and add that checkbox. To do that, we need to go to the database itself that holds our tasks. And a really reliable way to get to any database is to open up a page contained by that database, open it as a full page, and then use the breadcrumbs to go right back here to tasks. Now, technically, it's contained by something called a data source, but I'm not going to go too much into that difference. I've got a whole video on data sources and databases. Pretty new concept in Notion. I'll also link to that below. Uh now that we're actually at the database, we want to make sure that it is unlocked so we can add new properties to it and make general changes to its structure. So up here, if you see locked like that, you would want to unlock it at least for yourself or perhaps for everyone. If you're in a solo workspace, you might not even see this drop down. You'll just unlock it like that. And now we can create our my day property. I'm going to do it in this way. You can create new properties in tons of ways, but I'm going to rightclick my name property and I'm going to insert right. And then I'm going to create a property called my day. I'm going to give it the checkbox type. Just like that. And then I'm going to go ahead and edit it and give it a nice little sun icon. In fact, that's the most recent one right there. Uh, and then check this out. With checkbox properties, you can actually just drag it down to just be that width right there. Of course, you can also do this any other property. If you hold option or alt, it's kind of like a hidden feature inside of Notion. But for checkboxes, you don't even have to do that. They'll just let you squeeze it way way down like that. So that's really the only property we need to make the uh sort of primary functionality of this daily planning dashboard work. We just need a checkbox called my day. So I'm going to leave this unlocked for now because we may be adding some additional features a bit later in the tutorial. But that is the main actual change we'll need to make to the database. And we can actually work our way back up to the breadcrumbs and go back to the my day page where we can make some changes to our plan view. So for each of these views, all we want to do is go into the settings. We want to go to property visibility and we want to find the my day checkbox we created. We want to unhide it and make sure it is the last property in the list. Now we've got it over here just like we have on my demo copy. And then of course we have the status property over here. So if we want to actually finish a task, it's going to be this one that we click. If we want to add it to our daily plan, it's going to be this one that we want to click. And of course, you'd want to go ahead and do that for all of these views, which I will do with the power of time travel now. And there we go. We now have the my day checkbox on all of these views, all the
Segment 3 (10:00 - 15:00)
list style views at least. That took about 30 seconds. And we are basically done with the plan view. So next, let's go ahead and create another heading one block. If you just type the pound symbol and space, you get one like that. We'll call it execute. And this is going to be the most important part of our system. Now, if we look at my version here, you can see that we've got something that looks pretty similar to the plan section, at least in terms of its layout. We have a list style uh database view here or list style layout. And we are grouping it by status. We are showing pretty much a lot of the same properties. Got a project here. We have our status here, my day checkbox over here. There's a couple of other ones, these uh context tags that I'm going to show a little bit later, but on the whole, it looks pretty similar. So that means we can again save effort by copying and pasting. Instead of building out a full database view, let's just copy and paste this one more time. So copy to my clipboard after I've clicked that little six dot menu and clicked away. We'll go beneath execute. Paste it again. And instead of keeping all these views, we're just going to keep the first one. So I'm just going to delete everything except for the today view. So now let's go ahead and rename this view. So I'm just going to click it, hit rename, call it my day. We'll give it a nice little sun icon. I think that's the perfect icon for this. And then the most important thing we need to do to this view is change its filter criteria. Right now it's filtered to show us uh tasks that are not done and tasks that are due today. It's our due today view. But instead of that, what we want the filters to do is only show us tasks where the my day checkbox is checked. And if we look at the filters for the existing template, that is all we have sitting there. We even show the done tasks because with our sort of daily list, we'd actually like to see the ones that are done. So, going in here, we're just going to edit those filters. We'll go ahead and get rid of this status filter. We'll do filter. And we're going to add one where my day is checked. And then along with that, we're going to get rid of the sorts as well. And the reason I like to get rid of the sorting criteria is I like to be able to drag the tasks around in my daily plan to create an order for how I'm going to tackle them. So if I said I'm going to do all four of these tasks because they are all due today. I could go ahead and drag them around. Let's say I'll put the trash bin out first. Really easy morning task. Let's uh send the Black Friday email. Get that done really quickly. Then we'll go into emails and chats and oh actually I think we should update the website with Black Friday pricing first. So that actually goes up there. You see this is just a really quick way to establish an order of operations for the day and then you can really easily go into it. So with that we have established basically everything you really need in the execute view. A little later in this video I want to show you how to add one of the advanced features that I've built into my own system. These context tags. I also have a time tracking system that's built in here but I think that would add about 45 minutes to an hour of uh extra tutorial to this video. So, I'm going to split the time tracking portion of this into its own video. It's easily the most complex part of uh this whole system here, and I also think it's less useful than the basic part that I just showed you. So, we're going to do that in a separate video. Uh, but we will actually bring in these tags in a bit. For now, though, what I want to do is finish up the basic part of this dashboard by helping you build the wrap-up section down here. And the wrap-up section, which I kind of brushed over in the intro, has two main components to it. First, it has this button. And the button is the most important part because the button when you click it will clear this entire my day area up here. If we click clear my day, now this is blank. One more time. All the buttons really doing is unchecking the my day checkbox for any row where it is currently checked. But conceptually, it's doing something incredibly important. It is making sure that at the end of the day, this becomes empty again. And this needs to be empty again because when you start your daily planning session, whether it's the night before or right before you start working uh the day of, you want this to be blank. So that way you are sure that everything you add to it is deliberately added in the moment. If you don't do that, you kind of run into the same problem a lot of people have with traditional task managers where they have this due today view here, but it just sort of fills up with all these overdue tasks overdue in quotes that never actually had to be done. Like there was no real consequence for not getting it done. And they're all just sort of screaming out like they're urgent even though they're not. And if you don't clear your execute view, you basically just have gone through all this effort to keep the same problem in your life. The whole point is to have a blank space. Blank space, baby. Uh to start your daily planning every single day. So we're going to start naturally by creating that button and then I will explain these views down here. So down here, let's go ahead and make one more heading one. We're going to call this uh
Segment 4 (15:00 - 20:00)
wrap-up. And then beneath wrap-up, we're going to create a button. And we're going to call this button clear. my day. I think the perfect icon for this would be a sunset icon. So, let's find sunset. Is there a sunset icon? Maybe it's sun down. Sun arrow down. Wow. I can't believe sunset is not an alias for sun arrow down. Okay, so we'll have sun arrow down here. When the button is clicked, we're going to find the edit pages in action. Uh we're going to find our tasks data source. Hopefully, it's this one. I have a lot of tasks data sources in this notion workspace because I make a lot of tutorials. Uh and then instead of editing all tasks, let's say tasks where my day is checked. That'll be the filter for this action. We're going to edit once again the my day property. And we are going to set it to unchecked. Just like that. So we have all these tasks in execute. If we hit clear my day, boom, they're all gone. Now, if you want to add a little bit of a confirmation check, you might want to come in here and add another action, which is show confirmation and bring that to the top. Are you sure you want to continue? I don't know why it closed on me. There we go. Continue or cancel. Uh, and if you hit continue, it'll actually do this. If you hit cancel, it won't. So, that's how that looks. But now you're kind of done with the broad strokes. You've got your plan views here. You've got your execute view here. And then you have this wrap-up section which will clear it. Now in talking with some of the people in our customer community when they tested the my day feature after I created it in Ultimate Brain, some of them said, "Hey, I love the idea of clearing my day every single day, but I have meticulously picked all the tasks that needed to go into the daily plan and the ones that aren't done, I want to make sure that I can easily find them again. But some of them are in projects, some of them didn't have due dates, so it's not super easy to find them from the plan view again. Uh I wish there was a way to just sort of like restore my daily plan. And so basically that is what this set of views is for. The set of database views that have table layout beneath that clear my day button right there. So let me quickly explain what these views are and then we can build them together. Uh first this clear my day is basically a table style view of the execute views up here. And I need to add a task back to the execute view. Let's just add all these to be honest. Uh so you can see how it works here. This is really simple. It's list style. It's entirely based on the idea that you just want to check things off. But down here we have a table style view and that allows you to more easily edit the property values of these uh entries on a computer. So the reason this is here is let's say that something urgent came up uh after you've already planned your day. Let's say that uh you're a developer and somebody adds a really urgent GitHub issue that you need to get fixed today or you at least think is pretty urgent. Uh so you add it to your daily plan. Let's just say fix the GitHub issue. And I've added it to my plan really quickly. So it doesn't have a project. Uh due date. It doesn't have anything. And I'm hoping that I get it done today. But for whatever reason I don't. Okay. So I need to clear my execute view. That's the rule. But down here, I want to make sure that I add any needed information to this task that I just brain dumped into my daily plan before I clear my day. Otherwise, this just gets lost in the inbox somewhere, right? So, let's just go ahead and say, uh, well, I didn't get it done today. I got it done. I'll do it tomorrow. Um, and it is a work ongoing task. Let's just make sure that I put it in one of these projects. Or maybe it has to do with a specific uh project that I'm working on like notion helper upgrades. So, I'll put it right there. And now I've added these useful properties that allow me to find it later on if I don't happen to get to it. And I can very easily clear my day once again. So that's kind of the point of clear my day. Once I hit clear my day, this is going to be empty like you'd expect. Uh and now we have a couple of additional views that help us to sort of prime our brains for how we're going to plan our day tomorrow or maybe even get the jump on daily planning. There's one called review calendar. This is just going to show any tasks that have hard deadlines. So I can sort of prime my brain on what needs to get done tomorrow. And then finally we have the view that I built to sort of assuage some of those anxieties people had around clearing the my day list. Uh and that is a very very simple database view that shows our tasks sorted by the last edited time in descending order. The reason that is so useful is that when we click clear my day, it's going to uncheck the my day checkbox on any uh task where it was checked. that counts as an edit. So the edited time stamp gets updated and that means everything that I was working on is going to be right here at the top. So if I want to get a jump on planning my next day, now that I've done the required thing of clearing out this list, I can go ahead and add stuff back to it. So yeah, I didn't get any of these done. Let's just
Segment 5 (20:00 - 25:00)
go ahead and populate the list again. It looks the same as before, but there was a crucial step that happened. you actually took the time to clear it off and then deliberately say, "Yes, this is what I'm working on tomorrow. " I think that's the most important part. So, we can go ahead and build that out. Now, we don't have a whole lot of table style views inside of Ultimate Tasks, but I do believe we can probably just take this view once again, copy it, and we can change the layout type. I like doing this where I can um instead of building database views from scratch. So, I'm going to go ahead and add a few more tasks back to the execute view. That way we can see them here as well. And to make it look like mine, all we need to do is come into the settings. We can go to layout and we can set it to table like that. That's going to give it a table layout. I typically like to wrap all content in my table views so I don't have truncations going on. I do not want to show the data source title. I'm going to show vertical lines and I'm not going to show the page icon. Typically not useful to show the icon for task type data sources. So going back to my actual version here, let's go ahead and look at the other settings for this first clear my day view. We have two sorts do in ascending order with this subtask sorter in ascending order. Uh I don't know if we're going to mess with the subtask sorter in the free ultimate tasks template. So I'll just go ahead and create a sort where do is in ascending order like that. And then if we take a look at the filters, we have only one rule which is where my day is checked. And that is exactly what we had already since we copied and pasted our view. So I'll just rename this to clear my day. I'm going to go into the group settings and I'm going to group this by the status property. And typically I don't use doing uh but I don't want to hide the empty groups either. I think it would be nice to see finished tasks. So I'm going to uncheck hide empty groups. And then optionally, if you don't use the doing status, I usually just check a task between todo and done, you could hide that one manually. So you're going to get something that looks like this. Anything that got finished, like say send me that email is down here. Anything that is not finished is going to show right here. And like I said earlier, you can use this view to quickly add projects or change due dates or add any additional details before you once again clear my day like that. So, next, let's go ahead and create another view. Again, I like to duplicate that. Just make sure I already have my data source selected. We're going to call this one uh I believe it was like calendar or review calendar. Yep. So, we'll call this one review calendar. I'm going to give it a nice calendar icon. And the layout is going to be a calendar just like that. Let's look at our reference to see what the calendar is actually set up to do. We have a couple of rules. Status is not done and my day is unchecked. And then uh we are sorting by a subtask sorter property. I need to check to see if we actually have that in the free version of the template, but we can definitely set up those filters real quick. So my day is unchecked was one of them. And then status is not complete. So this will show us all of our upcoming required tasks that we need to do. And looks like we've got a few right there. We may even want to show some of their properties. So, under property visibility, maybe you want to show status like that. And that pretty much gives you that view right there. Okay. To finish this up, looking back at my day dashboard here, we've got one additional view called plan tomorrow. This is again a table style view. So, of course, we can copy and duplicate instead of building it from scratch. Uh, this one is going to show anything where the status is not done and it's going to uh sort it by the last edited date. Again, the point of this view is to have all the tasks that were most recently edited, which are usually going to be the ones where we've cleared them off of my day, percolate to the top. That way, we have a centralized place to find them, and we can rebuild our list if we want to. So, let's just go ahead and duplicate clear my day. We'll call this one uh plan tomorrow. Find a sun up emoji or icon for that one. And uh while I'm thinking about it, I'm going to go back to clear my day and I'm going to give this one a sun down icon instead of the regular sun emoji. Uh I don't know why I keep saying emoji icon. Okay. So for plan tomorrow, my short-term memory is not great. Status is not done and edited in descending order. So we'll go ahead and change this from my day is checked to status is not complete. Like that. And then we'll change our sort from due in ascending order to I think it's called edited. Yep. This is just a last edited time property you can add by default to any database. And we'll set that to descending order. Now we have all of the required views in our wrap-up section and we've pretty much finished the broad strokes of the my day page. So this is how you can add
Segment 6 (25:00 - 30:00)
a super duper useful daily planner directly to any task manager inside of notion. All you really need to do is add this my day checkbox to your tasks database and then you can create this set of views that again gives you this most important execute view right here that shows you exactly what you've planned to do and nothing else. Now, if you want to add something extra to this system, I now want to show you how to add context tags. And I already covered basically the why for these tags in this whole tagging system in my video that explains everything about this system without it being a build tutorial. Uh, but to do a really quick overview before we build it, there is this location tag here, this PI tag here, which I'll explain in a second, and this energy tag. And basically, for the tasks that you add to your execute section, you can use these properties to help yourself batch uh similar tasks together and help yourself order tasks more intelligently. For example, if we open up this send initial sales email task right here, and we open up the little view details side pane here, we've got all these properties in this prioritization side panel section. This one is called energy. So, you could batch tasks by high energy or low energy. Maybe you want to do a whole bunch of low energy tasks and then go into a high mental energy task or vice versa. You can batch tasks by the location. For example, maybe you've got like three errands. Well, if you know their errands, go ahead and get them all done while you're out doing errands. And then there is this pi property which I think is actually the most important one. Like I said in that earlier video that I made that's sort of a companion to this one. I explained the full thing. But the 30 secondond version of it is immersive tasks are tasks that you have to focus completely on the entire time you're doing them. Whereas process tasks are tasks that you kind of just have to get the ball rolling on and then they kind of take care of themselves. So a process task might be say putting a pan on the oven to get it heating up or giving details to someone who works for you so they can go off and do a task and not be blocked anymore. And using these tags, you can more efficiently order the tasks in your daily plan. And I personally think that the PI tag is actually the most important one because if you can get good at getting your process tasks in play and then switch over to your immersive tasks, you get more done for literally the same amount of effort. And if you switch those around, well, you've got a whole bunch of blocked tasks that are then waiting for you to finish these longer, more immersive tasks. So, if we want to add this into our system, and like I said earlier, we're not going to do time tracking in this video. That'll be an upcoming video. But if we want to add this into our system, we first need to add those three select properties: energy, location, and PI. So, to do that, once again, we are going to navigate back to our source tasks database. So, I'm going to open up any one of these tasks. I'm going to full screen it just like that. And I'm going to go one uh level up the beantock, up the breadcrumbs to tasks right here. Again, we're already unlocked, but you would want to make sure to unlock if you were locked. And then we're going to add three more properties. So, I'll just shift scroll over to the end here. We're going to add a select property called energy. We'll add another one called location. And we'll add one called P / I. I just don't really have a better name for process/emersive. If you've got a better suggestion, let me know in the comments. Select property for that one as well. Let's go ahead and set their icons. Energy. Maybe there's a battery. I think we use this one right here actually. Uh for location, I think there's like a city icon. And then for PI, this entire idea comes from the world of professional cooking, uh the misison plus concept. There's a whole book called Work Clean that details it. So, we're going to go with a frying pan and an egg for that one. Uh, let's go ahead and fill out our sort of default options. So, we're going to go with high and low for energy. For location, we can add errand. We could add home. Could add office, maybe underground volcano layer if you have one of those. And then for PI, we're only going to have process and immersive. Now that we have those, we might want to make them look pretty inside of our task pages. So, if we open up any one of our task pages once again, full screen it, we can go to customize layout. And by default, we're probably going to find those uh if we click the property group, we're going to probably going to find them at the bottom here. So, we want to go ahead and move them to a new section. I think I'm actually going to create a new section. So, we'll go add section up here in the layout builder. Call this prioritization. maybe one of the most important sections that you can add to a task manager because if you can't set priorities, you can't really get much done. Uh, and we're just going to drag them up. Energy, add pi, we'll add location, and while we're here, uh, my day, I think, should actually go in our pinned properties. So, I'm going to click heading here. Let me zoom out a couple
Segment 7 (30:00 - 35:00)
of ticks just to make it look more like how you'd probably see it. Um, that's better. We're gonna find my day. There it is. And I actually want to pin it. And the reason that I want to pin it, I'll hit apply to all pages here. The reason I want to pin it is that now when I open any task as a full page or inside peak, I'm going to see my day right there. So even if I'm not in my actual my day worksheet, I'm just looking at my tasks from any of the other views, I can very easily open the task and boom, add it to my day. Just like that. So, now that we've got our properties created, let's actually head back to our My Day worksheet. And inside of the My Day view that we created, we can go into our property visibility and we can add those new properties. Energy, we'll add location. We'll add PI. And I think I want to put those right around here. We'll put them before due. And this makes sure that I think most importantly my day is over here. I think I'll also put meta labels down there as well. So now if we want to add those tags, we can just hit edit and we can add them very easily like this or we can create specific views. So we can drag them around and that's typically how I like to use them. So instead of hitting uh edit and adding there and then hitting edit, adding them there, very slow process. We actually just have an energy view here. It's just a grouped list view and we can drag them like so. Super duper easy. So, let's go ahead and create that real quick. Once again, we can just duplicate one of these views. So, we'll just duplicate the my day view there. We'll call it energy. We'll go with the little battery icon that we were using before. And the cool thing is the filters are the same because we still want to only see tasks where my day is checked. So, we don't even have to change the filters. We don't want sorts because this is a drag and drop view. All we need to do is go into our settings, go to group, find energy, group by energy. And I don't want to hide empty groups. The entire point is to drag from the no energy group into one of these empty groups. So that's basically all we need. And now we can be like update website. I think it's a high energy task. Boom. There we go. For the other two views, just duplicate and tweak. Instead of energy, we'll call this one location. Find our little building icon. Change our grouping criteria from energy to location. Once again, uncheck hide empty groups. Good to go. Finally, duplicate pi. Find our little frying pan and egg. Change the grouping one more time. And uncheck hide empty groups. I think I'll put process at the top because it's generally good to do your process tasks first. Again, the entire idea is to get those process tasks uh rolling while you then switch over to immersive tasks and they're kind of doing their thing. So, I think process really makes sense uh to be at the top there. And then, of course, you can drag things around as needed like that. And actually, this is more of an immersive task. And once you're done just sort of dragging things around in these three views, you're going to have your tags set in your actual my day view. To wrap this up, I always think it's a good idea to navigate back to your database. Again, going to the breadcrumbs and lock it one more time. When you're not making changes to the structure of your database, adding or changing properties, it's a really, really good idea to keep those databases locked, especially if you're working with other people. But even if you're in a solo workspace, it's usually just good practice. And that, my friends, is how you create your own version of the my day worksheet that comes inside of Ultimate Brain and that I use every single day. Seriously, this is in my opinion the most important part of the template. It is the page that I generally run my life from. I also do a lot of note-taking and I'll use the general task manager views. But in terms of getting things done, this is easily the most important part of the template. And that's why even though I include it in the template that I sell, I wanted to show you how to build it from scratch in case you don't want to pay for a template and you want to build things from scratch. Now, if you like having things done for you, if you would rather just have the shortcut, we have included this directly inside of our Ultimate Brain template that looks more or less like this. Ultimate Brain is an all-in-one system for organizing your entire life inside of Notion. And you can run your life from just a couple of pages. You've got the homepage here, and I'm just showing you mine instead of doing slick B-roll. Um, we got the homepage here. You've got your task manager views. There is the most advanced recurring task system you are ever going to find inside of Notion built into this. We even include automations that work on Notion's free plan, which you can't build yourself unless you upgrade to their paid plan, but they do work in the template, which is pretty sweet on the free plan. Uh, we have a note-taking system with free automations that come with the template for taking voice notes. Uh, we have a super advanced web clipper called Fly Lighter for really easily clipping stuff from the web that works super well with this. There's a project management
Segment 8 (35:00 - 36:00)
section. There is a tagging system that uses Thiagofore's paramethod projects, areas, resources, and an archive for organizing everything that comes into your life. So, this is sort of the command center. This is where you can do everything for managing your life at a high level. And then you have the my day page, of course, for getting things done at a lower level. And there's a whole bunch of other bells and whistles if you're interested in that kind of stuff. A recipe tracker, a book tracker, a CRM for managing your contacts, and a lot more. You can check out all the details over at thomasjfrank. com/brain. And if you do want all this done for you along with the template, you also get world-class tutorials. We have both video tutorials and written guides. We also give you access to a customer support community. So, if you have questions, you can ask those questions and you'll get them answered by Notion experts. Once again, thomasjfrank. com/brain. If you want to build the task manager from scratch that we based this entire build off of, then you can check out this video right here. This will show you how to build ultimate tasks completely from scratch. So, if you want a really, really great video for learning the ins and outs of Notion, I highly recommend that one right there. Otherwise, check out this video right here if you want more clarity on the why behind my day and how it works.