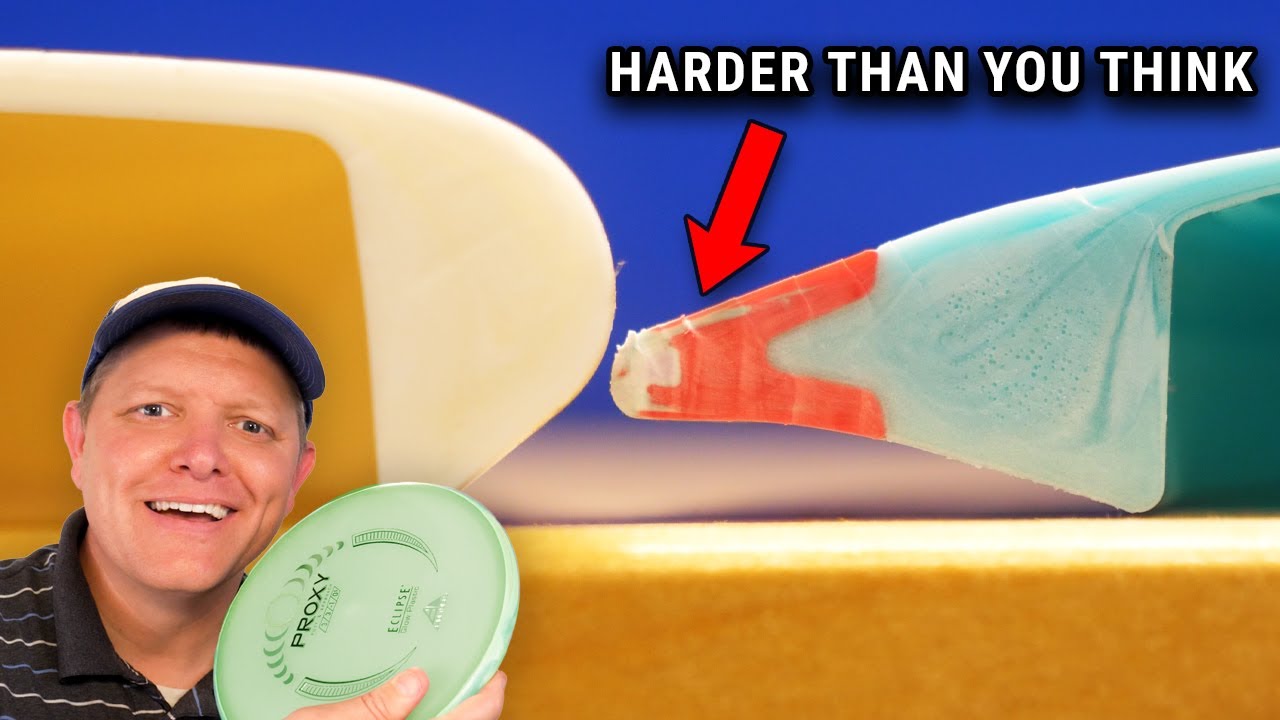
We're finally doing it. A lot of people have been reaching out for a long time asking me to do videos about disc golf. So today we're doing a video about disc golf. And this is great because disc golf is right at the center of a lot of things I love. You've got aerodynamics and physics and all that kind of stuff. You've also got just spending time outdoors with your friends doing fun stuff. And then today, the special thing we're going to talk about is manufacturing, how you actually manufacture a disc golf disc. So obviously the aerodynamics of the disc are important because when you drive from the tee box, you want to throw it as far as possible and as close to the basket as you can. But also the mechanical interaction of the disc with the chains on the basket, that's important, too, because you want the putter to fall down in the basket. Chad and Brad Richardson from MVP Disc Sports up in Michigan, they reached out and said, Hey, we love what you do on Smarter Every Day, and we want to sponsor a video or a series of videos on disc golf for Smarter Every Day. So today I'm extremely excited because MVP Disc Sports does this special overmold on their discs. And a lot of people in the disc golf community think that's really cool for multiple reasons we'll talk about later. But that is an interesting process, and we're going to learn about it as a part of the overall Smarter Every Day manufacturing series. We've learned about metal stamping, roboforming, some really cool processes used to create films, and this video is going to roll into that. We're going to learn a ton of stuff about injection molding, about robotics, about how to design a plant for efficiency. So let's go get Smarter Every Day in Marlette, Michigan, and let's learn how MVP Disc Sports manufactures disc golf discs. [Intro guitar music riffs] I flew up to the Detroit airport, which is always exciting. It's SO good. I drove 90 minutes north of the airport. Summers in Michigan are absolutely beautiful. I pulled into a large manufacturing facility. This is the headquarters and factory for MVP disc Sports. No photos or videos allowed. This is going to be difficult. I was led in by Shelly, and then we passed a putting green that employees used on breaks, and I was led through the headquarters and met Brad and Chad, the two brothers I told you about who started MVP back in 2009. These are people that had a vision. They started small and they started building things up, and they're using the talent pool from all over the Detroit area that traditionally works with automotive engineering and manufacturing. They're all pulling together, and it's been a huge thing for the local community. New manufacturing jobs in rural America using new technologies. I would love to see this model replicated across all of America. I was a senior high school. You were just starting college. It was just more of like a hobby. It was like college during the week. Then we would go home and pack orders, stamp this. Yeah, Brad and I did this, us two, for what? Five years before we got our first employee, four or five? Yeah, four or five years doing everything. Just doing a grind in the barn. [D] Slinging disc. [C] They always say it's the biggest sport you've never heard of is the phrase we use. It's out there. There's 12,000 courses worldwide, and we sell a lot of disc. [D] In disc golf, you throw the disc and it goes into a chain basket. And your thought was, if I could rubberize the outside perimeter, that the chain basket would grab the disc. [C] We were playing one summer, and it had a traditional disc and I had a large rubber band. I don't know why. I stretched that rubber band around the perimeter just for that grippy edge and putting with the target. The idea would be, oh, maybe that could help catch into the target better with the friction. We figured, well, we can try making that. And so we did. That's what the first run ion is. [D] The intention wasn't to have a gyroscopic effect. It was to grab- [C] Increase the friction. That's where the idea started. [D] It started with the rubberized outside, but then you found your way into the gyro. [C] Just because those were too light and we said, Hey, we need to make it heavier, found the weight fillers, and we had to make a choice, put it in the center on the overmold, and that's when it clicked. [B] Year number 2 was we made a mid-range disc, which was more focused on the gyro technology. [C] If you throw a disc with no rotation, it just flips end over end. Ultimately, it's a gyroscopic aerofoil. That's really what it is. You break it down in its simplest terms. If you increase that angular momentum, you're increasing the stability. [D] If I had to guess, I would say you've done a lot of research into how dense you can make that outer ring. [C] That's our job, pushing those limits to increase that. We're never stopping that. That is our entire goal, increase that MOI. Of course, other things like increasing the grip and durability, other things players look for, of course [D] Okay, there's two main ways that they make discs here at MVP. So we'll put that right here so we can see the difference. Okay, so this is a heavier plastic, this red stuff here. This is a lighter weight plastic, right? [C] Yep. [D] And this is a solid mold, a solo mold, you call it? [C] Yeah, a solo mold. [D] So whether it's a solo mold or an overmold, the manufacturing process is pretty similar. So what we're going to do is we have this roadmap here, and we're going to go through all the steps required to make a disc golf disc. And we need to give ourselves permission to jump around along the way because
Segment 2 (05:00 - 10:00)
we're going to take some tangents. But let's dive in and start at looking at the materials that go into the process. So this is the... [B] This is the manufacturing warehouse. Okay. So this is essentially where the raw plastics come in. Most of our plastics are made in America, which is great. There are some European grades as well, but the vast majority of it is American-made plastics. [D] Got it. [B] Clear plastic granules here. [D] It's rubbery. When I squeeze it, I can feel that it's giving away, like it's pliable. Then is that a vacuum? [B] Yeah, vacuum line here. [D] Where's it going? [B] It goes to the drying system. [D] You have all this built. You built this with this in mind. [C] You want to automate your material handling. [D] This is like those Coke machines, the fountain drinks, and you've got all the material here, and it feeds up, goes to your dryer, and then gets fed in to your- [B] Plastic drying. That's a very crucial step prior to the next building. At least for this particular polyurethane it's very hygroscopic. Hygroscopic, meaning it absorbed moisture from the air. For the injection molding process, that's bad. You want to remove the moisture. [D] Step one, we get it from the shipper or from the supplier. [B] Plastic has moisture. It just naturally absorbs moisture. [D] Step two, we have to dry it. [B] Yes. [D] Okay. [B] Very important. [C] Those lines coming from the gaylord, those have plastic in them. [D] Yep. [B] Those feed the plastic to the dryer system. [D] What? [C] And they go here. [D] Did you design this? [C] We work with a company that helps us fit it to our specs. [D] Is it all stainless steel? [C] Aluminum, but the elbows are stainless steel. [D] Okay. [C] The elbows have to be a tougher material because as that material makes that turn, there's a lot of friction. So as you see, they come down individual. [B] Well, you could see all the different grades of plastic granules inside each little hopper here. [C] The temperature and time at which you dry is important. [D] What is this? [C] This is our resin selection station. We can change these hoses, which changes which machine, which plastic goes to. Instead of having... Basically, this is a central system. [D] This looks like a network patch panel. [C] Yeah. [D] It looks like you're taking Cat 5. [B] Yeah. [D] What's moving? [B] Similar. [D] What's moving? [C] So you can hear material. Which one is it? [B] That's probably going to the drying hopper. [C] I can't see which one. [D] I can't see. Okay. [C] So the key is it allows us to switch which material. So for example, we have a soft version or a firm version, we can switch it and it goes in the machine automatically. Much easier than trying to redo a bunch of lines. [D] Okay, yeah. Wow. What a neat part. That's a manifold. You're bringing the material in, here. [C] It comes over and into these first, and then it goes out the bottom here into this to the machine. [B] These pipes here. [D] Oh, and then it goes to the machine. [C] This is right before [D] Okay, got it. [C] Based on how much we're consuming at any given time, how much of that material is being used, if we raise this, it will increase its dry time because it starts from the top, and as it's taken away from the bottom, gives you how much time it's exposed to the dryer. So that is our time. [D] It's almost like a grain bin. [B] Exactly. [D] It's a grain bin. So on the grain bin video, we talked about you put the beans in there, you blow from the bottom. Are you blowing air? [C] There's hot air right there. [B] So right here? [D] Yeah. That's air? [C] That's going into... It's just like a grain bin. Exactly like it. [B] Starts right over here. This system here. [C] So that's a dryer. [B] It's blowing the hot air through each system. [D] And it's going back to it. So it's a closed loop. [C] Yes. [D] Got it. [B] See that level sensor? That level sensor is our demand. So as a machine consumes plastic, if it gets below that level sensor, it will fire that demand to bring more material. [D] So where's the master controller for this whole [B] Right over here. [D] Whole setup? I love how they both know the whole system. [B] That's the master controller right there. Press one, loader one, press one, loader two. There's a different device that I use press 15, loader one. Dominic is MVP's process expert on injection molding. He's going to show us where that material first starts to be melted. When you put the TPU beads in here, are you heating it up or is this a screw auger type heating method? [DOM] This is a reciprocating screw. [D] Friction. [DOM] Yes, friction, shear heat. Now, we have barrel heat on this, but most of the heat that melts the plastic is created by the screw pushing the plastic into the barrel itself. These heaters on there are just to maintain that minimum level of heat. Things like your screw RPMs, your back pressure, how fast you're filling, those are all going to affect your sheer heat of the plastic and the temperature of your melt. [D] Chad took me over to another machine to show me the screw outside of the machine.
Segment 3 (10:00 - 15:00)
This is very similar to the thing I saw at Kodak. [C] Yes. Yeah, they have a much smaller scale than the one at Kodak. Yeah. [D] So plastic pellets go here. It turns this way. [DOM] It turns this way and it feeds the plastic forward. And as it moves forward up the screw, the diameter between the flights increases. That pushes the plastic pellets against the walls of the barrel, and that's where that friction kicks in and melts our pellets. [C] This right here is a smaller diameter compared to out here. [D] I see. [C] That's where your shear is happening. [D] But is the outside of the helix the same diameter? [C] Outside of the outer is the same, and that fits in this diameter here. 50 millimeter. [D] 50 millimeter? [C] Yeah. [D] All right, so plastic goes in there, which feeds into about right here. It's turning. As it's turning, it's pushing the plastic forward. That shear and mixing creates a melting. Is this heated as well? [DOM] No, the screw is not heated, just the barrel. [D] Okay, the barrel is heated. So the process is called injection molding. That implies that this auger is injecting the plastic into a mold. And we're about to see one of those molds for the first time, and they're really cool. And the cool thing about the product today, you remember we were talking about the core mold that they make, and then they put the overmold on the outside. Well, the product they're running today is glow in the dark, which is awesome. Look at it. You see which one has the overmold on which means the raw materials have to be glow in the dark. Isn't that cool? Let's go make some discs. [C] So these machines are core machines. We'll get to one that's running. So the core, again, is the center portion. [D] So this is the injection mold, right? [B] Yep. [D] The mold itself is a large piece of metal. You have two faces, and we have this picker here that it's a Cartesian-type thing. So we have a cavity in there, and we're injecting plastic, right? [B] Correct. [D] Okay. And how long does it take for the plastic to flow in? [DOM] On this process, just over five seconds for the plastic to fill the cavity. After that, there's about 30 seconds worth of cooling in the mold. That will set the plastic up enough for it to be able to demold and for the heart picker to grab it. [D] Are you flowing water through the metal part of the mold to cool it down? [DOM] Yes, we are. [D] Okay. Is it chilled water or just room temperature water? [DOM] It is chilled water for this application. If you look on the bottom, we have two water circuits on each half. Cool water goes in and the warmer water comes out. We regulate the flow on that, so we have a turbulent flow. [D] Better. Heat exchange, just like a rocket nozzle. [DOM] Exactly. This is the rare case where laminar flow is not as awesome as turbulent flow. [DOM] Exactly. [D] I concede this. Now we're going to talk to Sean. Sean's got a mold, and he's to break it apart and show us the inside. Wow. [S] They're a little bit heavy, but... [D] So this is an insert mold. So the insert would go there. [S] And the plastic would inject throughout here. [D] On the sides. [S] It comes in. Whatever profile we put in, it fills in from the side here, get our perimeter. Then when it's done, it opens up, and these pins push the disc out. [D] Sean took me over to see what they call the flight plates. These are the actual inserts that go into that larger mold assembly. Oh, wow. These are all your inserts? [S] These are all of our overmold inserts. So some halves match up with other numbers, but most of the time, it's just an A-side and a B-side. So you'll get the top flight plate. Where you get the plastic coming in. And then you'll have a bottom flight plate, which where your ejectors come out. [D] Wow. [S] And like I was saying, this profile is usually out here a little bit, so you never see those ejectors. [D] Chad gave me access to his 3D CAD files for the overmold so I could animate what's going on with the injection molding process. The plastic pellets are fed from the hopper down into the screw, which uses friction and shear to melt the plastic. Now, remember, this is a reciprocating screw, which means it has the ability to retract and push the molten and plastic forward. Notice this yellow check ring is moving. On the backstroke, the auger turns and loads the syringe, so to speak, by pushing plastic through the holes that are under the check ring. When the screw moves forward, however, the checkering moves back and it closes off the holes and the plastic is injected into the mold under extremely high pressure. Inside the mold, there's what's called a hot manifold, and a manifold is a pipe that branches into other pipes. The plastic in this manifold stays liquid because it's electrically heated. Let's remove that liquid so we can see how the plastic is flowing into the mold. When the screw pushes forward, it pushes the plastic into the manifold, and then it splits and flows to both sides of the mold cavity as it fills it.
Segment 4 (15:00 - 20:00)
The air in that cavity escapes through specially-cut vents that are in the mold. Water is flowing through the mold body on the backside of the plates, drawing out the heat and solidifying the part. The amount of time it takes the part to cool down and solidify is called the dwell time. The mold opens and the ejector pins then kick out the disc. So this next part does a lot. We're going to take the cores and we're going to go all the way through the over-molding process and it involves robots, and it's amazing because Chad designed these robot cells that just move the discs all the way through the process. There's lasers, you're going to love this part. [C] This is protected with light curtains, floor as well as the walls. This is where the operator can load up stacks of cores. You can see different ones. It runs through one, two, three, four, then rotates. That way we can shuffle our colors. In this case, they're all uniform, but a lot of times, if it's not glow in the dark to all of our traditional colors, they're all different colors. Before this cell, someone's job was to shuffle all the colors. There you go. [D] What's it doing there? [C] It's rotate. This is so we can go one, two, three, four. Rotating. So we can shuffle eight colors. [D] Wow, that's neat. And you just keep it shuffling the whole time. So the robot is going to come grab a disc. That's a pretty wild end effector there. Oh, yeah. Did you design the end effector? [C] I did not. I partnered with- [D] Did it spray something on there? [C] The discs want to suction cup together. There was a small pneumatic cylinder that is knocking the disc below it in case it was suction cup. It doesn't always suction cup, but it just fires no matter what. [D] That looks like something you added on afterwards because you had a problem. [C] It absolutely was. [D] Okay, that makes sense. All right. [C] Now, after it picked it up, you can get a better angle here. It goes through that jig. [D] It looks like you're setting it in there and you're indexing for a position. [C] Correct, yup. [D] It indexes in such a way where it always knows where the center of the disc is. [C] Yeah. And with our different diameters, we have offsets on our control panel that we can select to accommodate the different diameters where those offsets are. [D] So it's waiting on the last one to shoot. It's going to go take out the shot, and it's going to put another one in. So it's unloading and loading at the same time. So you don't eject until the robot is in position. [C] Yes. It wants to be a catch. [D] After we come out of the protected area here, so we're going to... This is the overmold. [C] This is your... [D] Your sprue? [C] Where it's coming from your sprue to a runner to your gate where it's interfacing with the cavity. And then also our added trim groove feature, which is not traditional. [D] So we got to trim that thing off. [C] Yeah. So this makes a cutting condition. Oh, this is our transfer jig for the collaborative robot to pick up from. [D] What do you call this machine? [C] This is our flash trimmer. It trim that outer perimeter, trimming the gates as well as that feature we put on there, that groove. I call it flash trimmer, but it's more of a groove cutter. [D] Is that a razor blade? [C] Yeah, that is a ceramic blade. We move the blade up and down to extend the life. [D] Oh, I see. You actually move it vertically. [C] Yeah. [D] Oh, and you have just a little micrometer adjustment here. [C] You can see we have a vacuum cup that lifts that part up. We lift that up so we don't have to make a double entry with that robot. The robot can go in, drop, lift up, and grab it all in one entry. We tried to make it so you can remove and then come back. It's all one entry. Drop, pick. [D] This is a... Proximity sensor is everywhere. [C] Yep. Part detection is key for automation. Robots are blind, so you got to tell it where the parts are at any given time. [D] Part detection. [C] In this case, this transfer stand, so it's going to wait at the end of a cycle. It's looking for that proc sensor to be triggered when that part falls. That cobot's waiting, and it's going to meet it. That little wiggle is an intentional... Get things to settle, because every once in a while... See, this interface is gravity fed. Well, the problem is when it locates on those two pegs, our two runners sometimes can be index a little funny, where it can intercept the end of arm on the cobot. So we do a little bit of that wiggle motion to make sure it settles in between those grippers. [D] I saw it actually rotated a little bit. [C] And that lines it up here for the trimmer as well. [D] This is probably the most pleasing part of the process. [C] Yeah. All the hard work feels good when you see it move. [D] All right. And obviously, all of this-Yup. [C] Yeah, you could pull it up. [D] This is going to go to regrind. [C] We make our two disc out of it. [D] You make what? [C] Recycled. Our recycled line is called R2.
Segment 5 (20:00 - 25:00)
[B] R2 Neutron is the recycled process. Any waste material that comes out of here, we felt it was better to make a product out of it than have to send it to the landfill. It's part of our mission of sustainability of being able to use everything. [D] You call this a Cobot? [C] Yeah, Cobot, collaborative robot. These have opened up a lot of doors. The main advantage is you don't have to have any guarding. Now, I say any guarding. You have to be careful on how you use these. Everyone thinks you can buy them just zip them around everywhere. There's a speed limit and also a height limit. You can't go above shoulder. You don't want to be in your neck and eye area. [B] That's what this is for. [D] Is this an OSHA thing? [C] Yes, this is an OSHA thing. But in general, what this is, every axis on this has a force sensing. So if it were to bump into you or get you pinched, it will stop and won't cause bodily harm. [B] That's what's different about this yellow one here. [D] The yellow one will just eat you up. [C] This will be bad. [B] It's like getting hit by a car. [C] You could see our sign on the window to give you an idea. Velociraptor containment. [D] That's why there's not a case. If I were to bump that, it would stop. [C] After trimming, it's going to swing over to that laser. [D] What does the laser do? [C] That laser, underneath the laser, is a scale. That scale is communicating with our controller, and that controller is communicating with the laser, and it's going to mark the weight in grams on the disc. [D] Oh, it's burning. It's burning it on So it actually uses a laser to burn that on. These have changed. So are you feeding colors into? [C] Yes, with our feeder on the other side of the machine? [D] Yeah. [C] Here's our color. Here's our color master. [D] You do the colors? Yeah, I do the programming of the recipes on the color feeders. We're using this color feeder right now to try to make a nice swirly overmold on all of the parts. These you feed in. [D] Where are you programming this at? The program all gets run in right here. We could do it on a PC well and then transfer it onto here. But this, most of the time, we'll just build the recipes in here. Normally, when you're running through your color program, you want to just follow the rainbow. All the colors next to each other in the rainbow, they all get along very well. So as long as you start with your reds and work your way through. [D] That makes me want to see the Wall of Shame where you made a bunch of dumpy colors. It does happen. The colors that don't get along when they mix together look awesome when they're side by side. [D] I see. So like a red and green, you don't want to mix. But if you can get red and green next to each other without mixing, it looks phenomenal. [D] So they're complementary colors. Exactly. [D] They're across from each other on the color wheel. [C] There's two different feeders. There's auger style or cylinder. This is actually a full cylinder rotating. [D] So it's not much at all. No, it takes very little. [D] So it goes into this Plinko style merge machine. [C] There's some magnets there to capture any metal, ferrous material. Sometimes you get metal shavings. [D] Goes in there. [C] And then a vacuum. This is a line vac. It's a Venturi vacuum that goes through. [D] And that goes all the way up here and feeds into the funnel. So now that we have the disc made, it's time to put the art on the disc. Now, this is a thing because it's how the athlete emotionally connects with the disc. For example, I went putting the other day. I knew the gyropalooza was going to do what I wanted to do, and I got to call it the gyropalooza. That's a festival they do. Anyway, the art is a thing, and people love the art on their disc golf discs. So we met up with Manuel, who showed us how to put a single color graphic on a disc. So this is just a normal disc. And then what is this stuff right here? [M] This is your foil. So that's going to put the LabSecond print on there. So it varies in colors that you can do foils. But for this, you want to just do black. And the safety here, so you can't just do it one-handed, so you can't get anything injuring you. So you just do two here. Comes down, take it out, make sure it's good and looks really good. [D] Oh, it's advancing. Yeah. Is it heat? [M] Yeah, it's heat. Temp right here, just on the side here. [D] Yeah? [M] So I mean, that is blistering hot. You're talking probably two or three degree burns if you're touching that bare-handed. [D] Oh, wow. That's cool. Yeah. So now that you know how a single image is put on a disc, you can imagine in your mind how you might put a image like this with multiple foil colors on it at the same time. They created this machine that's proprietary. They don't want me to show it to you because they want to keep that a trade secret. But they can put all kinds of images on discs, and they can vary all the different colors of foil. So one of the things that Brad and Chad kept talking about is they really like the idea of having multi-colored discs with multiple colors of foil on it. So you can almost infinitely vary the possibilities of what an MVP disc might look like. And that's through all the different color combinations.
Segment 6 (25:00 - 30:00)
So at this point, you have a beautiful disc that could be any number of colors, and it's got a really cool design on it that's got a varied colored pattern. So they put them in boxes, they wrap them up with this really cool plastic wrap palette machine, and then it goes to the warehouse where it's being prepared for shipping. And oh my goodness, do they have a huge warehouse. Look at this. It's incredible. They have all different kinds of things here. They were even testing on a new storage system when I was there that'll let them store 20% more inventory. Regardless, they ship this stuff out to retailers all over the world. In a second, I'm going to show you something amazing. But right now, I want to tell you about the second channel video because there are parts of the process I didn't show you in this video, and I think you'd be really interested in them. For example, how they recycle the pieces of plastic they don't use. They have this really interesting process that they go through. I find it to be hilarious. You're going to have to see my reaction to that over on the second channel, but it's amazing. They regrind this stuff. They're even trying to recycle the dust, which is awesome. That video also goes into the quality control of the plastic and how they measure these things geometrically to make sure that they have the correct leading edge. It's fascinating. So be looking for that video over on the second channel. But for now, I interacted with Brian, who's the guy that programs the robots, and I asked Brad and Chad, Hey, can I just have some of Brian's time? Because I want to put a camera on the robots so I can see this process from the robot perspective, and the results are fascinating. [Plucky guitar music begins] (Song is "Empousai" by Gordon McGladdery) [Valve clicks and hisses turning vacuum grippers on and off] [Robot arm servo sounds 🦾⚙️] [Metallic sound from knockout pins] [Air hissing] [End effector knocking as it inserts other disc into mold] [Fast moving servo sounds 🦾⚙️⚙️] [𝅘𝅥𝅮𝅘𝅥𝅮 Music sounds like a video game 𝅘𝅥𝅮𝅘𝅥𝅮] [(Just enjoy this next part visually) I thought that was awesome, but what I'm about to show you might be even awesomer. They're awesomer? Yeah, awesomer. There's a thing that happened in the disc golf world that was a MOMENT. This thing happened, and it changed MVP Disc Sports' business forever. And I really think it's fun to watch Brad and Chad tell the story because you can tell they genuinely get excited. Check this out. [B] We like to have that extra capacity, the ability to ramp up quickly because disc golf can have those moments, those explosive moments, where you got to ramp up really quickly. An example that we went through in 2021, James Conrad shout out, hit the greatest shot in disc golf history. It was the final hole of the World Championship. [C] You'll have to put the clip in your video. [B] You definitely got to get the clip in. [D] Okay, tell me about it. What happened? Paul McBeth and James Conrad were neck and neck on day five of the World Championship's five-day event, and he was behind by one stroke. On this particular hole, he was in a situation where he had to make a shot 250 feet out to tie. And he just had to make it. Everybody knew, based on the circumstances, he had to make it. He ran it, and he just absolutely nailed it from 250 feet away. [D] Really...? [B] He tied the round, and then he went on to the playoff hole
Segment 7 (30:00 - 33:00)
and then he won that particular hole, won the World Championships. [Announcer] He's got a lot of space out there to the left. We'll see how aggressive of an angle he puts on this, or if he keeps it more neutral and just lets the disc drag over. He's using that Envy again so..., it's a putter [Crowd is silent... nervous murmuring] Get the hole! [Crowd getting louder... ] [Screaming now... Building... ] 🥏[⛓️CHAINS⛓️] [CROWD FREAKS OUT! ] [Announcer in disbelief] OOOOooohhhhhh... NO WAY. NO WAY [GROWN MEN SHRIEKING] [YOUR SPEAKERS ARE RAILED, IT'S JUST NOISE] [YOU WANT TO HUG SOMEONE AND YOU DON'T KNOW WHY] [It's not stopping... ] [They're probably still screaming in that field] [B] So when that moment happened, we had to ramp up super quickly to meet that demand. That's actually why we bought these seven machines in this section here, because we just needed to ramp up as quickly as possible. [C] That one shot in his world championship was this of machines right there. [D] What? Like... why?... People just started loving disc golf because of that? [B] Well, it's just such a memorable moment in disc golf that there was just the demand for that particular product in that particular era. [D] OH, he hit it with one of your discs... [B] (Humbly) Yes... [C] He just recently switched to our brand, and it was his first year playing with us, and he wins World in a spectacular way. [Announcer] You're a world champion, James Conrad... [Crowd Cheering] CON - RAD! [D] That footage is from the Professional Disc Golf Association. YES, there is a professional disc golf association, and they have this sweet logo that I love. It's from a documentary they did called "The Holy Shot". It's a fun watch. You might want to check it out. When I showed my mom that shot, it blew her mind. A 250-foot putt, and just the energy of the moment, it's very exciting, and I loved it. I want to say thank you to MVP disc Sports for inviting me up to check out the manufacturing process. I thought it was amazing, and I hope you enjoyed this video. We're going We just have to do more videos with MVP. figure out what the topic is going to be. So thank you to MVP, Brad and Chad, for sponsoring this episode of Smarter Every Day. There's no call to action. They didn't say, Hey, go to this website, buy these discs. They just want you to love disc golf as much as they do. And I hope you go check it out. get a disc. It doesn't matter if you buy it, borrow it, whatever, and go out and do a walk with your friends out in nature and do some physical activity. You're on these screens enough, right? Just go to the park. You probably have a disc golf course near you. Go find it. Call a buddy, go out, and make a friend in real life. I think it's great, and you should do that. So that's the call to action. Thank you, MVP Disc Sports, for sponsoring this. And If you have ideas for what the next videos that we do with MVP should be, let me know. Because, yeah, write a comment. We'll check it out. We'll see what we can do because I think it's going to be awesome. The physics of disc golf flight, that's a gimme. Kinda want to do that one. But what are your other ideas? Leave a comment down below. Yeah, that's it. I hope you enjoyed this episode of Smarter Every Day. Please subscribe if you're into that sort of thing. If not, no big deal. I'm just grateful that you watched this video. I'm Destin. You're getting Smarter Every Day. Have a good one. Bye.