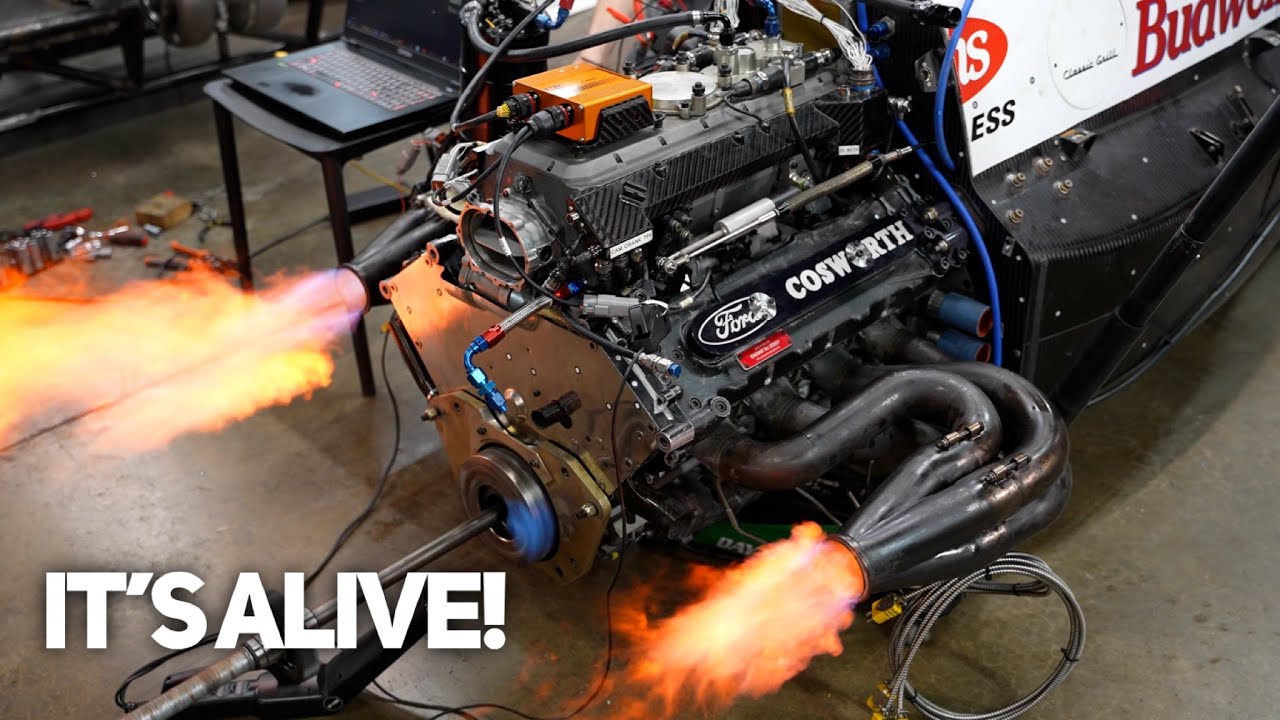
That was violent. — Yeah, that was the first fire. — As you guys know, it has been too many years in fact that this car has been not running. And so I want to celebrate that. As you know, this shirt has just been soft launched. But I'm really excited that we had a handful of shirts printed off cuz we had a couple spares. And Joel designed this and I actually really love it. I've been waiting until the moment that this engine fires up to showcase this. And so there's the car now. It's inspired from the '90s type pictures of the car racing. The car firing up is a very, very important moment to me. And so I want to kind of commemorate that. As you guys know, any sort of merch in this shop goes to the cause. This has taught me so much about how to make the final version of that. So, it's all part of the plan. Uh, I swear I have a plan. And so, if you guys want, these are available up on the site. They are limited and we only have that many up there. So, uh, get yours today. We've got some really big things coming up, but I'm very proud of this moment. These are the connectors for the Cossworth's ECU. We will never use it. So, what we're going to do is cut these open to see which pins are what because there are 79 connectors on each of these. And I'm having one hell of a time trying to figure it all out. Whoever did this uh from Cossworth did a damn good job. I was afraid that I'd cut into wires, but it's actually not the truth. They shield the [ __ ] out of everything. So, this harness is definitely worth reusing. — Oh, wow. There's a lot less wires than I thought. — Yeah, that's why it's like this is 79 pins. There's a bunch of shielded wire pairs or triplets or single wires. This is a very expensive harness. I highly doubt the person who made this would ever waste their time watching my channel. But kudos to you. This is really impressive. And now it gives me a little bit more of an understanding of what I'm looking for. I've completely taken all the boots off of each of these and I cannot get them separated. Therefore, I'm back to where I was. Except this time I've got a little bit of a trick. I found a bunch of pins that I can use. So I put all 79 pins in there. It's just much quicker to do like this and then go. Okay. Well, that's one is right there. So at least I can try to pin it out quicker cuz otherwise it's going do. This has been a [ __ ] show. This is an Indie car race battery. I've never seen anything like this. But I want to know what's inside. And I have no idea how to get this apart. That's like a glue or something on there. Now that's kind of gratifying. This is the moment of truth. I see batteries. — Well, good thing I didn't cut into it. [ __ ] ton of 9 volts. — Well, they are old like Niad type batteries. Are those two wires connected to each other? Cuz then that means series. But I want to — Oh, that's fine. Yeah. — I'm kind of wondering what it tastes like. — That's the first question you have. — Tastes like foam. — It's got kind of a foamy texture to it. Like foam and rubber. — Flubber. — Isn't that what whales have? — Flubber. Now I'm really curious what all these pins are. Like this is a battery. It should only have like power and ground. There we go. — That's sick. That is sick. 12 volts, 5 amp hour. This thing is already quickly becoming way simpler than I thought it was. I thought this was like a control board when in fact it actually looks more like a solder joint. So, you can see a lot of the black wires are going into this spot here and out are coming white wires. And that makes mapping out the wiring harness infinitely easier. The battery is the only place where it all splices internally. I've got this to protect my face from all the sparks. Got gloves for that. But you know one thing I never do the correct shoes. That is MIG welding at its finest. Thankfully because of Brunt I have the opportunity to keep myself protected and very comfortable. Those are actually really nice. So one of their best things is their Brunt Cushion. When you're working on your feet, you deserve to try and treat your whole body right from the ground up. That is nice. So what are these boots good for? Well, just about all of the hazards that are here in this shop, including this, they're even ehr rated. What does that mean? Electrical hazard. It's actually almost more gripped than without the water. They're waterproof as well. Every danger and hazard that's in this shop, that is exactly what these are meant for. As
Segment 2 (05:00 - 10:00)
much as I want to showcase this feature, they are oil resistant. They're brand new, so I want to I want to baby them until I inevitably scuff them and then they really become work boots. So, if you're looking for a boot that can take the brunt of all the abuse around here, look no further than right here. Brunt Boots. Get $10 off your first order using my code right here. And if you don't absolutely love these things, you can send them back. Yet another little Easter egg find from all of the things in all the piles. This little harness here looks a lot like the bigger harness, but it is like a dino test chassis harness. So, what matters most is that the Cossworth old 1997 box plugs into these three connectors. That's what I need to know. I need to know every single one of these because right now I'm missing a lot of data. This harness is built differently to test the ECU. So, we're seeing some Easter eggs here. They just said screw it. Instead of having it go the normal way, these are wideband sensors go directly to this. So, I now know that these are somewhere in the pins of these. So, that just saved me a lot of time guessing what those could be. Now, the problem with this, and what also is exciting for this harness, is that if we were going to use this harness to fire up uh a car, it wouldn't work because they didn't put all of the connectors from the ECU to the engine. They purposely have it split up. And it makes it a little bit easier to diagnose, but it also means that we can't just cut this off and plug in a Helltech and fire up the engine. So, these two connectors here go on the top of the motor. They're normally like $100 connectors. problem though, these are closer to $300 ones. Why? Because they actually have a whole another ring inside of there meant for all of the grounding. The grounding goes through the case of this instead of as a pin. So, we now have $600 of connectors right here. We can buy new pins and make our own harness. That's a good thing. These sadly are stupid expensive, but our ECU doesn't use them. So, these are actually worthless to us. So, what I'm going to do is cut the boot off of this again, start depinning it, and we've got ourselves a harness that we can just make the Haltech plug into this side and start making it work. I don't feel remorse cutting this one up because I found three of these harnesses. This is the part I want to preserve because these are the most expensive connectors to connect directly to the engine. That was so much cleaner than the way we were doing it before. This also isn't a race harness. I was able to pull this apart. What you can see here is a pretty cumbersome way to do it, but it actually is also kind of lazy, and I enjoy that. So, you take this ring, put it up over all of the wires that you're trying to shield, and then you bring that back through here, and then you tighten all of that up to here. It's that simple. So you don't have to like crimp and cut some of these wires out. It's simple but stupidly expensive nowadays. What we're about to do is cut all of the sensors off. These are all mapped out. They all make sense. That's officially no longer part of this harness. And I am not ready to cut all of this off yet. But this lets me see just how many wires I'm dealing with. Quite a few twisted pairs. That's going to be for the crank angle sensor and all the other main important sensors. But I'm counting the number of wires here to make sure that I've got all of them accounted for cuz these are all the pins that I don't have anything in. And that doesn't add up. So, uh, I got some more math ahead of me. But once I find the last two missing wires, it's time to My brain actually really hurts from this. There are variations in the wiring. So, the things that worked on the other harness, some of them don't line up here, and I've nailed it down to six of And I just realized at this point it doesn't matter if I get this harness 100% accurate cuz I'm cutting it apart anyway. So I'm going to go ahead and do just that. One of the really interesting things, you know, all these splices are, they're actually to the injectors that go in front of the turbo. So we're just going to cut those off first. And I'm actually going to try and keep those little heat shrink things with them to make it easy for me to figure out what's going on after I've completely gutted this harness. So gross to just destroy something so beautiful. I did a [ __ ] ton of work. They were all twisted in there. Wait, so you labeled all of those connectors pin one through whatever. But now you don't know what which wire is which. Yeah, that's why I was avoiding doing this is that now I have to go redo it uh when I go to start making the Hletech connector. The important part was that I tried making the base from it. So that's ECU connector three. I now have to do the same thing for this one. At least if I know roughly what is going to this stalk.
Segment 3 (10:00 - 15:00)
I can start pinning it. But it this has been very difficult. I cannot wait until I have the heltech connected to this connected to the engine and then watching all the sensors start moving. This is the aftermath of Joel leaving me with too much caffeine and other stimulants in my system. Bad friend. I had an excess amount of energy last night and I wanted to channel it into something that requires that energy. What better than sorting pins? Now, this is a set of pins that were sent to me from a fan. I paid for it, and it's all military milspec, literal milspec wiring. And the cool part is that the Indie car is actually built off of milspec, not autoport. And as something as simple as these two connectors here, these look like autoport uh connectors. And you always hear me say milspec, and I'm actually referring to Autoport. These are both 14s, which means they're the same size. Ignore the pins. That's the second number. Watch when I clock them the exact same way. They're flipped. And so milspec and autoport actually cannot be interchanged. They actually will have the same exact pin layout. And this one will be the same, but this side and this side, these double fins that lock it in place are 180. Awesome part is I took a dino harness that we found at Ed Pinks and D sheetd it. And something that makes me very excited, every sensor is shielded twisted pair and there there's three wires in there. So there's ground, there's 5 volts, and the signal. That can help me kind of trace back which pins are which on the other end. They were not spliced together at all. They would take all of these shields and then every single one of these damn pins went to the ECU. So I have no idea which one's ground, which one's whatever. To make matters worse, this is all white wire. And so somebody used these little heat shrink things to tell themselves what wires which. It doesn't help me at all. At least this gets me a little bit further. And the really good thing about this is these are $70 and $150 connectors. So once I crack the code, I can make a harness that connects the Helltech and we can fire this damn engine up. Mar was filming. He made a brilliant observation. He's like, "It looks like you're just depinning these. " And he's actually correct. For example, this right here is three wires, power, ground, and a signal. And it doesn't match what's on the engine. This harness was used on an older version of these engines. So they've redid the way that the engine side of the harness is done. So like for example, all these are injector signals. These are injector power. Then three wires is fuel pin one, two, and three. This is like on two injectors and one oil pin. It's not possible. So what I'm doing is depinning it all. And then one's going to be the crank angle sensor, cam sensor, pressure sensor. It is so hard to tell. But on this harness, all these wires are 22 gauge except for two of the wires, which are 20 gauge. They're the ones that power the entire ignition system on top of the engine. I have committed to this, and I'm very excited that you guys are seeing the last couple moments of it coming to life. I cut up a perfectly good harness for the Indie car and I have hotwired it to Haltech connectors. In the grand scheme of things, I think because I want to encourage other people to get into this, it is relatively easy. It's not magic, but it's also absolutely difficult. You have to know a lot to then shorthand this, and this. So, what you can see here is I've left all of the wires exposed. And in this harness, they're all white. What's really wild is that this harness has very, very thin wires. So, 24 gauge wire. You could melt that pretty quickly on accident. So, there's 20 two and 24 gauge wire hidden. Like, look at that one there and that one there. Two different size wires. At this point, I can either plug it into an R3, which is what we're going to do for right now, but it's designed for the R5. The only thing that won't work is the other injectors. I just swapped from the R5 to R3 in the software. That was really uh surprisingly easy. And all the things that are red are things that are only available on the R5. I should say that many more inputs. You can do a lot of these on the R3. It's just that it goes to the next connector that isn't plugged in. So, we are going to see coolant air temp, throttle position. These should read room temperature if the base config is right. So, ah, look at that. We got numbers. We got numbers with that right there at 90%. Just let's see what happens if I uh move the throttle. — Oh yeah, it's doing things at zero.
Segment 4 (15:00 - 20:00)
— Hell yeah. — Okay, so we have throttle position. So water pressure is the one coming into this, but the boost pressure is machined into the bottom of this. So in theory, if I blow on this, you should see a little bit of pressure. — Yeah, you can blow pretty good. You got up to nine. — I don't think a human can do that. I think it's like it must be in the wrong sensing. — Yeah, it's also chilling at 2. 2. So, — yeah. Yeah, but boost pressure is, you know, vacuum this is zero, you know, to normal pressure sensor and then up is up. But on this one, -14 PSI is actually zero. So, uh you have to use the correct sensor for that. So, we have oil and fuel pressure, which we should be able to do the same thing. It went up to 51. — Yeah, that's I can't make the amount of pressure that a fuel system can, but it's responding properly. Oh, you know, temp sensors. So, I can see that they're not reading, but that doesn't mean that they're off. So, oil temp goes to 4. 9. So, 5 volts. It's just sitting there waiting to go. And once I plug the sensor in, you should see it 4. 3. It's working. The only thing we need to do is set 4. 3 volts to room temperature. Do all that [ __ ] inside of here. It's not anybody's temp sensor. So, it's not going to read anything. — That's where this gets a little bit more complicated. — Yeah, Oops. Yeah. See? Pull up disabled. Reenable it. And we're back to 4. 3. So, we're consistent there. Uh, same thing with intake air temp. Let's see if that one's working. Set the pull up. Okay, that one. That one actually might not be connected. — 4. 3. — Hell yeah. Okay. They should be the same exact voltage because it's blue temperature. And then the last one is coolant uh temperature zero. We'll go enable 4. 3. So all of our temp sensors are working. These are actually PCI ring injectors. The fuel gets in from the side and then shoots out here instead of straight through. Instead of trying to find all these injectors, we're just going to plug quite a few of these in. These are low impedance injectors, meaning that they use high current compared to the ID injector. That's one of the reasons I actually spent a little bit longer today. Joel was waiting on me because if I use the 24 gauge wire, these things pull a significant amount of power. What you can see is each piston gets two injectors. kind of like first stage, second stage. They were very small injectors, like 300 cc per minute. This week has been a very productive week. This table is absolutely a mess. And it's got every car project, one rotor, 12 rotor, four rotor, and indie car all happening at once. It's the injector configuration. Oh, yeah, cuz they're set to the other injectors. So, it already knows that they're the wrong injectors. That's kind of sick. I've never swapped injectors on a thing, but it's pissed. The R3 I don't think has enough injectors do. So I think we're actually stuck just with one stage for a moment. If I did the wiring right, one A should click. — Yeah. — Yes. Okay. It's going to have to be two uh A. — Yeah. — All eight injectors on stage one are all there. So we're going to see how many of them fire up. three. — Oh, you hear that? — Yeah. — It just randomly. — Wow. Okay, this is uh huge because the last thing I really want to test the crank sensor. So, I'm just going to take this little cam sensor thing. Yeah. Picking it up, dropping it down. Picking up, dropping down. Aka teeth going by. So, there's a rise and then a fall. This engine could start. Now, the only thing left to test, we have to get the crank angle sensor working, is to test the ignition. In theory, right now, even without testing the cam sensor, the crank sensor is working. If we have the ignition system firing all the eight igniters, the engine would start. It's actually pretty straightforward the process here of getting this thing apart. Just take a couple bolts off. I need to know everything I can about this clutch right now because I am this close to turning this over, which means potentially starting it. It all starts with this clutch. The clutch is not only the clutch, it's also got the uh timing marks and it's the only way that you can start the motor. My questions are answered very quickly. If this side goes in Nope. So, you have to start this — with the transmission on. — Yeah. Actually, you know what I could do? Uh, I have one of those gears. So, this
Segment 5 (20:00 - 25:00)
prevents us from having to put the transmission back on cuz this is what it goes into on the inside of the transmission. So, now we can just put the starter into that. It is literally 100° in this. So, I'm sweating not only because of that, but also because I'm just going to test I don't know irreplaceable sort of setup with these skill sets that uh I possess and I don't trust those fully. So, what I do trust in is anti-gravity and hletech to make me look good. We'll plug this little setup back in, but this time onto the real car. So, this is a first moment. And in theory, it should do exactly what it did earlier. 36 stop errors, seven warnings. It's working overall. And most importantly, what we need to test right here and right now is the crank angle sensor. So, our hope is to see consistent zigzags here. Uh, I don't think there's a way for me Oh, yeah. Maybe I can do this to log it. — Yeah, there we go. — Jesus. Uh, nothing yet. — Okay. I've been looking. — Wow. Okay, stop there for the moment. I logged it to the PC and it says 1,000 RPM, which uh that caught me off guard. We couldn't see it, but maybe it did. No [ __ ] way it's working. — That's crazy. I straight up didn't see it. — I didn't see it either. It's going to be super confused because it has the extra teeth. It [ __ ] worked. Those are each of the times I turned it over. That's crazy. — That is That really — Why didn't it show up on that? — I think when it's logging it doesn't do as good of a job showing up on the ocope, but there that's it. Trigger tooth count. We We did it. — I'm going to give it another shot. — Yeah, cuz I need to show this to Haltech. — Oh, I see it. — Did it? — Yeah, it's clear. — There we go. — Yeah. — Okay, there we go. That's what I needed. That's what I needed right there. Hell yeah. That's so sick. That is so sick. Yeah, it was way crisper than — Yeah, even with me doing the weird [ __ ] there. So, Heltech's going to help me out with this issue. It's close to like a Honda engine, but not. So, I think for one of these, since I have spares, I'm going to grind two teeth off. So, this is actually a 12 plus one random tooth. So, it's 12 plus one. The Haltech software lets you do anything minus. So, you can actually take two teeth away. You could take this tooth and even this one, it doesn't matter. And it's a 12 minus one. So, it expects 12 and then when there's a gap, it knows to reset. So, I have to choose this tooth and one of these two probably to keep it simple. And we could fire this up on a Haltech. Holy [ __ ] this is working. This is what I love having about 36 teeth per revolution. This is what I'm used to. The important thing is the Indie car does not have that luxury. Now, what is interesting is you have to think there's 36 teeth to do one full cycle of engine. This, on the other hand, is a piston engine and it actually has to go around twice to do one full thing. So, technically, while this is only 12, 13 teeth, it's actually 24 if you're trying to compare apples to like engine angle and when combustion occurs. Nonetheless, I wish I had 60 teeth. Haltech is going to work on making an update for this, but they've got bigger things. They got stuff for you guys to do. So, I have to take a backseat to that. And so I'm going to grind off two teeth, which is going to make this less accurate. But I went and did all the math and looked at each of the four spots where the flat plane crank fires and found that I can get rid of this one, which I have to. And then I can get rid of this one here. Nothing is occurring after that until this tooth. Nothing like in terms of I need ignition. Maybe injection, but piston engines are way less sensitive to injection timing, per se. So every single time the engine's about to ignite, I make sure that there's a tooth still there before it ignites. So it's compressed and then there's the tooth top dead center. So it knows that's the most information it can get to know when to fire. So that way we don't backfire or do weird [ __ ] That leaves this tooth and this tooth to be grinded out. My goal is to make sure not only is the tooth as flat as possible, but even if it goes inward, then the sensor is picking up this metal disappearing as well. So, very, very particular there. This one's going to be a lot harder cuz there's teeth on both sides. So, I can't get it from this way. So, I'm going to go even slower. And through the power of editing, you guys will be with me on the other side. That is a permanently modified flywheel. And I feel pretty good about it. I'd love to recote those, but it makes me want to like machine the whole ring off and put like a higher detailed ring. But modern technology has gotten better, but doesn't change the fact that this is still one of the fastest cars on the earth without modern technology. We need to make sure that lines up. Otherwise, we're way off on
Segment 6 (25:00 - 30:00)
anything we do from here on out. So, this will go on this. The uh timing is on this. So, there's top dead center. We have all of that on which now means that the R3 should be able to think that this is the correct pattern. It's got both the cam sensor and the crank sensor working in a way that the computer can recognize. So that means the computer will then tell these spark plugs to start sparking. If that happens, I will be over the moon. It just matters that it ignites because this box is a mystery box to me to control. We have these little baby spark plugs. They're non-resistor, so they create a lot of electromagnetic frequencies, and that's one of the reasons everything's shielded in this motor. But we're hoping to see these dance. Now, here's something very interesting. On all of our other cars, every single coil has its own wire. So, I want that one. I want this one. This is not the case. This is called a twin distributor setup, which old school two distributor caps and then they're like T. So, inside of the cap is what dictates what fires, but it's firing off each cap. This is interesting because there are only two wires of input, and it's actually left and right bank. As far as I know, I could only get this by hand to fire off one. It never was able to pulse cuz I'm not a computer. We'll see if we can get it to play nice as a twin distributor setup. All in all, that means that I want to see eight spark plugs sparking. I did not see anything. — Okay, we'll stop there for a second. There's the uh missing tooth right there. So then I also have engine angle. And look at that. So it's got some weirdness going on there. It sees the space and then resets. So that's good. I'll have to dig into that more, but it should be firing the engine. We are doing more or less expediting the process of selling these engines. And as a result, I need to use the parts that we have with them. And that includes this CDI box. I've got probably 50 of them. I found the connector for it. Cut it out of this thing. — So, you were using a different one before, right? — Yeah. So, we're using a different CDI box that is not available. These looked identical. And we have more of these than the other style, but they have this older plug. So, I realized Joel forgot something super important on this. Me being Joel forgot that those are grounds for the circuits inside of this thing. It's got power ground and then it's got circuit like coil grounds cuz these are coils inside of here. But then the actual spark plug ground has to go back to the head that it's also grounded. So, you can see I was halfway there. That's for the coil ground. But I also have to ground these. — So they could have been working. — The other system could have been working the whole time because they were getting a signal. I'm a [ __ ] We're going to take some welding wire and just wrap it around all of them. — Bit of an artist. I won't be able to see it as easily, but I think I heard one of them sparking earlier. — Yeah. — Really? — I saw it. — Was at least more than one? — Yeah, I saw these three at least. I didn't see over here, but I wasn't looking too. — Okay, I'm going to do it again. — Okay. Yeah, they're all working. — [ __ ] yes. Okay, — I think we need to plug the old one in. See? — So, we can sell a whole setup that you just plug into. I just have to rewire one thing and we can go back to the original ignition. So, this means we can start selling these in. That said, we do have one box that was it's part of a set that we don't have. It's newer and it's got other features. I think it's too advanced. So, let me swap these around and this time use grounds on the things here, you know. Oh, you know what we can see? Let's see how much current they used. It was only using 2 amps. I mean, I guess I have to trust the information. We're going to test this one to see if it was going to work and I just didn't have this on there. In theory, it should fire one, five, and then I don't remember the I don't it's a revised firing order. So, there are two firing order. So, I think if we fire those back up in slow-mo, you know, it's just left, right, and the controller was picking which cylinder it's going to be different if this works. — I don't think so, but do it again. — No, — these do need that additional controller. That's fine. I could actually make it work with the Helletech. It might give us a little bit of extra control, but it's going out of our way. We want to work with what everybody else who buys an engine from me has. So, no harm at all. This has been pure hell. And I hope you guys enjoy the outcome from this. But I have slaved away at this. And it's 96 degrees outside. It's like more than that in the shop. And we have the crank sensor working, the cam sensor working. All that means is that the ignition can finally work at the same spot. And I think we're this close to finally tuning
Segment 7 (30:00 - 35:00)
the timing. So setting timing. So let's see. This thing is on its last leg, but I think it should be okay. start some [ __ ] Oh. Oh, that's pretty. — Fine. — It's going to melt enough and then we won't have to worry about it. — Sure. — When you move it. — Yeah. — So bright. — It's beautiful. Okay. Okay. I was I was trying to be nice. That is almost exactly on. That was some math and some guessing. And we have a Indie Car motor timed. Since we have gotten the ignition system figured out, I believe this will be kind of easy to diagnose. But this is the grape vine of injectors. And I think they actually have to be installed this way. You can't get the connectors on once they're in the engine. It's going be kind of hard with the damn fan, but we need the fan to survive. Uh, but we should be able to hear various injectors click. All the error codes about them being open circuits are all gone. So here's cylinder one. — Mhm. Yeah. Uh seven. Okay. And then eight. Yeah. — Okay. Sweet. — We are in business. So, in theory, if this thing had fuel and we've diagnosed the cam crank sensor stuff, you can be assured that every time you see this camera on, we've done this probably 20 other times, scratching my head. Each piece is something that we have to learn more about. Looks like the same [ __ ] different day, but it's making massive progress. So, we're going to see some squiggly lines here, and hopefully the squiggles start high and then go low. Right now, I'm getting it where it goes low. and goes high without going into detail. That's a problem. Look at that. Up, down, up. Well, you see it right there as the engine's slowing down. So, you want the sensor to read the tooth and then turn off. And even the cam sensor is actually working as well. This is the coldest day we've had in like 3 months, and it's 86° in here. Spirits are very high. This is looking like an actual engine. I've finally got all the fuel injectors. I've kind of got the wiring figured out. There's a plate that stacks on top of here that these connectors, this sensor, the alternator, another pressure temp sensor, they all have to go through these two holes back here. And then there's a fuel rail that goes on top of this. So, what I'm doing right now is putting the little metal caps on top of all the injectors. And these are really just like crowns. They just hold up the bottom of the O-ring. But I have all brand new injectors on them. So, once I put all these O-rings on, I have to try and figure out how to rock the fuel rail and get it on there. But once it's on there and that plate goes on there, you can't see any of this. So, my theory right now is to put this half of them all on and then hook the other half. I got this whole side on. This is looking promising. So, we just need to get this to drop in. I didn't get as frustrated as I was expecting to get to be honest. Thankfully, Joel found O-rings for these and uh all the runners that plops onto here, but that's not what goes on next. So, this plate, it's a really weird intermediate step. Shove this guy through here. So then on this side we have something similar. We have the other injectors. We have the oil temp sensor. Makes nice simple sense. This is a big moment cuz I've never done this with this motor. We have to hook this over the boot. This is what holds the manifold in place. And then we have to put I think they're M8 bolts in there. But the fuel rail itself is held in here and here. And that holds it up. Here is the really exciting part, which is the slide throttle. First time this engine. That's beautiful. Thank god we bought, you know, 20 motors so we could build one. Put a fuel filter in there. pressurize and return to our fuel lab system externally. And we now have a uh engine capable of potentially starting. The theme of this week has been just let's use the fuel lab external surge tank to do some crazy [ __ ] The fuel
Segment 8 (35:00 - 40:00)
filter and regulator are in here. So, it's kind of cool. This is a filter and it actually filters from the center out. So, we need pressure going into here. This fuel goes around here, goes through the rail, and then comes back and returns through here, and then goes back into here. But there is one little side adventure. This is the PCI ring. So, this is what plugs into the turbo cooling ones, which we do not want turbo cooling at this exact moment. We just want fuel pressure. Thank god to the guys that are smarter than me and make these excess wire lengths. I just swapped two and three because that's their revised firing order. I'm writing that down on here because technically everything else is firing 1 2 3 4 where now it's 1 324. So this new system should fire in the correct order. So that is ready to go on. I think we're about ready to prime the fuel system. We are going to fire it up without fuel. So we should hear it what it sounds like making compression. No fuel yet. Just a quick crank over and see what it says. No check engine lights at all. We are going to power on the fuel system. We won't see anything, but we should hear the pump do that. And then we'll watch for fuel spilling everywhere somewhere. 80 PSI, which as we know, that's 87 PSI right there. That's exactly what they set their fuel pressure regulators to. With the three rotors button, the 12 rotors switch, we now have a kill switch because I realized that shit's going to get real quick. — So, how are you going to hit that button when you're way over there? — Uh, well, that's a team effort type of thing. I ran out of excuses. I'll look at my list. That's what I'll do. Basically, we have a 1 in 25% chance of this thing being close. This little box, it fires up. It doesn't fire up. It fires up. But we're going to see if we get our 25% chance lucky. — And if not, stick around for the rest of the video. We're going to do it 24 more times. — Yeah. 100 times and still never get that 25% chance working. — This engine's primed, ready to go. It's just ignition that is kicking our ass. Because of all the really wild and crazy things we want to do and do it on a Haltech, I bought this little box. $2,000. It's ridiculously expensive. Here is our current box. This is the entire ignition system. It only uses two 20 gauge wires to power it. And you have all eight coils. Now, the thing is this does not have eight inputs. It just has two. The computer system was smart enough to tell it left, right, and you could reset it to get it back to one. There's no distributor here. There's nothing telling you where the engine is. It's keeping track both the computer here and this separately. This has its own brain. The problem is HTech doesn't like boxes like this and nor should it. This is a very obscure thing. So, there's no way for the Haltech to reset this. There are two ground wires and then there are four coils. The grounds actually really ingeniously go through these and the bolts ground them to the block and that completes the circuit. We will take this box, two power, two ground, and then eight signal wires to the ECU. And then this side is basically mimicking this. We got eight coils, four grounds. That seems to make sense. And then now when this box says, hey, I want to fire off cylinder one, you know, two, you know, four. You know what? It can do it individually. All eight are separate. And the Htech loves that. And I love that because the Htech won't forget the order of this. It doesn't matter. That should allow us to fire this up the first time cuz that's the only issue we currently have stopping us from starting the Indie Car engine. This officially is the first thing I'm wiring to the Indie car with the intention of using it in a race environment. So, you can see I'm busting out Kevlar. I'm actually using it to hold the wires in place. I want to make sure that my harness, even these kind of test harnesses, live up to the rest of the car. So, what is this? that's going to plug into there. And inside of this is all eight individual cylinders. So, we can tell one through eight to turn on and off, as well as, crazy enough, all the power to spark this thing up to 225 m. There's a lot of power without a lot of wire. And in fact, I didn't have 20 gauge wire, so I used 18 and cut it down a little bit. And so, it's this is oversized. Insane that you can do that. And then the one that sucks that I have to figure out how to do is wiring these two into here. I have finished my first part of the harness and that then just goes to the hellte mess over here. It's extra long on purpose because I'll cut it all down. But what I think will end up happening, but it'll hide and say here and then come out here. The thing that uh you guys are joining us for is this.
Segment 9 (40:00 - 45:00)
These are very expensive coils and I'm cutting them up. I will never do work that clean. It feels so destructive. These are actually auto sports. Right now, we're going to use just DT connectors and repin this. So, I'm curious to see what colors they use inside of this little harness. — I'm going to guess white and white. — They do. They do love their white — and also white. — Wait, wait. Nope. — Oh, there's blue and black. — Yeah. [ __ ] Okay. So, what we do know is that each coil's got its own power. This is grounded to the block. And you'd expect it to be the ground. Seems like my meter's dead, but then I go over the blue. Both blues. That's chassis ground or engine ground where the actual black wires do not go to chassis ground. And so I'm a little confused because on the older style, there's only six wires. And I've got a little bit of digging to do. It's a good thing that we're going to be using really cheap connectors because we have some diagnosing and testing. We're going to use the older style set which look identical other than the fact that they have six wires. And to keep it simple, they have little numbers on them. These are what the coils look like if you guys are curious. I'm swapping them back to their original position, which you can tell by the way the wiring harness wants to go. And they're just held in to these little plates. This is just simply putting it back to how it was. So that way the wiring from 1987 that says the right numbers is actually correct. I spent a large part last night getting this to this point and I realized something crazy about well coils I think in general but these coils specifically you can't test them easily and you can't disconnect them. So when I go to test wire one which they have you know 1 2 3 4 and then the two grounds every single thing is within 1 and 12 ohms of resistance. So, I'm going to just go ahead put this here. What the [ __ ] is calling me right now? Stephen. Uh, nah, that's my really good friend. — Point that I'm trying to make is that that's a ground, but we'll pick any wire Pick another wire here. And they all do the exact same thing. So, the reason why is that coils are quite literally it's a coil of wire. So, it actually makes it very hard for me to test other than lighting them up and seeing what happens. Here's the last harness. I'm going to show you guys this before we terminate it. It's slightly overbuilt cuz these should be 20 gauge. They're 18. And then these are 16 gauge. So, these will all go to one side and these will go to the other side. It's going to be hard to see if we get spark, but we'll know. Our goal right now is to have that bolt line up right there. Oh, that was almost exactly on. This is a very pivotal moment for this. I've got spark plugs working exactly consistently for the first time, and that was what was holding us up the most. Tighten these up and then pressurize the fuel system. I'm actually kind of nervous cuz I know it should work. It goes nuts. I just have to run over there and get that connector. — God damn. Woohoo! Oh, that's an official first fire. — Yo, — I'm done. I'm done for the moment. — That That's going to fire. — That's this close to firing. That last one is She's getting angry. We got to do a couple more things before we actually let it go because it will hurt the motor. We are finally out from under the hobbit hole. where we've been doing all the work up to this point. We're going to split these two. Again, there's a couple small things that we need to finish between there. Mostly it has to do with hoses and lines. And ideally, we would have the two hoses running from here to here, and we would be putting fuel here. There's some coolant things, but mostly the oil line that goes from the tank to the tank needs to have a line cuz as soon as this thing fires up, it's going to be shooting it everywhere. But our goal is to get this thing idling for about 30 seconds before coolant becomes a problem. What you can see here is the beautiful mesmerizing barrel style throttles. There's a little spacer right in between there. And so if you tighten this as that, it locks up. So I need to get find another spacer like this one. So that way I can tighten this because look at this is just wobbled until then. There's a bunch of really small things, but it's basically coming together really solidly.
Segment 10 (45:00 - 50:00)
These used what's called a Wiggins clamp. Now Wiggins clamp is a company at Dell Wiggins that clamps these on. And the best way to put it is the Vibrant clamps are those but better. The problem is Vibrant doesn't make 3 and 7/8 an inch and a quarter. There's no use other than like an Indie car. So I'm stuck with the situation of what do I do with these? And right now we want to loop this bottom line straight up to this top line. You can see I spliced it and it's just not going to work unless I cut this clamp off and then just clamp it to this metal. So, I'm not going to lie. I thought putting that blue towel would like get ripped, but it did exactly what I was hoping and prevented any aluminum from getting inside of it. So, we got a nice little lip here from the weld. Hopefully that gives us just enough to clamp onto. This might surprise a lot of people, but I'm going to be using restore and protect for this. In fact, that's what we've been turning it over with. And I'm using a thin oil. Oils are actually a lot more similar than you think. There are details. Obviously, this isn't VR1. Uh, but it's pretty damn good oil. We're swapping to their engine mounts just to keep everything simple. But these ones right here are head bolts. I'm just torquing them to approximately the correct torque. And then these just hold the engine mount. So it's not really a big deal. I swapped over to the stock ones only cuz mine kept galling up, but I didn't have these sick steel inserts. This part is so [ __ ] sick. Finn said that he doesn't have the strength to do his side. Thought I think I have strength to do both. — Oh. Oh no. It's — all in the hips. You can throw some nuts. — More nuts at it. We're going to go ahead and fire it up with all the stuff that we've done. Something crazy is going to happen. I don't know what. Okay. Oh, that's actually more terrifying. Okay, there we go. — That was scary. — It's in there. It's still burning. Okay. — Okay, we're clearing it up. That's hot. — That's so sick. — I'm going to set it to the other number. There's nothing happens. Do this. Key it off. Keep that on. Use that stupid ass arrow. — Smoking out the intake. — That That's a backfire. Look at that. That stupid box fires by itself when it turns on. — That has to be the wrong timing. That has to just makes logical sense to me that that's the wrong timing. So, Patreon is asking me about checking timing and all that, and they are 100% right. Check out this. I have it currently set at what I think is top dead center. So, it should be facing that notch. And see this hole right here? Do you see where the piston's at? — Nice. — It's 180°. I got these two dots mixed up. So, I just have to add 180 or take away 180 from this. And uh those are our two numbers to start with. — Okay, that's — probably the wrong Maybe that was violent. — Yeah. — Wait, why are they both doing the same thing? — Uh the cable uh the Heltech pulled out. I don't know how that happened. And so I was changing making changes making changes. Nothing was happening. It'll pop or not. Okay. — That was the first fire. — Are you okay? I'm alive. We did it. — We're Everybody's okay. That was [ __ ] crazy. — I saw a fly over there. — That was crazy. That's a first fire. Thanks to Patreon. I almost lost a knee, but we just fired
Segment 11 (50:00 - 50:00)
up an Indie car. — It just took off when it fired. Huh. — That was nuts. It was like [ __ ] That is actually slightly bent. Uhoh. It's — stuck in there, — I think. Oh, you know what it did is it just moved the uh the clutch discs. — There we go. — Oh, sweet. — Yeah. So, yeah, that thing had so much mass that it was able to pull the discs and twist it. There you have it. the first fire on the indie car engine with a rag tag group of guys. It'll idle, it'll run. We are there. And that is a really crazy place to be. We're about to learn a lot while doing a lot very, very quickly. But nonetheless, we're going to scream this thing up to 156,000 RPM very