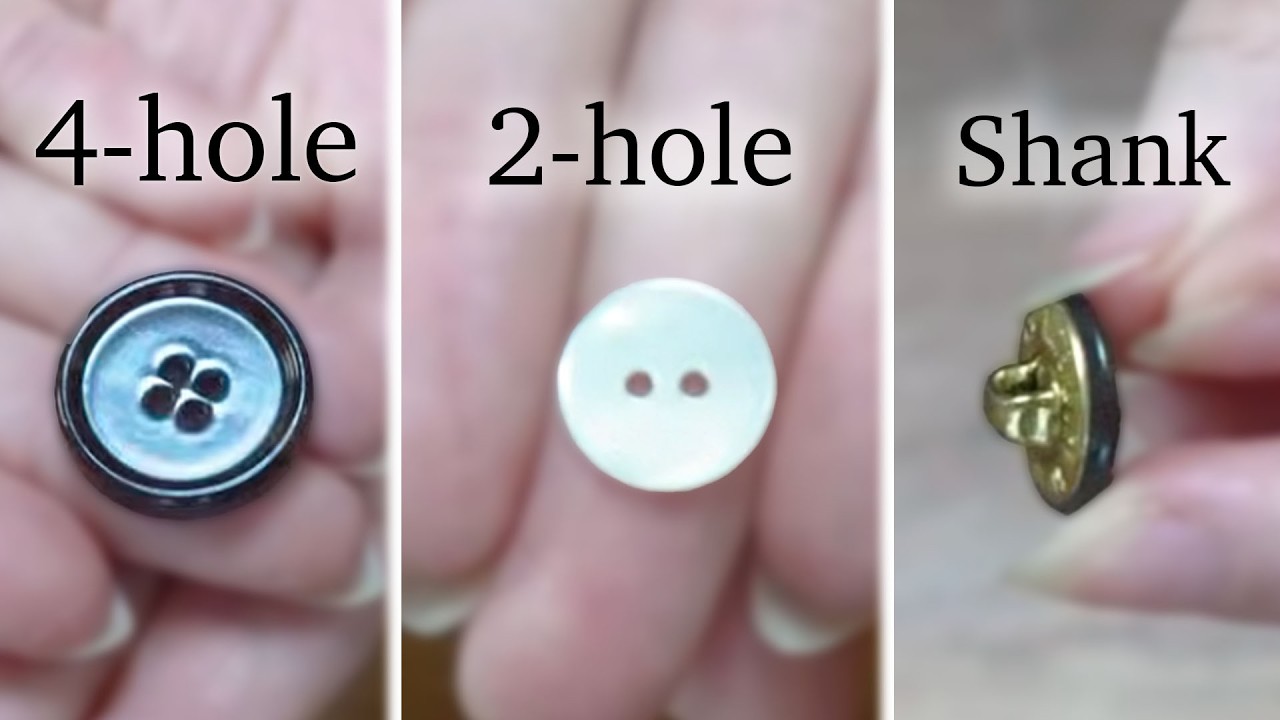
The sewing on of a button is probably one of the easiest sewing tasks you can do. In fact, I would hardly even classify it as a sewing task. It is literally you are stringing a piece of plastic or metal or wood or horn or bone or whatever it is onto a piece of cloth. So, absolutely do not be put off or daunted. This is a very simple fixed task that absolutely anyone can do. So, the first thing you'll need to do is to gather some tools. A needle first of all is going to be your first priority. Any needle will do for this purpose. You don't have to worry about size or thickness. I know there are many different needle options there, but whatever you have access to is going to be perfectly fine for the situation as long as the thickness of the needle is slim enough to fit through the hole of the button. The next thing you will need is probably some scissors to cut your threads with. Again, any scissor will do. You don't have to have a little tiny pair of embroidery snips. You can literally just use any pair of kitchen scissors will be fine. The third thing you will need is some of thread. I would recommend using a silk buttonhole twist. This is thread that is very thick, very strong, and specifically made for sewing on buttons because buttons take a lot of strain. So, you want to have a thread that's nice and strong that will really be durable and will hold. If all you have access to is a standard hotel sewing kit type thing, you'll probably have just a standard sewing weight polyester thread, which is also perfectly usable and I will be demonstrating with this thinner thread today because you're probably more likely to be working with this one, but also because this one you only have to thread through once. There is one little extra step that you have to do for this one and I just want to make sure that you've got that down. The secret fourth thing that I would very highly recommend having is a thimble. This will just protect your fingers, especially if you're sewing through a fabric that is more hefty. It can be very difficult to get the needle through and it can be very painful. You should be able to put the thimble on your middle finger of your dominant sewing hand and be able to turn it upside down and the thimble will not come off. It is stuck on your finger. I also very highly recommend, I'm a huge proponent of leather thimbles. Uh you can very easily make these if you have just a scrap of leather. Just cut out two little semi circles and whip stitch them together all around and that will do wonders in protecting your fingers. If you're sewing on one singular button, you can probably get away with not using a thimble unless again, you're sewing through a very thick fabric. Buttons come in different sizes and widths and thicknesses, but the main differences that you will need to know for sewing on a button are the whole placements. We've got three very common types of button here. We've got the standard four-hole button here, a two-hole button here, and finally, you have a shank button, which is different because it doesn't have the holes in the top. It has a loop on the back that will allow you to attach the button to it that way. So, these starting tips go for any of the three button configurations. Step one, thread your needle. So, to sew on a button, you don't need a huge amount of thread. Quote unquote, good practice within sewing will say never cut a length of thread longer than your wrist to your forearm. It's up to you whether or not you follow that rule. I certainly do not always. But, the thing that you're going to do with this type of thread is we're going to double thread this. So, you want to make sure that however long you want your thread to be is double that. For the purpose of sewing on one button, we can absolutely get away with a thread about 8 in long doubled over, so about 16 in long. And that's very generous. We're going to have plenty of room to work with here. So, I'm going to just cut that thread. This thread is thin enough that it will go through on its own probably, but wetting the tip of the thread either by licking it or by running it under some water or just by stiffening it with a little bit of beeswax if you have any beeswax or just a candle, just running the tip of it through a bit of wax will help to stiffen that tip and just allow it to slide through a lot easier. There we go, straight through. And you want to pull it through and just match that end up with the other end here, so that you have one doubled piece of thread like that matching up at the other end. Perfect. You don't need any knots in your thread. Do your knots once you get into the fabric and it's a lot easier to do that way. So, we have got an example waistband here. First of all, we want to figure out where the button is going to be placed. If you're reattaching a button on to a garment that had a button and lost a button, you will probably already have an advantage because you will see a couple of pin pricks or some disturbed threads in the weave of the fabric where that button did once sit. So, you can just use that as your marker. If you don't have that, you just simply button up the rest of the garment. Say you've got a button here, and here. You just button up the rest of it and then if you've got a piece of chalk or a pencil so that you can just go through that buttonhole and mark where that button is going to sit. anything dusty that would very easily wipe off of your fabric, that's great. But, a tiny little pencil mark or a tiny little sharpie mark is going to get covered by the button. It's not really going to matter.
Segment 2 (05:00 - 10:00)
This waistband closely mimics the construction of a buttoned edge. You will notice that it is two layers of fabric. And the reason for that being is that buttons take a lot of strain, so that edge needs to be very sturdy. This gives us a really great surface to work on because it allows us to have really clean finishes. We can hide any stray threads within the folds of the fabric. We now want to take up our needle and our thread, flip the fabric over, so we're now working on the underside here. And just translating this button mark here, we want to be around here. This is where the button is going to sit. However, we don't want to start there. We want to start about an inch away. Let's say around here. We're going to put the needle in. We're not going all the way through to the other end. We're just trying to slide right in between those two layers of fabric. So, slide that needle in and have it come out roughly around where that button was going to start. So, remember we we've got our mark here. We want to come out around here. Bringing that needle back up just around there. And we're going to slide the needle through so that this tail, as you can see the tail is slowly starting to disappear until it just disappears into the fabric. This is why we've got about an inch of space here so that there's plenty of breathing room to slide around. If you're really nervous about this, you can leave a little bit of extra and just cut that off. That's fine. Now, we just want to take one little stitch. Again, we're not going all the way through the fabric. We're just catching a couple of threads on just the lining side, the inside of the garment. No needle coming through here. We're taking a little stitch just at the point where the thread is coming out. And pulling that through. Before we pull this loop all the way tight, we're going to bring the needle back around and effectively tie a knot. And bring that all the way down. And pull it nice and taut. So, this is a really nice strong way to anchor your thread. And it's also really neat looking because you don't have any stray threads floating around anywhere. You can do this again if you would prefer to have a really strong knot, which is something I would actually recommend for buttons because these again do take quite a lot of strain. So, we're going through one more time and just making a really nice hefty knot. So, it is now time to sew on the button. Herein is where you should find the time stamp to skip straight to the button that you are looking to try and sew on. So, let's say for example you are sewing on a four-hole button here. We want to lay the button right around where it's supposed to sit, right here. And then, simple enough, we just want to bring the needle up through the fabric so that it comes up through one of the holes. Now, the pattern in which you sew this button on is entirely up to you. If you want to have threads between the top and bottom hole, and just have two parallel lines here. That's great if you want to do horizontal lines, that's great. a little X shape, square, that's cool, too. It's all up to you. For the purposes of this demonstration, I'm going to just do a couple of vertical up and down, up and down. So, we've come up on the top of column one, and we are going to put the needle back on the bottom of column one. And just pull that through. Now, here is where we need to do a little bit of a trick. We don't want to pull it super tight and flat here, because then we have the button sitting right flush against the fabric, and that is a problem because something has to sit underneath this button. So, we want to leave just a little bit of space, and you can find out exactly how much space you need by looking at the other half of the garment. So, we just want to be sure that this is going to sit underneath here, and that's going to be nice and comfortable. Say a quarter of an inch of space there. You can even put your finger in there if you want to just balance that nice and carefully. And then, exactly the same thing. You put your needle back through the back of the fabric, have it come up in the top hole, down on the bottom hole. And you've now gone through twice, so you've got nice you have a fair bit of thickness there. And this is again why we want to double the thread if you're using a thinner thread, because otherwise you're just going to have to keep going through and through, like eight to 10 times, which is just exhausting. I would like to go through usually about three times. So, we'll do one more just to make sure things are nice and super strong. And now we cross over to the other side. So, we're going to come back in through this back, but we're going to come up through the top of column two. We're going to come up. And we're going to go down. And then we come up. And then you go back down. And you just do this again two or three Now, we've done this two times. I've come up a third time. But here's what I'm going to do now. I'm going to go back down, but I'm not going through the fabric. I'm just bringing
Segment 3 (10:00 - 15:00)
the needle out the side of the button. This is going to be a very important step because right now we've just got a bunch of threads hanging on the back. And this is a step that not a whole lot of again fast fashion companies will do when they're making your clothing. And this is something that makes your buttons really nice and strong. But you're going to take this tail and you're just going to wrap it nice and tight. This is wrapping a post on the underside of the thread here. Just so that button again stands away from the fabric nicely, but also so that post stays nice and strong. So we're going to go around. I want to do this maybe four or five times. Once I'm satisfied with that, just getting that needle under there. Doesn't have to be exact or pretty, but just bringing that needle back down to the back side of the fabric. This can be anywhere on the back of the button. Doesn't matter. And now you've got your button very nice and securely attached. You can really pull on this and nothing's going to happen to this. But we've got to finish off our thread. So we're going to do exactly the same thing. We're just going to take up a little bit of the fabric. So you bring it through. And we're going to do our same little double knot or single knot if you're working with a very delicate fabric. Once. And then twice. And then I'm inserting that needle once again just into this lining layer. And we're just going to travel the needle about an inch or so away from where we've been sewing the button. Turn it over just to make sure the needle's not showing through here and that thread's not going to show through. Have it come out an inch or so away. And we can cut this thread right down to the surface of the fabric. And now we've got a beautiful, strong, sewn-on button. It's absolutely not going anywhere. No threads on the back. This is going to last you a good long time. For the two-hole button, this is actually going to be slightly easier than the four-hole button. Just as we've started off our thread in the previous step, let's say we've decided that we want the button to sit right here. We're going to bring the thread, needle and thread, up through that one hole. It doesn't matter which way you do this, if you want to start on one hole or the other. And we're going to bring it down through the other hole. Now, before we quite lock this thread into the surface of the button, we don't want to have this button sit really flush against the surface of the fabric because we have to have some space for something to fit in here. And we can figure out how much space we want to leave by taking the other half of the garment. This is sort of a medium-weight tweed here, so we will need a fair bit of space in the back. You could even put the button through the buttonhole at this point and just see how it goes. You don't want to have it so tight that it starts to dimple into the fabric, but just loose enough that it sits comfortably and doesn't want to slide around too much. This is probably going to be a good width here. I like to just slide my finger under there to just gauge that amount of space, so that I don't accidentally pull this button too close to the fabric. And then once again, we're just going to go through the back, come up through the first hole, down through the second hole. And I'm going to do this about three times, making sure that button is hovering away appropriately. We're coming up a third time through this first hole. Sometimes it might take you a little bit of poking around, but that's perfectly normal. You want to, when you're putting your needle through, be sure that you're trying to go through the same entrance and exit holes each time, otherwise your stitches may end up all over the place, and it's going to start to pull the button in all sorts of ways. But we're coming back up a third time through this, and we're going back down a third time through the second hole, but we're not going to go through the fabric this time. We're going to come out the other side of the button, not going through the fabric. Just to bring the needle out, have it experience some freedom on the upper layer here. And while we have this out, we're going to wrap the thread a couple of times, probably about four or five times. 1 2 3 4. What this is doing is this is creating a post on the underside of the buttonhole. These two threads were separated here and here, and we're just binding them together very tightly in a very strong post to have it stand a little bit away from the fabric. This will really help to improve the strength of your button. So, once you've done that a couple times, you can just reinsert the needle back around the base of the button, back out to the underside of the fabric. And at this point you can pull it nice and tight because that post is locked in there. So, to tie off the button, we're just going to retrace our steps from the beginning. So, we're going to take a little bite of fabric here, where we started, pull it a little ways
Segment 4 (15:00 - 19:00)
through, but before we pull it all the way through, take that loop and tie a knot. We're going to do this twice. Again, if you're working with a suitably thick fabric, if you only want to do one knot, that's also cool, too. Have it go through twice. And then, once again, we're just going to put the needle through just this inner layer of fabric, and travel the needle an inch or so away. And have that come out way over here. So, once again, we're turning it over just to make sure that there's no bit of needle showing through and thus no thread is going to show through the front. Just going through, so the thread is being lost in between these two layers of fabric. No one will ever know it's there. You pull through and you can just cut this thread flush against the fabric and there you go. No threads, perfectly clean on the inside, nothing to catch, nothing to pull, but you have got this beautiful, very, very strong button tied on. Look, this isn't going anywhere. So, if you've got a shank button, you're in much luck because this is the easiest form of button to sew on. Once you have prepared the underside of your fabric, you've anchored your thread, we're lining up the shank of the button right on that chalk line to make sure it's going to be perfectly where it needs to be. Hold that in place as best you can. And all you have to do is come up through one side, thread the needle onto the shank, can pull that through. Once again, make sure the shank is lining up neatly with the chalk line and put the needle back down through the fabric. Now, because we have the shank already built into the button itself, you shouldn't need to sew on any posts unless you're working with a really, really thick fabric, you should just be able to pull this thread so that the shank of the button sits flush against the fabric. Now, you can actually simplify this step a bit by sort of bending your fabric around the shank here and that way you can just stick your needle straight through so that it goes through the shank, back out the other side and pull it through. So, you've got a nice, sturdy button. I would do this about three times. You want to make sure that there's enough threadage on the bottom of the shank so that it's not going to slide around too much, which might mean that you want to put it through a couple more times. Let's do a fourth time just for good measure. And there you have it. Nice, strong shank button attached. Now, to finish this off, we're just going to retrace our steps in the same way as how we attached the thread to begin with. So, right where the thread is exiting from the fabric here, we're just going to take a little bite of the fabric and just pull it through that loop so that we're tying a knot. And if you're doing a double knot, just do that again. And then we're going to put the needle back through just this inner layer of fabric and travel about an inch away from our starting point. So, flip it over just to make sure that there's no needle coming through and we're just going to pull this needle all the way out. And we can just cut this thread right next to the fabric. And there we go. We've got no threads, no loose threads. Looks nice and neat and we've got a nice strong button attached to the front. That's not going anywhere. So, there you have it. There is how to sew on all three of these different types of buttons. If you would like to learn some more sewing tips, do feel free to subscribe. I make entire garments on this channel using both hand sewing methods as well as historical machinery, the ways in which clothing was made to last throughout history. I've also written a book entirely explaining step-by-step how to do each one of these hand stitches, buttons, of course, as well as how to make buttonholes, any stitch that will help you make garments that last a lifetime. I wish you all the best of luck with your future wardrobe self-sufficiency goals. Or if you're making entire garments, well, that is the most self-sufficient you can be. Good luck.