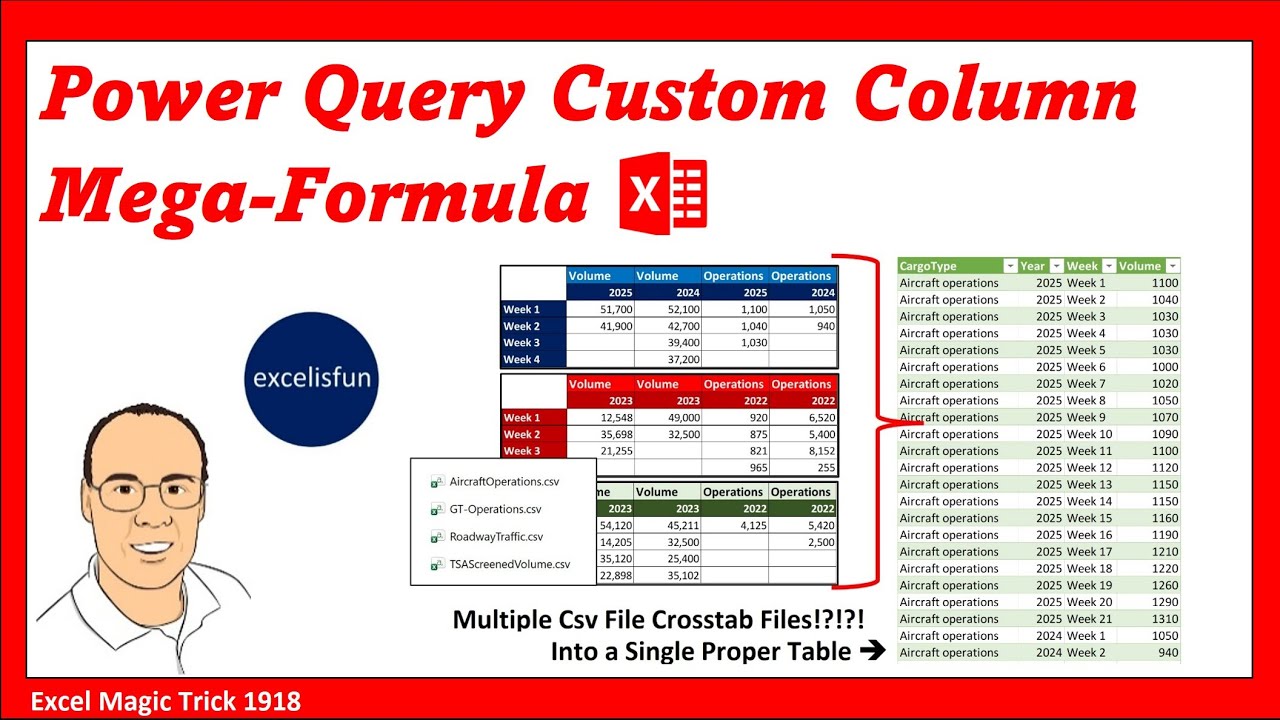
Welcome to Excel magic trick 1918, 1917, and 1919. Yes, in all three, including last video, we're going to take multiple CSV files that are cross tabs and we're going to convert all of them, including any we might add later, into a proper table. Now, last video we saw how to create a custom function. Next video we'll do the same thing but with a parameter. But in this video I got to show you my favorite way to do this. Build the solution all in a mega formula in a custom column. Now an advanced power query M code video like this. Well it means you got to know M code. And if you want to learn M code from beginning to advance, hey, I wrote a book, The Transformative Magic of Mode in Power Query, Excel and PowerBI, here are the links to buy them. They're also below the video. And as we'll see in this video, building a custom column. There's lots of great examples in this book of how to do that. Now, we covered the trouble with a crosstab table as a method to store data in the last couple videos, but in the comments, the commenter said, "Hey, this isn't bad data. This is perfectly good data as an output. This is good, easy to read. But if you want to sort these numbers or make a pivot table, bam, you need all the numbers in a column so you can sort and this table structure is required if you want to use the pivot table tool. " Now, we already covered this, but in essence, the first row of the cross tab has to be converted into four records. Each of the column variables in the row variable for each number. So, that 1,50 has the year, cargo type, and week. All right. On the goal sheet, here's the goal. We have four CSV files, separated values. Here's a preview of the four cross tabs we'll start with. We need to get them into a proper table. Looking in Windows Explorer, that's the folder you can download. It's zipped, so you got to unzip it. But then inside, these are the two files we'll add later. We'll point Power Query to that second Seattle airport cargo data folder. And Power Query with the amazing from folder feature, we'll import everything in the folder. To import the CSV files, we go to data, get and transform data, get data, drop-down from file, from folder. We point to the folder with the four files. Click open. Here's a preview. We don't want combine or load. We want transform data. When I click it, opens up the power query editor. On the left, I have a bunch of answer queries in here. I'm going to collapse. Select the query. F2. We got to rename this. That's what I'm going to name it. You can name it what you'd like. Now, we can close this. Now, we have the content column and in each row, we have a CSV file. And what we're going to do is we're going to go to add column, custom column, and we're going to build all the steps in a single column. Now, we'll do this step by step so we can see how each function we're nesting is transforming the data into a proper table. Not only that, but we don't need to get rid of all of these columns because at the end we'll have a new column filled with tables and we'll look up the single table, thus leaving behind all the others. All right, so add column custom column. We'll name the column get transform CSVT files. Now the first function we're going to nest well it's CSV document. It can get the data from a CSV file. CSV. I see it there. Tab. Open parentheses. Now, by default, CSV. doccument assumes the delimiter that separates the bits of data is a comma. So, all we have to do is put source. I'm going to doubleclick the content column. Now, there's other arguments in CSV like how many columns and what the delimiter is, but we want all the columns. We already have the delimiter by default. So, that's it. When I click okay, we get a new column. Now, we don't click on table. We don't want to extract the table. We click off to the side. And there's our preview. Sure enough, up in the formula bar, table add column source. It's acting on the previous step, there's the name we gave to the new column. And for each row, CSV. doccument document actually goes over to content, takes each one of the CSV files and brings it into the column or converts it from that commaepparated
Segment 2 (05:00 - 10:00)
form into an actual cross tab table with default column names column 1 2 3 and so on. Now the next step is to take the first two rows which have two variables and transpose the table. So those variables are in columns. Now, we could go over, click the gear icon, and edit up in the dialogue box, but lots of times it's just as easy to edit up in the formula bar. Now, I'm going to click after each, type a space, and then tablet transpose. And if you want to accept the function table. transpose from the drop down with the tab key, don't type capitals or periods. If you do, IntelliSense doesn't work. So, we hit tab. Now, table. transpose needs a table. We're giving it a table. We click at the end, close parentheses, then click the check mark or hit enter. Now, if we click off to the side, there's our transpose table with both variables in their own column. For the next step, we need to take the first row and promote to header in the formula bar after each space table promote headers. I see it there. tab open parentheses delete all we need is a table. So we have that close enter. Now if we get our preview we have promoted headers. Now we need to rename these two columns. So I come up to the formula bar after each table rename. There it is. Tab open parentheses. Delete. Now we do want to come to the end backspace comma to bring up the screen tip and it says renames as list. We're actually allowed to rename multiple columns. For each column we have to give it the old name and the new name. So that means we use the M code syntax list within a list. Now curly bracket means a list. But for each item in these curly brackets I need two elements old name and new name. So that's where you use list within a list. Actually open curly the old name is double quote that was a blank comma. The new name is cargo type and double quote n curly on the first interior list. Now, comma, the next list old name underscore1 in quotes, comma, and we want year close curly close curly. So, we have list within a list. That's what we need in that argument. Now, we close on table. reame columns. Close on table. addc column. Click the check mark. And bam, there are the renamed columns. All right. So the next step, we're going to take these two columns and from these two columns, unpivot other columns. That means the variable week will be in a single column and all the numbers also. So after each and I want unpivot other columns. Tab open parentheses. Delete. Now let's click at the end backspace comma. We need to tell it which two columns to pivot from. And this is just a list. So just curly bracket quotes cargo type and then comma year. Hopefully I spelled everything right. All right. And then comma these two arguments are what the two columns should be. Name and it tells you it has to be text. So the first column will be weak and then comma volume end quote and then we close on table. mppivot other columns close on table add columns check mark and look at that our formula is transforming that cross tab CSV into a proper table. Now we still have two more steps. We need to remove the blanks from the volume column. So we'll come up after each space and the function is table select rows. Tab open parentheses. Delete. Now it needs a table and then a condition as a function that works in each row. So I come to the end backspace comma. There's the condition as function. I put each. That's the keyword that allows us to type a formula that'll work in each row for table add column space and it's the volume column and we use our field access operators square brackets volume
Segment 3 (10:00 - 15:00)
and we need the not operator less than greater than and then double quote that's the syntax for an empty cell from a CSV file or as the user interface calls it a blank close parentheses check mark and look at that it's polite I forgot the close on table add column close enter and now let's check this out sure enough the blanks are gone now we need one last step and that is to add data types now I got to show you a great trick I sometimes forget all the code for data types but I'm going to select a column and I'm going to add an extra step and just look at the M code. So I'll click the data type icon and the one I always forget is whole number when I click well there's the function and actually you can use this trick for any of the steps that we've used when you're creating your own M code. We're definitely going to need table. transform column types. There's the table from the previous step. Oh, it's just a list within a list. column name, data type, and if we add a second data type to a second column. Let's add text. So there it is, a list within a list. We have to create in our formula four sublists each with a column name and the column type. Now we can X this out. Actually, I'm going to cheat. I'm a bad typer. Copy. Escape. We'll X this out with the last step selected up in the formula bar after each type a space controllv delete and then at the end backspace comma this is where we create the list within a list. So, open curly, that's the outer list. Open curly for the first column. Cargo type in double quotes. I better remember the O, comma, and then type text close curly, comma, and the second inner list year, comma, and it's in 64. And sure enough, I see it right there. Tab. All right, I'll hit pause and then create the next two columns and data types. And there's the finished list within a list. Four columns with four data types. Now we come to the end. Close parenthesy on table. transform column types. Close on table. addc column. Check mark or enter. Scroll over. And sure enough, there are the completed finished tables in each row of this column. Now, just like last video, we're going to need to look this column up, return it as a list, and put it in table. combine. I'm going to select the field name F2 to put it in edit mode. Copy. Escape. We're going to add a new step. That's the previous step, which is a table. And how do we look up a column from a table? We use field access operators. Square brackets. CtrlV. The name of the column and that lookup syntax. Enter. looks up the column, returns it as a list, which is perfect for table combine. Tab, open parentheses, and sure enough, it's asking for a list of tables. That's what we're going to give it. Close. Enter. And there's our finished table. All with a mega formula in an extra column. Creating each one of our tables with a single formula in a column. Now we can rename and then load close and load. Actually I'm just going to click the close and load too button because when I do it'll load it as a table to a new sheet. Now let's notice the query returned 1,38 rows. Here we are back in our Seattle airport data folder. Click shiftclick copy. Doubleclick controllv. Now because Power Query is pointing to that folder with the beautiful from folder feature. When we go back and refresh, it will incorporate all six files. Now we can refresh the query or table. Rightclick refresh. I see it loading over here. Sure enough, we got the new records. Now let's doubleclick and open up the query and look at our beautiful formula that we created. Oh, we need to refresh the view here in home. Click the check mark in home. Refresh preview. And sure enough, all six files and we can see the transform tables if we click in each row. All right, that was a lot of fun with building a mega nested function formula
Segment 4 (15:00 - 15:00)
and a custom column. Next video, we'll do the same task, but we'll build a custom function and see the big advantage of using a parameter. All right, we'll see you next Excel magic trick. —