Check out DollyONE v2: https://geni.us/sfBSs
This video was color graded with my Vintage Look 2 LUT Pack: https://danielschiffer.sellfy.store/
GEAR I USE FOR VIDEOS:
Sony A7C body only (Talking-head camera) on Amazon: https://geni.us/9cdDlHW
Sony A7Siii body only on Amazon: https://geni.us/B102
Sennheiser MKH416 shotgun microphone on Amazon: https://geni.us/Jbp5n
PolarPro Recon Matte box on Amazon: https://geni.us/9cLM
Zeiss Batis 25mm Lens on Amazon: https://geni.us/eyTtpy
Zeiss Batis 40mm Lens on Amazon: https://geni.us/WxvYp
Aputure 300D ii on Amazon: https://geni.us/UlLbD
Aputure Light Dome ii on Amazon: https://geni.us/f2LUR
________________________
Some of the links above are affiliate links, where I earn a small commission if you click on the link and purchase an item. You are not obligated to do so, but it does help fund these videos in hopes of bringing value to you!
For sponsorship, product reviews, and collaboration, you can email me here: daniel.i.schiffer@gmail.com
ig: @daniel.schiffer
________________________
________________________
Оглавление (2 сегментов)
Segment 1 (00:00 - 05:00)
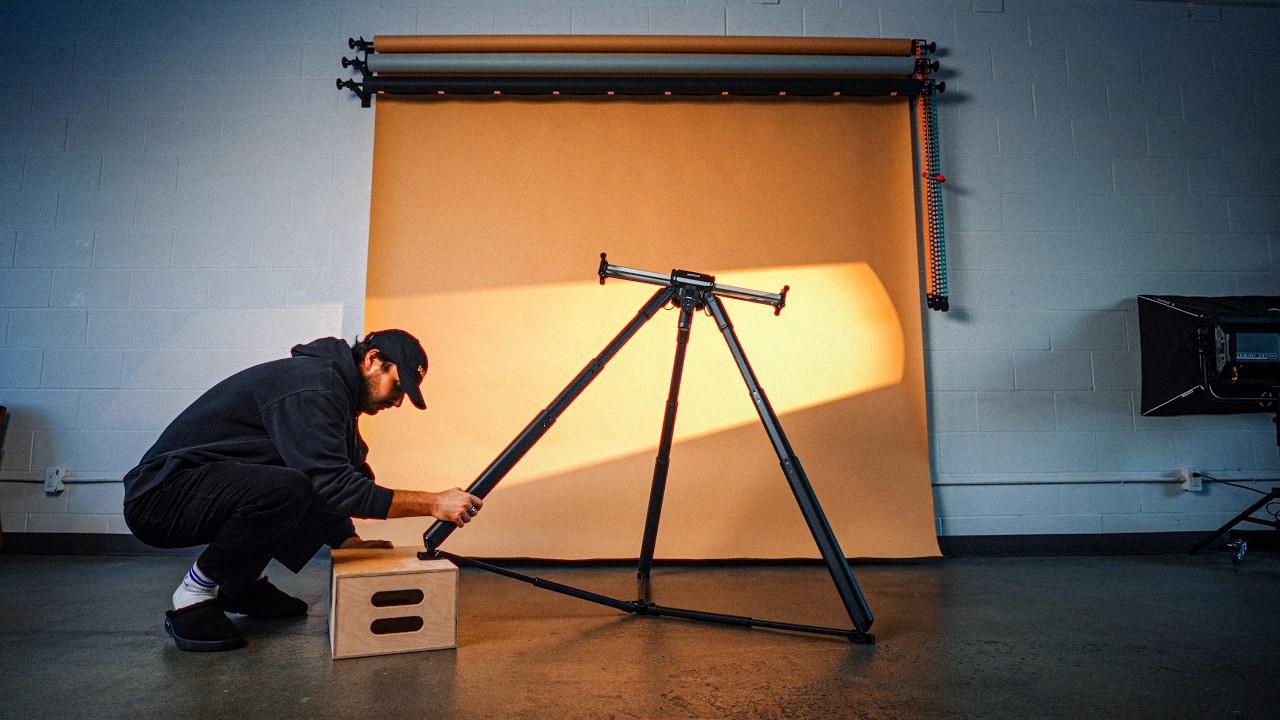
Filming content of yourself when you're by yourself can be challenging, but could this be the solution? This right here is the Dolly1 from Edelchone, and I got to say it is pretty cool. Dolly 1 is a fully motorized motion control system that converts your ordinary tripod into a camera dolly. Now, while this video is sponsored by Edelcrone and they did send me the Dolly one to try out, you should know that I am a genuine longtime user and a big fan of Edelchone products, many of which I have purchased myself over the years. But what exactly is the Dolly 1? Who is it for, and how does it work? The Dolly 1 is designed to be an ultra portable trackless dolly system, making it more versatile than a traditional dolly or camera slider. What do I mean by that? Well, a traditional dolly requires a track which comes with all kinds of limitations like the direction you can move the camera, the distance and most importantly, in my opinion, portability. Camera sliders, on the other hand, are also limited by a fixed length. So, if you ever wanted to capture a much longer keyframed movement that meanders freely through space, a traditional dolly or camera slider can't really do that. So, that is where the Dolly 1 comes in, and it is super easy to use. To get started, we'll unfold the leg in the back here, straightening it out, and then making sure that all of our tripod legs are the same length, we can place it directly on the dolly 1. We can now individually adjust the feet of the tripod, making sure they're sitting correctly. And using the provided Velcro straps, we can secure everything together. Next, we can attach our batteries and then fire up the Edelchone app on our smartphone. And then we'll connect to the Dolly 1. And just like that, we now have full control over the Dolly 1's movements. Now, as far as how we want to mount our camera to the tripod on the Dolly 1, we actually have a few options. You can, of course, use your regular tripod head, whether that be a ball head or a fluid head. If you already own a gimbal that can do any sort of object tracking, you can use that to get some really interesting shots. But if you wanted to take things a step further, you can pair the dolly one with a couple of Edelchone head ones. This way, we can also combine panning and tilting movements to our dolly shots. For me, where this tool really shines is for content creators who do a lot of self-filming, and I definitely fall into that category, whether it be on YouTube or short form videos. I do a ton of behind the scenes where I film myself creating commercials, and most of the time I don't have another person helping me shoot BTS. So, typically, I just leave my camera rolling on a tripod, which is totally fine. But for an entire behind-the-scenes video, it can get a little stale. So, naturally, one of the first things I ask myself is, what could my behind-the-scenes footage look like if I used something like this? So, I'm currently in free form mode, which means I can take the entire dolly 1 with my camera and move it over to a position. I can adjust the pan and tilt accordingly and set my first key frame. And then I can take the entire thing and again push it with my hand. Super intuitive all the way to the opposite side of the room where I will again take the pan and tilt and adjust and set our second key frame. From here I can click both key points on the Edelchone app. This will bring the entire dolly back to our starting point. As the camera is now back in its starting point, I will act out my action. And there you have it. In my humble opinion, this is a lot more interesting and engaging than just a static tripod shot. And that's not to say that every single clip in a video has to have camera movement, but mixing in those dynamic shots can increase the production value and also opens a lot of doors for shooting creatively. Here's another example where I can just be doing stuff around my studio and I have the dolly one on a loop going back and forth grabbing that BTS footage as if I had someone there filming me, even though I don't. In this case, I had the path set to line since all I needed was a straight line back and forth. Now, let's say you wanted to try something a little more complex. Maybe a much longer movement where instead of pointing the camera at a single target throughout the shot, we actually switch between multiple targets during the movement. Well, you can do exactly that with target. Yeah. So, for some reason, I kept calling it target mode. It's actually called point mode, but I already I just Yeah. Over at Dennis's studio, we had the idea to film a long continuous shot where the dolly one would make this big S shape
Segment 2 (05:00 - 09:00)
throughout the whole space. But rather than having the camera point at one thing the entire time, we use target mode to set two different targets. One being Dennis sitting on the sofa looking at the TV and the other being me standing at a workstation using my laptop. Whichever target is selected is where the camera will remain pointed no matter where the dolly and the camera is currently in its movement. In this case, we started with the camera pointed at Dennis on the sofa. And then halfway through the movement, I secretly switch targets from my phone so that the camera would whip around and point toward me for the second half of the shot. So, we've looked at linear movements and free form movements, but what if you want to use the dolly 1 to perform an arc? Well, an arc with the dolly 1 is actually very easy to set up, and I will show you how from my own POV. So, in our Edelchone app here, we're going to want to make sure that we select path and go to arc. And it's going to show us how we need to set up our camera. So, making sure our camera is pointed this way with the bottom of the dolly horizontal. And then we want to make sure that the camera is level, which it is. Once that looks good, we can hit done. And then it will ask us to position our dolly so that the camera is facing the center of the arc. So, I'm going to take the whole dolly here and move it like so. And you can see this leg here is pointing right to the center of where my arc is going to be. And we will adjust the camera accordingly. And then we hit done. And then we can move this to another position on our arc. And again, the leg and the camera are pointing right to the center of our arc. So we'll hit done. And you can see now that the app has adjusted our joystick for the dolly to just say arc. So it's one path where if we hold it down, you'll see our dolly goes back to the starting position. And just like with our other movements, we can preset key frames for our beginning and end poses, or we can just control the dolly manually, which I am doing now. And as you can see, it's very easy to set up a arcing shot with the dolly 1. And you can use this for products, you could use it for podcasts, interviews, any situation where an arcing movement might be useful. So, one of the things I wondered immediately, and I'm sure many of you are wondering, is how smooth a surface? How smooth does the floor need to be in order to use the Dolly1? And the answer is it kind of depends. At Dennis's studio, his floors are ultra smooth polished concrete. I didn't even have to turn on steady shot on my FX3 because of how smooth his floors were. But over here at my studio, on the other hand, my floors are not smooth at all. They're concrete, but it's sort of a nubbly, bumpy, textured concrete, which is obviously going to cause some level of jitter or shake. So, yes, here in my studio where the floors are really bumpy, I found that I got the best results with the Dolly 1 when I turned on active study shot on my camera and then combined that with some sort of stabilization in post. And that's just the reality and the trade-off of a trackless dolly. You get all that added portability and versatility, but floors are obviously imperfect surfaces which we don't have a ton of control over. So don't expect to use the Dolly1 on the beach or on a gravel path. Now the next question you might be wondering is it loud? And no, the Dolly 1 is actually surprisingly quiet. If your talent is talking into a microphone that's close to them or even a lavalier mic or a directional microphone, then you shouldn't hear the Dolly One in the background at all. And we're really just scratching the surface as far as what we can do with the Dolly1. I feel like this would be a ton of fun for music videos, real estate videos, short films, one takers, even commercial projects. Also, I forgot to mention that there's a time-lapse feature, so you can shoot moving hyperlapses, which again is really cool. And I'm sure you could think of all kinds of unique, creative ways to utilize that in your videos. You can think of the Dolly 1 as the newer and more affordable little brother to the already existing Dolly Plus, which has a higher carrying capacity and is compatible with other Edelchone products like their sliders, jibs, and Tripod X. Speaking of Tripod X, Edelchone has also just come out with their much faster Tripod X rapid. If you're not familiar with tripod X, it's a self-leveling motorized tripod and with a single click of a button, the tripod will adjust its height and level itself. For me, this is great when I'm in my studio because, let's say I'm using my camera slider, the tripod X will make sure that it's perfectly level, so I don't have to keep fighting with manually adjusting tripod legs every time I want to adjust the height. Even on the most uneven of surfaces, Tripod X will level itself out, which saves a lot of multitasking time while you're on a shoot, whether you're doing a lens swap or setting up a scene. I've enjoyed pairing the Tripod X Rapid with the Edelchone tripod wheels. And I just let my slider live on this setup since it's easy to move around and incredibly sturdy. But thank you so much for watching the video. I hope you enjoyed this quick overview of the Edelchone Dolly 1. If you want to check it out, you can of course go to the link in the description below. And I look forward to seeing you in the next