Build your own AI-Powered App with Nebius AI studio: https://bit.ly/skillleap-nebius
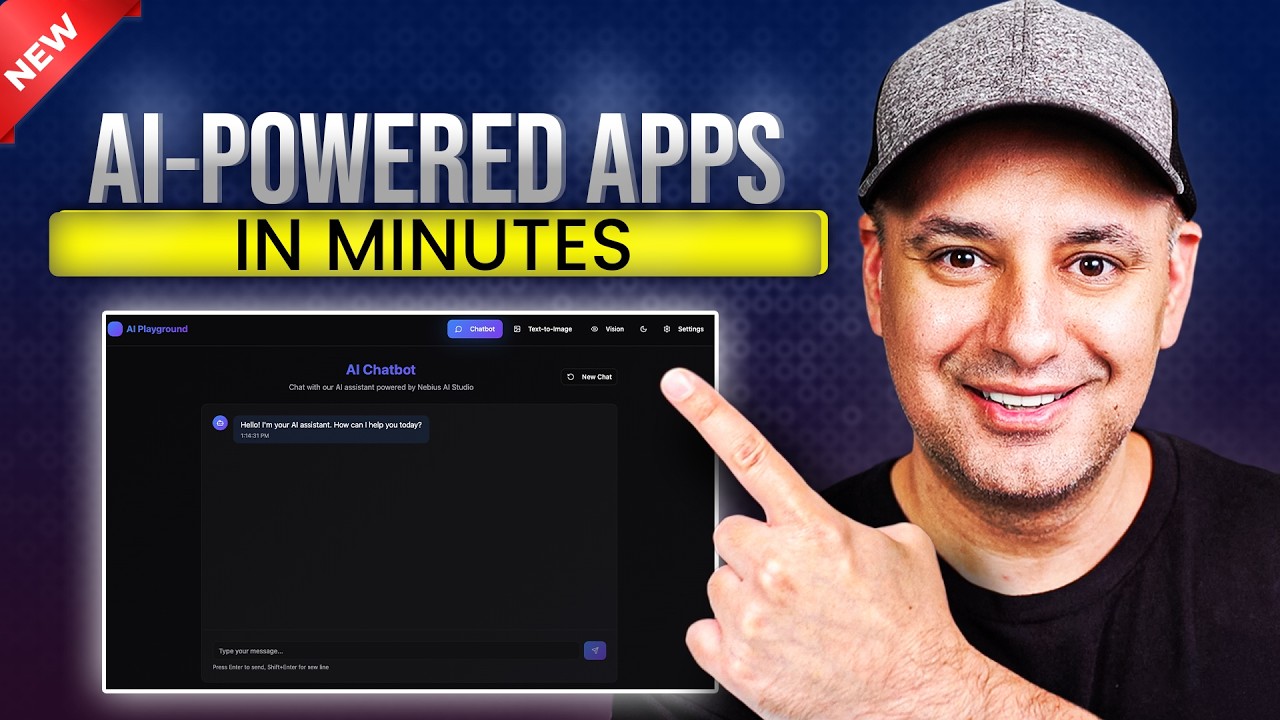
I go step by step to show how I built an AI-powered app using top open-source models. I made it super simple, even if you're not technical. This app has a chatbot, a text-to-image model, and a vision model that can look at images and describe them. Normally, building something like this would take weeks and a lot of coding, but I did it in under an hour using Nebius AI Studio and Lovable.
I show how to get your API key, keep it secure with a backend, and connect everything together using Lovable's chat tool. You’ll see how I test each part of the app—chat, image generation, and image analysis—and how I add a setup page to choose models and add system prompts.
This helps me build powerful AI tools fast without needing to worry about servers or writing a ton of code. If you’ve got an idea and want to launch it quickly, this is a great way to do it.
Learn how to use AI to grow your business with Skill Leap AI.
Access 20+ expert courses & community, free for 7 days: https://bit.ly/skill-leap
Оглавление (3 сегментов)
Segment 1 (00:00 - 05:00)
Building AI powered apps is getting easier, but it's still pretty technical and it could get pretty expensive. But in this video, I want to show you how to make an AI powered app using state-of-the-art open-source models. And I'm going to make this as non-technical as possible. Now, I'm going to build this app right here. And I actually build a very similar one that we are rolling out to our membership too using this exact same technique. Now, this is an AI playground where you get your own chatbot. You also get your own image model and you also get a vision AI model too where it could look at things like pictures and tell you what's inside. Now, building something like this could take weeks of setup. It could require a lot of coding, paying for infrastructure, but that's not really realistic, especially if you're just trying to launch an idea like what I'm trying to do here. Now, the reason I was able to do this in less than an hour instead of spending weeks on it is because of a platform called Nebius AI Studio, the sponsor of today's video. Now, what they've done is they basically took the best open-source models in the world and made them instantly usable. Now, I don't have to worry about servers or scaling. I just connect them here and I just focus on what my front-end experience needs to be, which I'll show you how to build to in this video. And the way you use it is super simple. This one is one of the best open source models. This is by OpenAI. So, I just simply go to the playground here. And over here, I could just type in a prompt just like any other chatbot and send this out to test this out. Now, I just need one API key, which I could get right over here in one click, and it will take advantage of all these AI models that I could use inside of my app. Now, okay, let's actually build this AI chatbot and playground that I showed you in the beginning. I'm going to use another app called Lovable to put all the pieces together, but everything powering it is going to be running on AI Studio. All I really have to do is drop a few blocks and connect them to AI Studio and then the whole app is going to come to life. So if you haven't used Lovable before, Lovable lets you type in a text prompt and it could build you an app. Now, it's not going to be an AI powered app. That's where AI Studio comes into play and we're going to tap into that to actually AI power it with the leading open source models which are going to be very, very easy to implement. But I'm going to type in this text prompt over here. It's going to build me an AI playground app with a simple menu. And I have three pieces that I want, right? I want the chatbot that's going to be easy to tap into some of those models that I mentioned in the beginning. Then we want text to image model. That's going to be another part of this app. And the third part is going to be a vision model. And I'm going to go ahead and send this out here inside of Lovable. Now Lovable is for the front end and what your app actually is going to look like. But you don't have to use Lovable if you know how to code. Obviously, you don't have to use Lovable. You can just build it on your own. And there are alternatives to Lovable, too. One of them is called Replet that actually has a very similar user interface, too. Now, I'm going to give Lovable a little bit of time here. Usually, in a couple minutes, depending on how complex your prompt is, it's going to give you the first version, and then I'll show you some things that you need to actually tweak to get this working in the background. Okay. So, in about a minute, Lovable made this app for us. So, we have a chatbot. We have a textto image model over here where you could generate images from a text prompt and we have our vision model over here. So exactly what I asked for with that pretty simple prompt. Now this is where the key part is. We need to tap into AI studio to AI power this app because right now this is not going to work and it's not going to be AI powered. But in order to do that and if you're not technical this part's important. Usually when you build apps you have a front end. This is what everybody gets to see. And then you have a back end where people don't get to see. Right on the back end, you usually want to store things that are secret. In this case, we're going to get an API key from AI Studio. Now, the thing is I'm going to connect this to all those AI models with just one single key. So, let me show you how to get that first. All you have to do is when you go to AI Studio, I'm just going to click on get API key over here. And I could name my key. So this is gonna be my new AI playground. And I'm going to create that key. Now with API keys, you do want to keep these secret. And that's why you need a backend to hide it. Otherwise, if you have a front-end website, anybody could rightclick and look at the code on the website and see your API key. So if you're not technical, you just have to understand it that way. Hide your API key. In order to hide it, you just need a backend for it. And I'm going to show you exactly how to do that in Lovable in a second. I'm going to copy this right here. Now, inside of Lovable, they have something called Superbase over here. Right here. So, we need to connect it. That's going to give us a back end where we could add our API key. And on the left side of Lovable, you could actually ask it to do this with chat as well and set it up. Right now, I'm going to go ahead and click this. And I'm going to connect that right here first. And I'm going to go ahead and connect it to a project. And I'll go ahead and create a new project from here. Okay. Now, the project is set up. And this is going to
Segment 2 (05:00 - 10:00)
look very technical. So, we're not going to dive into this at all. I'm going to use lovable here and do this all with chat and lovable here. I've already connected superbase. So, I'm going to tell it I've connected it. And another thing you could do with lovable, you could turn on this chat. So, if you don't have this chat, it will just do what you're asking it to do right then. If you have a chat, it will come up with a plan. So, I'm going to ask it to actually add our API to our superbase back end. Okay. Now, Lovable actually gave us a super detailed plan over here. All these different steps on adding different chat models, image models. Again, all from AI Studio. So, now all I have to do is say implement the plan. Again, as long as I have chat turned on, I'm not giving it a task. I'm asking it to come up with a plan and then I press implement plan. Okay, so it took couple more minutes. So, it's telling me that my API key is secure in the back end. So, it says never exposed to the front end. This is a security thing that you do have to understand to make sure that is hidden from public view. And it's telling me that everything is ready to test. So now I have a chat model that is powered by open AI's open-source model is called GPTOSS 12B. This is a fantastic model. If you're used to chat GPT that uses ChatGpt version 5, this is going to be very close to that as far as performance and is far cheaper than that. That's why we're using open source models to keep the cost down. It's going to use Flux. This is the image model that's going to help us generate text to image over here. And then we also have analyze images with a vision model too. Okay, let's go ahead and test this out in full screen and then I'll show you how to add little features here. For example, this doesn't have an easy way to start a new chat. So, I'm going to go ahead and add that. But right now, I'm going to ask, "Help me draft an email. What information do you need from me? " and it's using a thinking model because that is the model we chose. That was the OpenAI model. So, it's going to give me right here exactly what it needs for me to draft a question. Now, if you don't like the format, you could fix that with what's called a system prompt. So, we're going to go ahead and add that too in our background. So, it's going to have a very clear set of instructions on how we want these answers to be formatted. But, it is working. It is using a reasoning model here, a thinking model, and it's giving us the answer very, very quickly. Okay, let's test our text to image model. I have a text prompt here for a littlekin on a kitchen counter. Generate that image. And I'm just going to show you in real time here, so you see the speed of it. Yeah, that was pretty fast. You could download it directly from here, too. And our vision model. Let's go ahead and analyze this image over here. Yep, that's exactly the description we want out of that model. So, couple more things we're going to tweak here. Let's go back to the chat. Okay, here's my follow-up prompt. I'm going to create another page. So, so far, if you click over here, we only have one page in Lovable, which is what everyone's going to be able to use as soon as we share the link, which I'll show you. But we want to add another page. I'm going to call that page a setup page where we could choose our models without having any discussion with chat. It's really easy to do that from AI Studio. You copy and paste just a name of the model and then you put it in the lovable here which I'll show you. And then I asked it to also change the chatbot to format things a little bit better with a system prompt. So this is now going to add a section where we could add a system prompt. System prompt is something that the user doesn't get to see but something that controls the chatbot. If you ever use chat GPT custom GPTs for example, they have a system prompt. you get to define how that chatbot is going to behave. So now if I go up here, I have another page called setup page. So if I go to the setup page, this is what I get to set up in the background. I have a system prompt. This is going to be my system instruction. And it says you are a helpful AI assistant. Always respond in plate text without any markdown, which were those little stars that you saw in my first response. And I also get to choose the model right here that are very, very easy. And again, this got pulled in from AI Studio directly just from that one API key. I could switch these at any time, and I just need to save it every time I make a change. So, this is a great way to do this. And I could do this for other AI models, too. So, if you go back to AI Studio, you could copy any model you want and tell Lovable to use exactly that model. That's why in the beginning of the video, I showed you the playground. So, you could practice with the model here to see if you like the reply. You could test out different system prompts over here and see exact replies and then decide, hey, this is the model I want to use. I'm going to copy that link. I'm going to tell Lovable to use it. Okay, let's go ahead and test out this prompt. I'm going to ask it for 120word description of this product we have called AI Playground. Okay, perfect. This fixed all the issues that we had in our very first chat. And again, I did that with a new setup page with a system
Segment 3 (10:00 - 12:00)
prompt added to the front end of our website here. Okay. Next, I'm going to ask it to add something. So, we could actually be able to create new chats with a new chat option. And I'm going to ask it to create a light mode version of this. So, we could switch between dark mode and light mode in one click. Okay, so it's ready. Let's see. We have now a nice light mode. We also have this new chat option. So, every time after I start a chat, if I just press new chat, it will start a new chat. So, exactly what I wanted. I also decided to add settings over here. So anyone could go back here and change the model if they wanted to and change the system prompt. Obviously you could hide that if you don't want that and it won't have that. You could even add a login to that panel. So the setup panel could be an admin panel that requires a different password for example and that superbase backend that I showed you for hiding our API key. It could also do things like that and you could get all of that done in chat. So now we pretty much have a working app and to publish this you have to just press publish right on top and publish it right over here. I usually recommend especially when you use API keys do the review security option and it will check for any issues before you publish it and it will give you solutions and it will fix those things for you. So do this first and then you publish it and it will become a link like this and you could share the link with anyone. And if you really want to put this out there, you could also add your own custom domain over here and buy any domain you want and connect it to this and then it's ready to go from there too with your own custom domain instead of this lovable one. So, we got ourselves an AI playground with a chatbot with top-of-the-line open source textto image model and we got ourselves a vision model where we could upload anything and they again they had other models here that I didn't even show you. So, you could really build this out with some follow-up prompts right inside of Lovable. If you ever get stuck when you're using apps like Lovable, just be patient with it and just tell it exactly what the problem is. You could share screenshots and it usually does a really good job solving the problem for you. Now, this is all powered by the best open- source AI models. And the thing that I really like is how fast I was able to put this all together using AI Studio. Now, something like this would probably take me way more time. I probably honestly wouldn't even try to tackle a project like this, but as you saw, it was pretty much plugandplay. So, if you're looking to build your own AI powered app, give Nebus AI Studio a try. I'll leave a link in the description with credits so you can use that right now as well. Thanks so much for watching and I will see you on the next