You might be wondering about the aspect ratio here. This isn't normal. This is being recorded on the same camera I recorded my first YouTube video on, a Canon GL1. And I made a lot more videos on that era, but most of them didn't wind up here on YouTube, like printer smashing. Back then, making videos for YouTube was a lot different. It was way better than the 90s when I had two VCRs and had to pause videapes to make cuts. But even though cameras went digital, they still used tape. There was a fancy solution for that back then, but it cost like a,000 bucks. It was called a memory recording unit. You plugged it into the FireWire port on your camera, or as Sony used to call it, EyeLink, and it would save DV footage straight to a compact flash card, similar to cameras today. So, for this video, I'm going to try to bring back the spirit of these early mini DV camera days using this, a FireWire hat for the Raspberry Pi. But before we get there, I think I have to relive a little of the experience that was early YouTube. You'd record videos on tape, then plug the camera into your computer, assuming you had one with enough horsepower to edit video. Then, you'd play back footage and wait for it to dump into the hard drive. Then using a fancy NLE or nonlinear editor, you could chop together video clips like an iMovie or in my case Final Cut Express. Now, the crazy thing is back in college when I made my first few videos, I couldn't afford any of this stuff. I used an older G4 model with barely enough hard drive space for one or two projects. And I didn't own this video camera. I had to borrow it. These things were expensive, almost $3,000 back then, which would be almost 6,000 today. But 20 years on, the complex tape mechanisms in these things are starting to break down. This one just barely works, and sometimes it'll just eject the tape without recording to it. So having a way to record externally, like with an MRU, would be huge. But even used, those things are still going for like 300 to 400 bucks because of like skateboard and retro video enthusiasts. So I'll build a custom MRU using all new parts. Besides the Raspberry Pi, the most important part is this Fire Hat from Computer Equipment Group. It lets you plug in any FireWire device to this port here and then you can use the simple controls on it to record video clips. This isn't the only DIY solution either. I first heard about FireWire on the Pi thanks to this project called OpenMru. They both rely on the open- source DV Grab software that runs on Linux. And if you want to build your own rig, like say if the Fire Hat isn't available, you can do that using the parts I link in the description, like this FireWire card with a PCI Express hat. Now, FireWire was basically Apple's baby. Even the iPod started shipping with it. They supported FireWire devices all the way up to the release of Mac OS Tahoe. But in a strange turn of events, Linux now actually supports one of Apple's standards better than Apple does. The current ITE 1394 maintainer for the Linux kernel committed to supporting FireWire until 2029. Before we get to the Fire Hat though, I'm going to see how the old tape workflow used to work. Then I'm going to see if we can replace that with a Raspberry Pi using FireWire. And finally, I'll edit some of this video on this old Mac to see if you can still make modern YouTube videos on a vintage setup. But first, if you want to build your own open MRU, did you know MicroEnter still sells FireWire cards? Yeah, I didn't either, but I thought I'd mention that and thank them for sponsoring my Merchintosh videos. It's crazy the things you'll find here. And if you're in the market for a monitor, this month is Monitor Madness with some great deals from $80 gaming monitors up to 4K and OLEDs. Click on the link in the description to see all their latest deals. And if you're in Austin, Texas, get ready for a grand opening later this year. Okay, so first things first, I'm going to record on this camera and see if I can even remember how all this stuff used to work. Okay, let's see if we can record to the tape. I'm going to hit my record button here. It says it's recording. Yeah, the light there is blinking. So, how does that look? Uh, I will zoom in. Yeah, we don't need to zoom in that much handheld here. The one thing that I remember now is like the tape mechanisms on these things were always loud. Like you might hear that on the internal microphone here over my voice. That's kind of how it was. You kind of had to live with that. And you can hear nowadays I use this wireless mic. Uh but even if I had a camera on my main camera over here, it wouldn't be picking up that body noise. And even if I'm zooming in and out, like I'll zoom in and zoom out. The zoom mechanism on here is not silent. It's pretty close. This was again a very good camera for its time, but technology has gotten so much better, not just with resolution and with the ability to move files quicker, but even the little things like not having a tape motor that's constantly running while it's recording. But one thing I kind of do miss from this era is the uh the zoom controls were so nice on these. Again, these were like professionalgrade
Segment 2 (05:00 - 10:00)
cameras or proumer cameras. So, they were better than most. But uh even on the Sony system that I have with my FX30 and all that, it doesn't feel as good as the uh zoom control you get with this. Like I'm going to zoom in on my little uh pies dispenser. And I don't know why it's not focusing. Oh, I'm on manual focus. How is that possible? What? It's like I'm going to zoom in on this little pies dispenser over here, my Raspberry Pi Pez dispenser. And uh the zoom control that you get with the speeds and how you can smoothly come in and out. It's really good. And I mean, you have to pay a lot of money for a camera that has that good of controls. Plus, these old cameras, they would all compete for how far you could zoom in. And this is without digital zoom. Um and yeah, it's pretty crazy. These lenses were pretty decent. Uh, and that's still something where like today if you want to buy a good lens, it's going to be thousands of dollars. Uh, and most people are not willing to spend that much. So, you're not going to get a lens even as good as the built-in one on this Canon. Even here in the studio, the sound is actually going to be a little bit better because the studio is treated much better. But, uh, you know, the microphone is not going to be able to compete with that tape noise. The other thing that's interesting is the dynamic range on these old sensors is a lot different. Like if I'm over here in the uh decently well lit area with all my lights, uh you can see there's even lens flare from the overhead light, but it can't really get like the deep blacks and the brighter surfaces that well compared to a modern camera that has like 14 stops of dynamic range. Again, this is not bad. Not bad at all. Like uh zooming in on the sticker board, the colors are good. The brightness is good. Um everything is good. And this is in auto uh aperture priority mode. But you know, as I go around and go into the dark areas, even that's not bad. But you can see there's a little more grain over there. Um and there's also it's weird. There's like a vertical shake. I have uh steady shot turned on. So I wonder if or I don't know what they call it, image stabilization. Image stabilizer. I have that turned on, but it seems to be doing a better job of stabilizing in the horizontal axis and not the vertical. Uh but yeah, that's uh another interesting thing to note using this uh far older camera. It's when I come over here, it's like I really want more uh I want more light. Whereas over here, it's not so sad about that. One last test. And even my Sony A7C has a little trouble here, mostly because I don't have a neutral density filter on it. This camera actually, it does decent with auto settings out here. Um there's the falafel Saha truck. Um, it does decent, but there's also a built-in ND filter. So, you just press a button on here. And, uh, that lets you use a wider aperture to give you better depth of field, even outdoors, without having to bring an extra lens filter with you. So, that's a cool thing that you get on these uh, fancier cameras that, you know, today you have to spend a lot of money or buy a lot of filters and carry them around with you if you want a feature like that. Okay, I think I have enough footage to start importing the project, assuming things work like I remember. I'm going to plug the camera into the FireWire port on the back of my G4 and launch Final Cut Express. Now, this machine is a G4 MD or mirrored drive door. So, named because of, well, that should be pretty obvious, but the nickname most people had for it was the wind tunnel. And these four vents on the bottom are a big reason why Apple had trouble keeping G4s cool. And that's why the G5 went to the giant cheese grater style just to get more air blowing through the system. With a lack of air intakes, the fans on my G4 make a lot of noise when it really gets going. Anyway, I remembered I had to open a capture window to get video off the camera. So far so good. And you have little playback controls here. But this is where my memories kind of fall short. I thought I could just click a button and Final Cut would play back the video and cut it up into individual clips. But I couldn't figure out how to do that. It might just be a limitation of Final Cut Express 2. So, I just captured the whole thing into one clip, and that worked. I wasn't about to go in and log a bunch of markers to do it for me, like I guess I used to a long time ago. But surprisingly, the GL1 kept up with all this playback, rewinding, and queuing up. And honestly though, I'm not really sure how long the tape mechanism will last. For old school DV editing, this G4 is surprisingly capable, at least using the SSD I installed in it. I don't think it'll handle 4K at all, but I was able to scrub through, add some transitions, and even add some blur. Though, when I did that, I was reminded how pampered we are nowadays. On my Mac Studio, I can add color correction, titles, multiple camera angles, and it'll play back in full 4K resolution without any stuttering. Back in the as everything had to be rendered, transitions, filters, anything you put on the timeline. And that meant sitting there waiting while the dual G4 CPUs in here would eat up 200 watts rendering out frames. I won't bore you with the final result of that little video edit, but I was going to try previewing it on my old Sony Broadcast CRT. Unfortunately, after
Segment 3 (10:00 - 15:00)
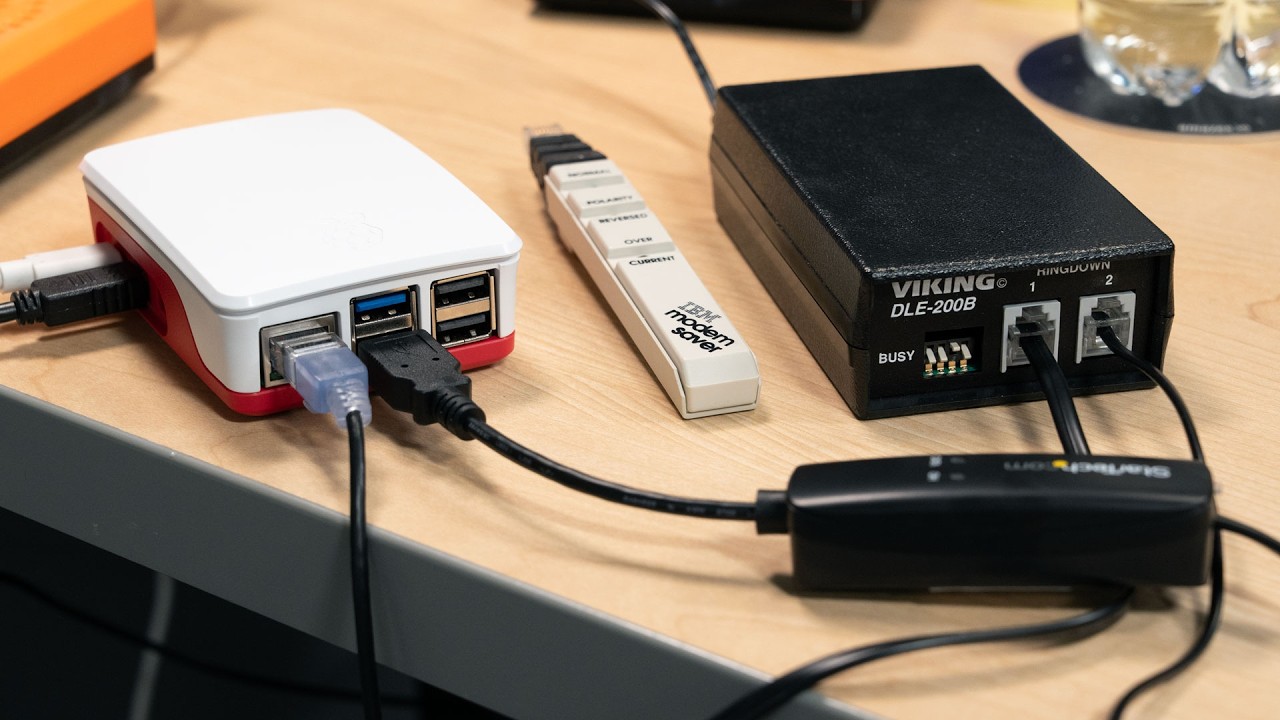
plugging it into my G5, I realized I have another project to add to my backlog. Fixing this dim display. But pros used to have an external preview monitor because even though fancy editing rings had flat panels, most people watching video would still be watching on an old tube CRT. So, you had to see how things looked on one of those. By the way, did you know that you can use old Apple keyboard cables for Svideo? Apparently ADB uses the same connector. But my nostalgia for these old cameras is much greater than my nostalgia for editing like it's 1999. So, let's fix the major issue. Let's get rid of the tape. These cameras do everything through FireWire. You can capture video off tape. You can even record from the computer to the tape. And most cameras even let you output live video right through FireWire, too. But like I said earlier, at least as far as Apple's concerned, this technology is dead. Which is a shame really because even up to Mac OS Sequoia, you could plug a FireWire cable into a modern Mac. Well, with a ton of dongles like this does not compute did here, but it would still work with full remote control through Final Cut Pro. That's wild. But now that Apple's killed it off, we still get a few more years of Linux support. But why did Apple support FireWire for 26 years? And besides retro enthusiasts, who's using FireWire at all these days? Well, there's still proAV gear that people bought over a decade ago that works just fine today. And especially for audio folks, they love their old gear. It was kind of crazy how much FireWire could do at the time it rolled out. 400 megabits and low latency might not seem like much today, but it was faster and better than USB, Ethernet, and pretty much any other consumer- grade interface at that time. Plus, it could provide power. And with FireWire 800, it was expanded even further. But USB took over the consumer market pretty quick after USB 2 and 3 came out, and especially without any licensing fees per port like Apple had. Firewire stuck around for a long time in the professional market, but eventually Thunderbolt took over as Apple started axing all their FireWire ports. But that's not really what I care about. I want to make this old GL1 useful again without relying on tape. So, when I saw this post about OpenMRU in the tapeless subreddit, I immediately bought the same FireWire card and PCI Express hat. I wanted to see if I could duct tape something together to replace tape on my camera. And I could. But while I was working on that project, I got an email from Twin CD mentioning a new FireWire hat, a little board that you strap right on top of your Pi. And not only that, it came with a UI and physical buttons to control recording and power. Now, the one I have here is a prototype, and the group making this thing is actually setting up a crowdfunding campaign. If I can get a link to it, I'll add it down in the description. But the hardware is only half the equation. Even though Linux supports it, I think the number of Raspberry Pi users using FireWire is pretty tiny. PIOS doesn't have the right kernel driver compiled in for it, so we'll have to do that ourselves. I'm not going to go through the whole process because I have a video doing just that on level 2J Jeff, but you have to recompile the PIOS kernel with these options and I posted all the instructions on my blog. But once that's done, you reboot your Pi and FireWire devices just work. I haven't tested everything, but you should be able to use hard drives, cameras, even AV gear, assuming it has Linux support. The first setup that I had was working, but it was pretty messy using it. This was the first recording I ever made with a GL1 on a Raspberry Pi. It's the first test recording with a Raspberry Pi FireWire through this GL2. But like I said, that setup was pretty messy and I had to run DV Grab commands over SSH to start and stop recordings. We should be able to clean things up with the Fire Hat. I was just starting to test it when my dad showed up. — And then we're capturing DV camera footage. — What? — Yeah. — DV camera like old school TV. — Yes. See, I can zoom in and zoom out. See how smooth that is? — Look at that. I can't see it any Oh, yeah. You can't see it at all. — I can see it. You see? Okay, now I can see. There's your eyeball. — Yep, my eyeball. There I am. — The Fire Hat software was originally written for the Radside Rock 2F. So, after changing a few settings, I got everything working on the Pi, including the little screen and buttons on the front. All right, now I'm recording without any tape using this Fire Hat. And the interface for it is awesome. So simple. You just press a button to record and stop. It shows you how many seconds, minutes, and hours you've been recording. I have a little battery indicator on here. And oh yeah, this is running on a battery. So I could strap this to the top of this camera if I wanted to. But yeah, this is the Fire Hat. And uh the interface is simply enough that I can go through it in a minute, but obviously I can't do that while I'm handholding the camera here. Uh but it's working well. It the Pi is running great. Uh not even getting that hot encoding the DV footage. I guess it's not even encoding anything. It's just writing the footage straight from the camera to the micro SD card here. And I've been testing this with the Pi Sugar 3 Plus, which has a 5,000 milliamp battery. And uh so far in my testing, you get 2 to four hours of record time um with the DV writing to the micro SD card. And I haven't tested recording straight over Wi-Fi to my NAS
Segment 4 (15:00 - 17:00)
but that's also a possibility on here. Uh but I'm going to stop recording on here and uh listen to the thing on the computer. And I'm guessing that the sound will be great compared to the tape footage earlier. I guess I'll play back a clip from that just for comparison. Right now, it's the first test recording with a Raspberry Pi FireWire through this uh GL2. And oh yeah, that's a huge difference. Uh much better. Anyway, my arm is getting tired, so I'm going to set this stuff down and we'll walk through the interface on here really quick. So, this is the interface. You have uh the screen has a little timer. It has a battery indicator that I coded up for this thing using Pi Sugar's little uh API. It has the time remaining for record time on the disc that's plugged into the Pi. And uh there's different modes. So there's three buttons here and a little beeper and a little LED. I don't think the LED is in use right now, but the beeper does uh work. If I press the button, you can go into power mode, so you can shut down and reboot the Pi. Uh network mode tells you the IP address of the device. Uh, storage mode tells you how much storage there is. And record mode records and uh I don't know if there's playback. Let's see. Oh, that's just going through the modes again. So, this is like up and down and then select. So, if I go to storage, there's no options there. network, uh, no options there. Power, you can press select and then you can shut down, reboot, or cancel. So, this interface is extremely simple for now, which is great. Honestly, it makes it very easy for even uh somebody who doesn't know how this stuff is supposed to work to pick it up pretty quickly. Uh but it defaults to this. And if I unplug my camera, which I'll do right now, it switches to no cam. So, this is all nice in real time. Then I'll plug the camera back in. Those little mini firewire ports are so annoying. Let's get you in there. There we go. Plug it back in. And there's our time code. Again, it's not real time code, I guess. It's just the time of the clip recording. Now, to finish off this video, I thought I'd do the conclusion on the GL1 recording it straight through the Fire Hat. Recording with a Fire Hat and a camcorder isn't as easy as modern camera workflows, but it's about as good as it gets with old DV cams. Step one, plug in the camera. Step two, hit record, and that's it. As Jeff Goldblum says. Step three. There's no step Once you're done recording, you can copy your DV clips over Wi-Fi. And that's actually better than the workflow I have on my modern Sony camera. So, I don't even need to use a card reader. Edit the clips together in your video editing app and boom, you're done. I'll leave links to everything in the description. And until next time, I'm Jeff Gearling.