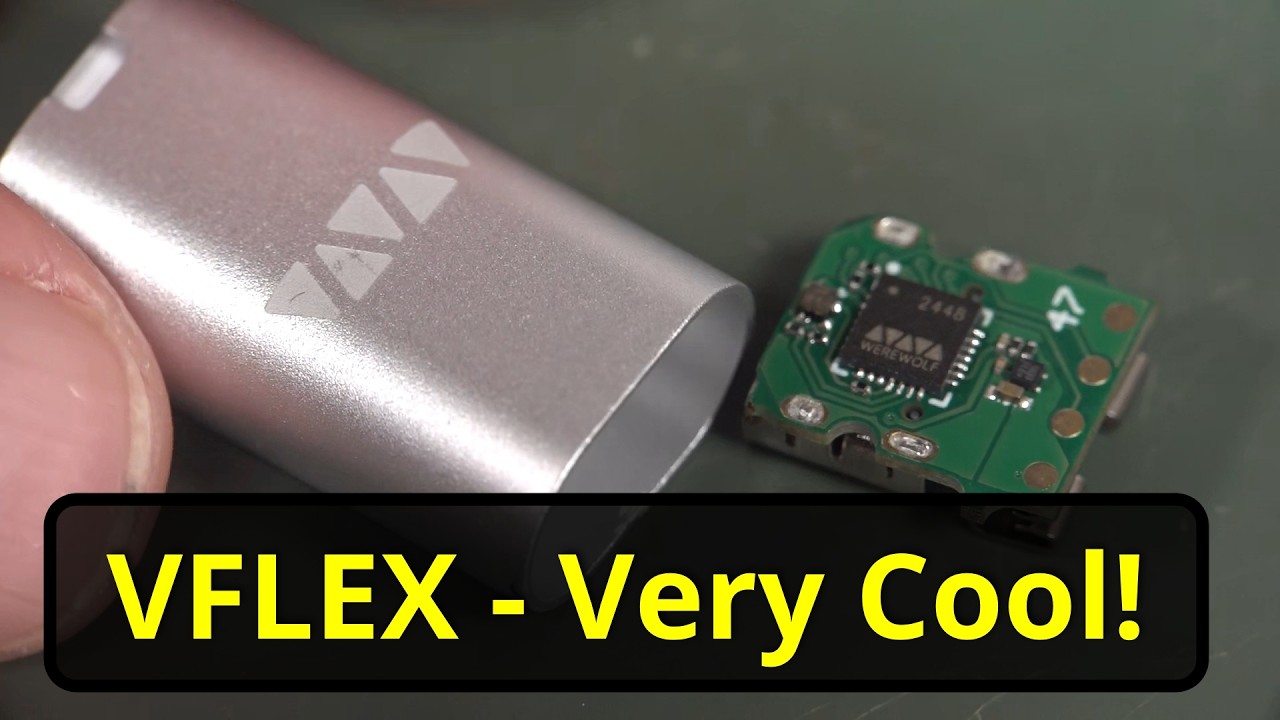
Hi, welcome to everyone's favorite segment, mailbag, where anyone, individuals or companies can send something into the mailbag and we open it up and we check it out. And yes, we've got the big knife. Let's go. Thank you very much. Uh Kelvin, not Kevin, Kelvin Wodkins from Retrotronics in Warsaw in Is that Indiana? In the United States of America. If you want to send something in, send into mailbag. Got to put mailbag on it. PO Box 7949, Norwest, New South Wales 2153, Australia, not Austria. So, let's have a squeeze what Kelvin has set in here. Uh, and an ID tag. What's an ID tag? I don't know. What do we got? We've got a Vestus P. A Oh, a retro chip tester. I designed my own chip tester back in the well would have been the early ' 90s or thereabouts. Um I'll see if I can include an old photo of it. Not sure if I have a photo, but I've got a screen shot of the um software which I wrote for it. Um, and it was like, as the name says, it was a chip tester that would test um, 74 or 4,000 series CMOS chips because back in the old days, you used to have to actually, you know, you couldn't just get them from your Digi Keys and your mouses and your whatnotss, your LCSC's and whatever. Couldn't just get them from eBay or something. So, you desoldered chips from boards and that's where you get like valuable chips from. I've even still got some. Check it out. A few of them fell out, but I've actually got some original chips. Oh, yeah. My the foam has seen better days. Oh, the foam's about to collapse. Um I need to upgrade my foam. But um yeah, some of these are like, you know, 1986. Got 1983 vintage there. 82 stuff like that. So, I still have some original chips. Uh that's double-sided, too. Oh, hang on. All right. Let's get rid of this. So, I'm just assuming that this is a similar thing. Um, anyway, let's have a look. Uh, we do have a note. I'll read that. Um, you can now test any retro integrated circuit you want. Hundreds of tests already included more, but yeah, it looks like, um, it's going to do similar. Oh, look at that. Whoa. Retro chip tester. We've got a flat flex interface there. Yes. So, there must be a board with a No, I don't see a Oh, yes. A zip socket. There it is. Um, and we've got a screen. Cool. Bananas. So, and a little stand here. Oh, this is pretty great. So, why would you still want something like this? Well, if you're into your retro chips and stuff, especially if they're like some custom gal or power logic or something like that you simply cannot buy anymore and you want to uh test them, you know, especially if you're into vintage gear, you don't want to replace it with a modern chip. You want like a, you know, a 1982 vintage um 74 LS, you know, 244 or something like that. Um but anyway, this is pretty cool. We got an ST STM32 there. Um, and proudly made in Indiana. There you go. The United States of America. And I'm guessing that is exactly the map of Indiana. Hell, Dave. Well, I wouldn't say this is hell. Um, my name is Kelvin. I just finished a project. Finished. Uh, it's a retro chip tester. Now, I know there's another chip tester out there that does a lot of chips. That came about one week after I came up with your idea. That being the case, I uh purposely never looked into the other system. And fair enough, I wouldn't want to look into the other system either. Um, I see that you technically can with that one, but not in the same way as mine. Mine comes with its own scripting system allows users to create files and share with them. I never get got that far to the scripting uh thing. Mine was like a gooey interface thing where you could like manually like input. Mine was more of like a visual guey system where you could uh you know feed in um you ones or zeros or whatever um or you know clock or whatever into um various uh pins and then watch the output in real time kind of thing. So uh yeah and it did have like a database as well. It's not a kit. I make them all uh from what I can see is a lot cheaper. As for the function you basically do anything you want. Need to run tests. You can see all the pins set addresses and all that sort of stuff. Cool bananas. Um, thank you very much, Kelvin. PS, I forgot these are available at Vitus Parts. Yep. On Oh, on eBay and Tindy and Retrotronics with a K. com and on Amazon. Jesus, everywhere. There's probably instructions on the uh website, but uh I assume that this fits in here like this. It's a bit how you doing. Um I don't see a way to screw it in. Uh, is that just is it? Yeah, that's designed to keep it in place. I'm not
Segment 2 (05:00 - 10:00)
sure what the deal is there. And then why doesn't that have a brace across there? I'm not entirely sure, but we do have a bag of standoffs instead. Um, that might work better perhaps. Or actually, looks like. Is that Yeah. Yeah, that's designed. Okay, so that's designed to go on there on standoffs. Yep. Yep, that makes more sense. And then the screen is Yep. And the screen goes there. Okay. So, I'll install the standoffs and get back to you. Oh, maybe this is just like a packing thing. Is it? Um, in that case, I don't know why you'd bother. Um, I just put it in a padded bag and Bob's your uncle. Slight assembly problem. Um, the ribbon cable needs to be folded up multiple times under there. Otherwise, the hole here for the screen um is going to come a gutter. So, oh film aficionados, here you go. Oo, beautiful. That does say 3M on there, but there's no way this is a genuine 3M text tool. Um because a it's the wrong color and b it doesn't have text tool on it. So, yeah, that's just a cheap ripoff. Oh, I wanted the genuine jobby, but it'll do. All right, let's power it on. Haven't read the instructions. No idea, but Oh, is there a switch? Uh oh. On. There it is. On. Oh, still nothing. Looks like there's a power lead there. Ber. Well, there you go. It did not like the USBC to USBC cable that I had. So it was maybe it was not negotiating anything. Um so yeah, that's a problem. Anyway, I've got a USBA to USBC now. And there you go. We're in Lake Flynn. Excellent. Now it just says button one, button two, button three. Um unless there's matching buttons. Whoa. It just reset Something just reset itself. Oh. Oh, there you go. Pre- ship. We can Okay, so that's select down. There's Oh, there's too much delay there. Like, I can't do that really quick. Uh, and well, info. Well, no. Um, the buttons need to tell you what does what. Boot zero. And yeah, we can hit reset. Firmware 1. 0. 0. So, chip select, type select, settings, US ah USB mode. Oh, that's USB interface mode. Is it okay? Is there some uh software to go with it? Chip select type select. What is Oh, there you go. So, that's down. That's enter. Um, DRAM SRAMM CPU 7400 series IO others. Neat. Let's do some say SRAM action. Oh, select letter. Oh jeez, that's a bit difficult on this uh on this keypad, isn't it? Oh, what? It's a 1. 0 user interface. All right, so we can't easily just bugger off. Oh, yeah, there we go. We got to go all the way back there. CPU. Uh, yeah. No, I don't think uh we needed to select from a list. Maybe the list isn't there. It's not programmed with the list. 7400 series. That's the list that we saw before, was it? Oh, this is a searchy dirty mode. Okay, so we'll ignore the um search by type. How do we get back? There we go. We'll just do the chip select now, shall we? There we go. Pre What's pre-ship? Pre-hip other pins 40. I like the uh graphical display there. That's pretty cool. All right, I'll see if I can find a matching chip. Whack it in there. Okay, I got a 74HC 393. Shouldn't matter that it's um LS. So, I assume pin number one is at the top, but anyway, let's see if we have a 393. It's fairly popular, so I'd assume it's in there. Come on. 373. Oh, come on. Okay, I've got a 74 HC74 1989 vintage. Thank you very much. Uh, and we've got that. Let's go for our 74, shall we? Oh, I missed that first one. Well, in info, there we go. Code size, code address. Uh, I don't see how that helps us, but okay. Uh, oh. Oh, we can view code. Oh, chip code. Okay. So, that's its binary code of how it's testing it. And what is the strings? Uh, testing. Okay. Right. Yeah. This is the part of the scripting language. Okay. Cool. So, if we go test
Segment 3 (10:00 - 15:00)
press okay to test. Now, it should tell us like it had should have silk screen up here is number one, but I'm going to assume it's at the top, but it may not be. It could be down here. I maybe I should RTFM or I'll just give it a go. Here we go. I'll go for broke. I'll put it up the top like that. I don't know. How would you have designed it? Would you have used the um bottom as a reference or would you have used pin one at the top as a reference? I don't know. Let's go. Testing. Function passed. There you go. Okay. Well, let's move it down. Let's just move it down one row and see if it actually Oh. Oh, failed. Oh, hang on. No. Yes, I know it failed. Oh, no. Okay. So, let's test it. Okay. To testing clear. It should fail. Function passed. Testing preset. Function passed. How does it pass when I don't have it in the correct slot? I don't function. Well, does it say fail there? Failed. I don't know how some functions were passing when I'm completely one off. Okay. So, I left the chip in there and I ran it again and it did actually uh pass. It should um say like there should be something like flashing on there telling you that it's uh testing cuz it's not uh clear at each um step. Anyway, um it did actually pass. Cool. Bananas. Okay, I'm on the website here. I've hooked the thing up, put it into USB mode. Uh and it just turns up as a comport. Here's the web page with the documentation. And once again, it doesn't tell you um which top which pin is of the socket is like I just assume pin one is the top and I was correct, but I think there would be some people out there who would design it bottom referenced. So anyway, so what else have we got? Uh extra you need 5 volts, 500 milliamps recommended. Uh it tells you how to use the buttons and everything. It's not spectacular, but it's all there. Okay. And it's telling you what uh these strings are and stuff like that. Format value in the strings, critical rules. So, yeah, this is all the scripting language stuff. I'm not going to go into the details. What I want to do is try out the software which I have installed and there's a dedicated page for coding it and for the software as well. Coding tests for Vitus P. Uh, so this is what it looks like and here you go. So here's all the info on how to program, how to use the script language and program this thing yourself. So great. If you really have to test like a custom chip, this thing would be jeez goes on forever. Yeah, this thing's very well documented. Anyway, we can update the uh firmware here, but we'll just stick with what we've got. And as for the gooey software, we've got a fruity version, we have a gatesy version, and we have a Penguin version, and here's all the uh chips that were in there that have been programmed. So, look, 6502. You can test a 6502 CPU. Yeah, you can test like RAM and stuff. I still don't know what the pre-chip chip is. Maybe Oh, it comes pre-hipped. Maybe with a test chip, which I didn't get. I don't know. Oh, there is a full-on user guide here. I didn't look at that. Oh, hey. Hey, it it's text. There you go. Cool. Bananas. Oh, that's just what's on the main page. Okay, let's go to the software. So, if I run the software, this is what we get here. Um, unfortunately, it's very difficult to read and I can't like make this font bigger. Maybe if I went into Windows and made it bigger or whatever. Anyway, um, comport uh, five. And I've got it in USB mode on the thing. And it works. And I don't know what this button down here. I actually hit this before and all chips are raised. So, not sure what's doing there. So, we can import these are chip files. They just be uh text files, I'm sure. I assume so. One file added. And then we load the file. And oh, select load. Boom. There it is. So, there is the script for our Sorry, I can't make that bigger. There is the script for testing our 74 chip. Neat. And these are all the individual functions that you can use. Very comprehensive. And the chip file, yeah, is a text. Here you go. It's got name and then Yep. There's all and the strings. Cool. So, it looks like you can edit your own thing using this guey or you could just do it in text or whatever. Emacs. Now, it's not responding here for some reason. I'm not sure why. That was after the chip erase thing. Okay. So, I'm going to try this again. I'm going to load in the 7474. I assume this is the run button down here. No, that's the erase button.
Segment 4 (15:00 - 20:00)
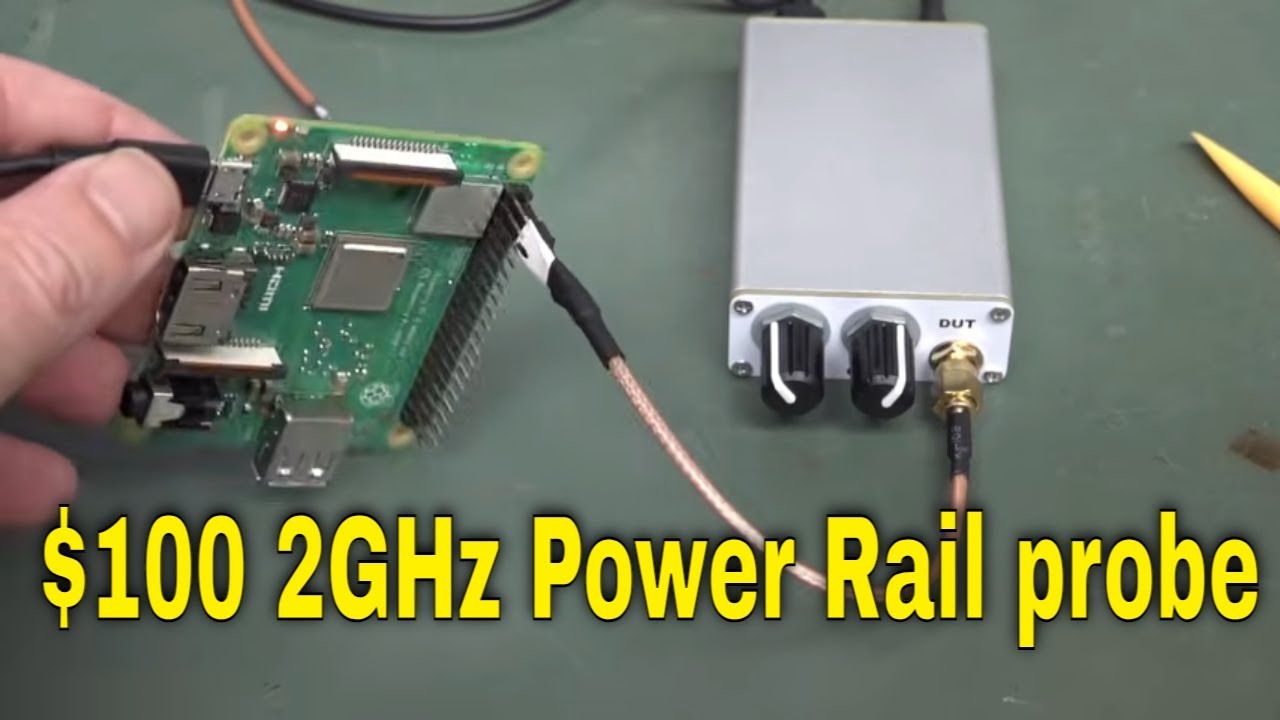
E erasing all chips. Didn't want to do that. Might be a bit hard to erase my 74 HC74. So, this is the Apple Fruity version. Um, and it looks like it's got refresh send code. Yeah, that that's erase chip. Send code. Run code. Okay. So, I need to do that. Oh, send to erase. Oh, there it is. Run. Okay. I I couldn't read that there. All right. Run. Oh, okay. I've got to send it. Chip upload complete. Cool. All right. I would have expected it to enable the run test. Now, it's saying on my screen to uh press okay to run test. So, it looks like you have to physically interface with the thing. It would have been nice if it told you up there. So, yeah. And then it's running. So, I downloaded the code to the thing and it's running. And it will eventually come up green. Like I said, like it should have like a progress indicator or something like that. Uh would have been nice if it like actually showed you what function it was testing and then showed you the immediate result of each line of code or something like that. That would be cool. Anyway, green passed. Winner chicken dinner. So that is pretty cool. Thank you very much, Kelvin, for sending that in a retro chip. Very niche market, but if you need it, you need it. Um because a lot of vintage stuff out there people will only put in the you know they want to make you know if they're restoring the Apple one or something you want to use like a period you know a 1976 TTL chip or whatever and you want to test them doing that on a breadboard pain in the butt but doing it with something like this automated fantastic. Um yeah and it can do you can set it up to do look at this multiply divide you can and bitwise operations and all sorts of things. So you can set it up to do uh test DRAMs and SRAMs and even CPUs apparently. That's pretty cool. Anyway, it looks very comprehensive. Excellent effort, especially for version 1. 0. 0. Fantastic. We don't win a chicken dinner. I'll put a link in down below if you're after one of these puppies. Great stuff. Hi to all my viewers from the Nether regions. Uh this one's from Tamus Sabbo with a silent zed, I guess. uh from Breeda. I guess that's the suburb or the um you know the region in the Nether regions. Get it? And it's a pretty vague description. So, I'm not sure what type of the Oh. Oh, we have some. Whoa, look at that. Oh, they survived. They're like waffles. Stroop waffles. M waffles. Oh, there we go. I will have to try those. Um, we have a note. And we have a power rail probe user manual. Cool. High performance active probe engineered for precise measurement of low level ripple noise and transients on DC power rails in 2 gig bandwidth on your power rail. Sweet. And the Australian government, they opened for inspection. The doggy sniffed it out and went, "Well, I don't like the uh smell of that probe, but uh it's all right. We're safe. Australian government approved. " Oh, look. This actually looks like I assume this is a like a commercial looking thing that Oh, here we go. Oh, it's got knobs. Beautiful. Fine and coarse knobs. Device under test. We got an SMA connector. And there you go. That bug is off to our scope. USB powered and it's a power rail probe. Neat. Oh, it's made in China though. Produced by Zenco. Okay. Um, right. So, anyway, supplied with a little uh two pin header probe like that. Of course, if you got your power on your board, you're designing a demo board or, you know, prototype board or whatever, you might have a two pin header on that and you can measure um the rippley on your rail. And just in case, of course, you don't have a little two pin header, you can solder it straight on. And of course, that's got extra inductance. So, the bandwidth isn't as great. If you want the utmost in bandwidth, there you go. You can That's the Z0 probe. Um I've done videos on those. You can directly uh probe straight onto your PCB. Nice. And you get the SMA to BNC's as well. Sweet. Okay. Comes fully equipped. So, there's the specs. It's an active probe. Max offset voltage plus - 24 volts. That's really good. Uh most active probes on the market have a very low input voltage. You can damage them easily. So, yeah, you can come a gutter uh real easy. Anyway, uh 1. 3 to one signal attenuation. So that means that you'll have to program your attenuation uh to that variable amount of 1. 3. And if your scope doesn't allow that, i. e. it just has, you know, x 1* 5 x 10 x 20
Segment 5 (20:00 - 25:00)
uh fixed ones, then you'll just have to do it manually with your confuser. Um anyway, 65 microvolts RMS noise uh to 20 meg. Uh do we have a noise plot uh after that? Don't know. Anyway, cool bananas. You can power this from the uh USB port on your scope and no worries. Um, and do not float your oscilloscope earth potential. Yes, warning, Will Robinson. Finally, it's got knobs. Love it. So, the coarse knob does your plus - 24 volt uh swing. And then the fine does 500 molts. Nice. And it's 50 ohms output referenced. Do not use a standard probe with it, of course, because uh they I've done a construct like what how you a one probe is constructed and it's actually a lossy coax cable. I've done a dedicated video on that. And there you go. Um, do not put a resistor in series like I show in the um in the probe videos I've done like coax probe videos. So, um yeah, they reckon just bang in. No worries. And it's got a 50k ohm uh loading. That's very nice. But that's not 50k at frequency because well, there's going to be an input capacitance. Did it tell us the input capacitance? Uh no it didn't. but it's going to go very low at high frequency stuff. And of course, you have to hook it on to it's designed to hook on to a uh 50 ohm scope. So, if your scope doesn't have 50 ohm impedance, you need to add uh your 50 ohm externally. All right. Hi, Dave. Longtime viewer. Thank you very much. Uh this is my first time sending a mailbag. It's the PRP1 power rail probe designed to uh measure power supply noise and load. It will be available from the Zingo store. Uh, we hope that uh the price of it will be about $100. Cheap as chips. Nice. Um, it's launching in January. Oh, lucky I'm shooting it this Oh, no. It's February now. Damn. Thanks for the EV blog. Well, thanks for watching. Uh, please hold tongue at the right angle when zooming in. But this is a pre-production unit once. Okay. Right. Yeah, probably hand assembled. Cool. Thank you very much, Tamus. Oh, there it is. 0. 5 parads. Uh, that is excellent for an active probe. That's about as low as it gets. And there we go. We've got a PCB end plate like that. Um, silk screened on both sides. End plate, too. Why not? Anyway, I've done a whole video on uh USB uh front panels and stuff like that. Oh, we've opened it up. Oh, we have. Look at that. Ooh, isn't that beautiful? Well, that's interesting. Here's our input over here. And here's our output. And there's a micro strip going right along there. micro strippers when you have a controlled impedance trace on the top and the ground plane on the uh bottom side there. Um it'll be called strip line if it's embedded um in an inner layer and has ground top and bottom. Anyway, so this is a micro strip and they've got a long micro strip like this. If I was laying out this board, the first thing that I would have done is um put the um input amp as close as possible to over here. Otherwise, you're just increasing your um input capacitance. So, yeah. And your output is going to be uh completely tolerant of that length, but your input um that matters, but still only half a puff. So, nice. Can we get that off? We might be able to get that off, but that's pretty nice. And you can never have too many VAS along there. Look at that. Anyway, standard extruded aluminium case. Nice. And there's probably Yeah, nothing on the bottom. Didn't expect it like that. We have a uh split ground and isolated well split uh ground like that. No worries. All right. What's under here? That's where all the magic is. Well, there you have it. That's under the can. Uh I can't readily read any part numbers on those uh six pin 23s or that three pin there. Are there even numbers there? I don't know. I'm bloody small camcorder screen. Can't see diddly squad. I can't even see if there's numbers on there. There may not be. Uh, I think you can see the part numbers cleaner on. Have to clean my camcorder screen actually. It's filthy. Um, but there you go. Uh, yeah, we can see some part numbers. If I can find some ready info, I'll pull it up. But, uh, yeah, they're often hard to find, but even though I don't know precisely what those devices are, if I can find a data sheet, I'll put them up. But what we're going to have here is that you might think that we're going to contain like a really high frequency gigahertz band um active amplification here. Well, that's not actually the case. Here's the input over here. Okay, coming along here and you'll see it goes directly into this AC coupling capacitor here and straight into the output over here. What's going on? Well, this is a hybrid architecture and this is common in these uh power supply rail probes. So, the AC coupling capacitor here that'll be a high voltage uh jobby and that is doing the high frequency um it's not doing any amplification. It's just passing basically all of the high
Segment 6 (25:00 - 30:00)
frequency stuff directly through to the output. And because this is a match transmission line, etc., right? You can get um you know gigahertz uh performance fairly easily with that sort of thing, but you've got to remove the DC. And of course, the AC coupling capacitor will remove all of the DC uh component. Does that mean you can just have a capacitor in series with it and Bob's your uncle? Well, no. That's not really how it uh you know, you're going to have a pretty uh poor probe if you do that sort of thing. So, what you're going to do is all the rest of these, these are just going to be uh low-noise, very low noise, um low frequency amplifiers that basically just uh subtract the DC and feed it back in. Hence why it's being fed back in via this resistor here. And it'll basically be subtracting out the DC value that goes in here. So, that's what the fine and coarse knobs do. they will um you know you set it so you cancel out the DC voltage on the output here. You just tweak them with your tongue at the right angle and it subtracts the DC voltage and allows some like really low frequency uh stuff as well. So the low frequency and DC stuff is recombined with the high frequency AC stuff coming through the AC coupling cap here and Bob's your uncle. you get a nice low impedance output like this um over a couple of gigahertz range. So, it's pretty simple. There's nothing really like you know I mean these you know get really schmick uh low-noise um opampantss in here are going to cost a bit but uh you know it's not like you need gigahertz bandwidth um amplifiers in this thing. So that's how you can get an active uh probe and that's why the attenuation ratio is only 1. 3 to one because it's it's almost 1 one not quite. Um so it's a very low attenuation ratio which is what you want uh to maximize your uh dynamic range of your signal. So yeah that is it's simple and neat you know but there's a bit of artistry in uh getting that right though. All right, I've got it switched on and powered and connected and um I had to get over a weird thing. I'll show you in a second. I'm using the fine adjustment at the moment and I'm on 2 mill volts per division. I have set my scale to 1. 3 uh to one there and I can remove the input connection. There you go. So, that's the inherent noise of the thing. But let me show you what happens if I actually uh turn off the um 50 ohm load here. Go back to 1meg input impedance. It actually oscillates. The output oscillates. So anyway, I've asked about this on the EV blog forum cuz uh TMS is actually uh Zyu on the EV blog forum. It's got a Z in there. um and got this thing uh manufactured by and it didn't occur to me that uh Zeno is actually uh the company that uh manufactures the uh nano uh VNA thing and other stuff. So that's why he reached out to them and said, "Hey, can you manufacture this for them? " And that's why it's available on their uh or will be shortly if it's not already available on their uh website. Cool. — It's probing time. What I've got here is a Raspberry Pi 3B Plus uh 3A plus, sorry, for those playing along at home. And I'm using uh the supplied lead. By the way, it wasn't labeled and it wasn't obvious which one was the uh zero, like the ground here. So, um yeah, I measured it and made sure it went uh to ground and I've labeled it negative. So, there happens to be a convenient uh ground and 5V pins on there right next to each other. So, we can probe that directly. Of course, as I said, that's not the absolute best uh way to probe it, but it's definitely more than good enough for Australia. And if you really wanted to uh take your probing seriously, then you'd, you know, wire exactly on the point that you actually want to probe. Anyway, so we're probing the uh 5V rail. I've just got it uh powered from an external uh battery pack here. And uh let's take a squeeze. So, as I said, I've got this uh set up for 50 ohm uh input impedance. I've uh set my um scale factor for my probe where it is. Uh yeah, I can actually set 1. 3 uh precisely in here. Not all scopes can do that, but in this particular case, I can. If you can't, just set it to 1 one and then you can manually uh you know scale it later with your uh confuser. No problems. So my 20 volts per division there is going to be accurate. And this is what we get on our 5V rail. I expanded out. uh we're only 100 milliseconds per division. I've got no SD card in there, so it's probably like rebooting. I don't know how the Raspberry this particular Raspberry Pi works or whatever. But anyway, but it's like uh changing state every like 150 200 milliseconds or something like that.
Segment 7 (30:00 - 35:00)
And we can zoom in here. So, and we've got all this nice fast detail. Look at that. And we adjust our trigger level here to look at some of the, you know, faster things. But of course um if you want to capture it, we can just single shot capture that and we can look at these fast transients that are happening on our 5V rail there. And this is going to be, you know, pretty close to what's there. So as you can see, this is sinosoidal. It's ringing here. So this is going to correlate if you had some other channels and you hooked on uh say the digital signals. This is where a mixed signal oscilloscope would come in. Um I don't know what is causing that, but there's obviously some um switching fast switching transient in there. It's going to be very fast. And then we've got all this excess ringing, you know, at not it's not much. We're only talking like 50 millolts per division on a 5V rail. It's not huge, but it's there and could upset the apple cart. That's why you want to probe stuff um like this. So we can actually see exactly what's happening there. But all that sinosoidal ringing in there is probably due to like the inductance and capacitance of uh the power supply and the components and everything else and the bypassing and whatever is going on in there. We don't know exactly what's causing it in this particular case. We'd have to go into a lot more detail, but cool. We can actually see stuff like this happening. And it's not consistent either. Like there's something else at a lower amplitude was happening here. So this is switching in a different part of the circuit causing uh you know less gulps of current um from there and but it's reasonably consistent isn't it? But you can see that there's like at a longer time base there's periodically larger things in here which is happening. So we can go over to there. So we can zoom into there and you can see that well yeah similar thing happening. it's just ringing um caused by um large 5V transients on the rail. Could be caused on a 3. 3 volt uh rail for example and then that's coupling through to the 5V rail. We're pro probing the 5V rail here. But yeah, we can see all this high frequency detail. Pretty cool, huh? All right, let's see if we can compare that to an active probe. This is a very schmicker 2 gig um agyant active probe. If you have to ask the price, you can't afford it. Yes, old school agyulate still works with this new fangled keyside stuff. And it's got a one puff input capacitance there, which is uh double what uh the power rail probe does. Anyway, I'm going to uh use the probe. I've got a low inductance uh tip here. Um I'm going to have to use my third hand and try and you know, I can't just plug it in like I could with that one. So, I'm going to try and use my third hand, tongue at the right angle, probe it, and try and single shot capture it. And I'll get back to you. There you go. I captured it. And well, you might be able to see something in there just but the problem is this is where the difference lies between a power rail uh probe like this one and a regular active probe. Yes, they're both active probes, but because the power rail probe has that DC offset, those DC offset uh controls there that allow you to wiggle wiggle Yeah. and move the DC um into position so that you can use the full dynamic range of your scope of the ADC in your scope to actually measure the power rail probe. But with a regular active probe like this when we don't even have the ability to do AC coupling. Well, we could if uh well, this particular probe doesn't support AC coupling on the input, but that has its own limitations and things like that. So, if we actually go into the active probe here, you'll see that we actually don't have an option for AC coupling, it's just not there. If your scope front end is capable of uh taking care of those DC offsets and you can get a bit more dynamic range, but we're 1vt per division here. You can see our ground. So, 1 2 3 4 5. So, we're measuring the information there. So, yes, we can zoom in on that. Okay, here we go. And boom, our signal has come in once we've taken out that 5V offset. But look how much noisier that is. It's terrible, Muriel. Yeah, we can still see the information. You know, the information, some of the information still there. Look at that. Right. So, there's a little uh the reason there's a timing difference there is because we haven't uh skew calibrated these uh probes. By skew I mean the timing difference. But yeah, we're probing the same point down here, but this is going to have a different propagation delay on this probe to this probe over here. So you can do skew correction for your uh probes. That's called. So if you're taking serious measurements and you want to time correlate properly between different channels, you have to skew correct the uh probes. That's just a thing. But anyway, um yeah, we're, you know, there's only a small difference there, but you can see that there's just no contest here. And because we're dealing, even though this is like absolute
Segment 8 (35:00 - 39:00)
bleeding edge 14bit front end, none of that 12- bit rubbish, this is a 14bit scope. This is as good as it gets in this particular bandwidth, right? And we just can't get the same resolution that we're going to get with a proper power rail probe. And that's the advantage of these things. If you want to measure a DC power rail, yeah, okay, you can AC couple your active probe, but eh then you're not going to see any uh low frequency fluctuations and then you might have bandwidth limitations and other things. So, so that's just a simple example of the difference between the right tool for the job in this particular case, a power that's why it's called a power rail probe cuz it's and it's got these big DC offset controls because it takes out the DC offset before it gets to the input of your scope. So, you can use the entire dynamic range that 14 bits of your scope. I mean, we can, you know, we still got 14 bits to play with. If I go to back to channel one here, like we can zoom into here and see a lot more information in here because we've got that 14 bit dynamic range. And but over here, but with the active uh probe on the green waveform here, we're just like we're kind of like more down in the noise even with a 14 bit converter. Hence why it's noisy and not flat. You might think if you used this fancy dancy couple of thousand active probe, oh, Bob's your uncle, right? I'm going to get super duper measurement waveforms. No, you might think this noise is actually coming from your circuit when it's actually not because you didn't use the right tool for the job. In this particular case, when you're probing power rails, you want to remove the DC offset before it gets to the scope. That's what these things do. Cool, huh? Now, I just wanted to show you what could happen if your scope didn't have that DC offset and you had the ground point here and you had to set it to one uh volt per division. But this Ksite HDO 300 here, it has the ability to actually uh DC offset the input like that. Okay. So, we can actually offset it by 49 volts here. But not all scopes are going to have that. Okay. So, I actually uh re um captured it there. And you can see that bingo, we're doing pretty good now. But this scope just happens to have the ability to do this DC offset on the input. But it's limited. I can't remember what the input offset, but I think we're at the like extreme limit of it. I don't think we can go to like, you know, 20 volts um offset or something like that. So, that's where the power rail probe is going to come in. But tons of scopes will not have this sort of offset range. But you can see even then like the noise difference here, you know, there's a significant difference. I mean, this keyside is going to do the job. It want to. It's a pretty darn schmick. It's one of the highest uh performance on the market. Um, but you can see, yeah, its noise performance isn't quite as good there. Ah, there you go. Actually, this keyside scope is really good. It actually goes to uh 12 volts there offset. But, as I said, most scopes aren't going to be this good. Anyway, thank you very much for sending that in. The PRP1 power rail probe if is around about that uh 100 bucks and that's an absolute bargain. Um, but I just checked the website. It doesn't seem to be on there yet. I'll link in the EV blog forum uh thread down below where the designer is a member of the EV blog forum and has actually discussed the design and development of this thing. So, I'll link that in. And that is very cool. Highly recommended. Great extra tool to have to add to your kit when you want to measure power rail ripple and noise and stuff like this. It It's brilliant. I'm not going to do like a full performance characteristic and stuff of it, but you've seen how it works and it seems to work great except for that oscillation when the output is not loaded. Eh, that's probably the output driver there. It just didn't like not having a 50 ohm load. Started to oscillate, but it works fine when you actually um input load it properly. Anyway, that's very cool bit of kit. I'll link it in down below. —