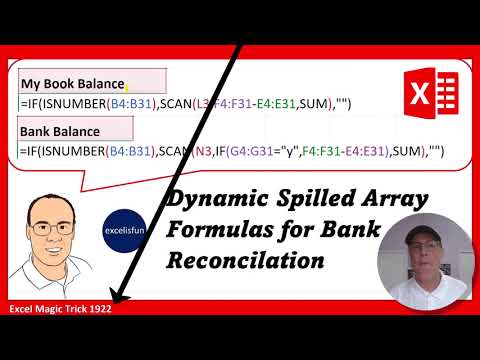
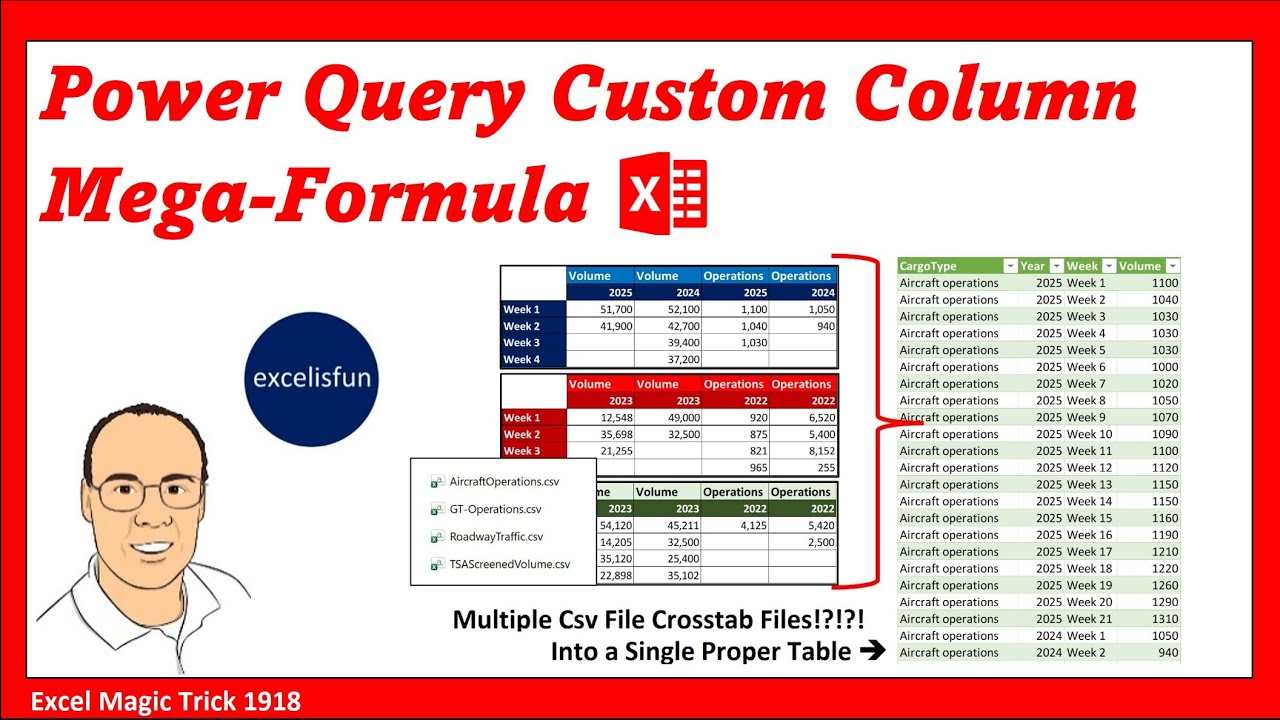
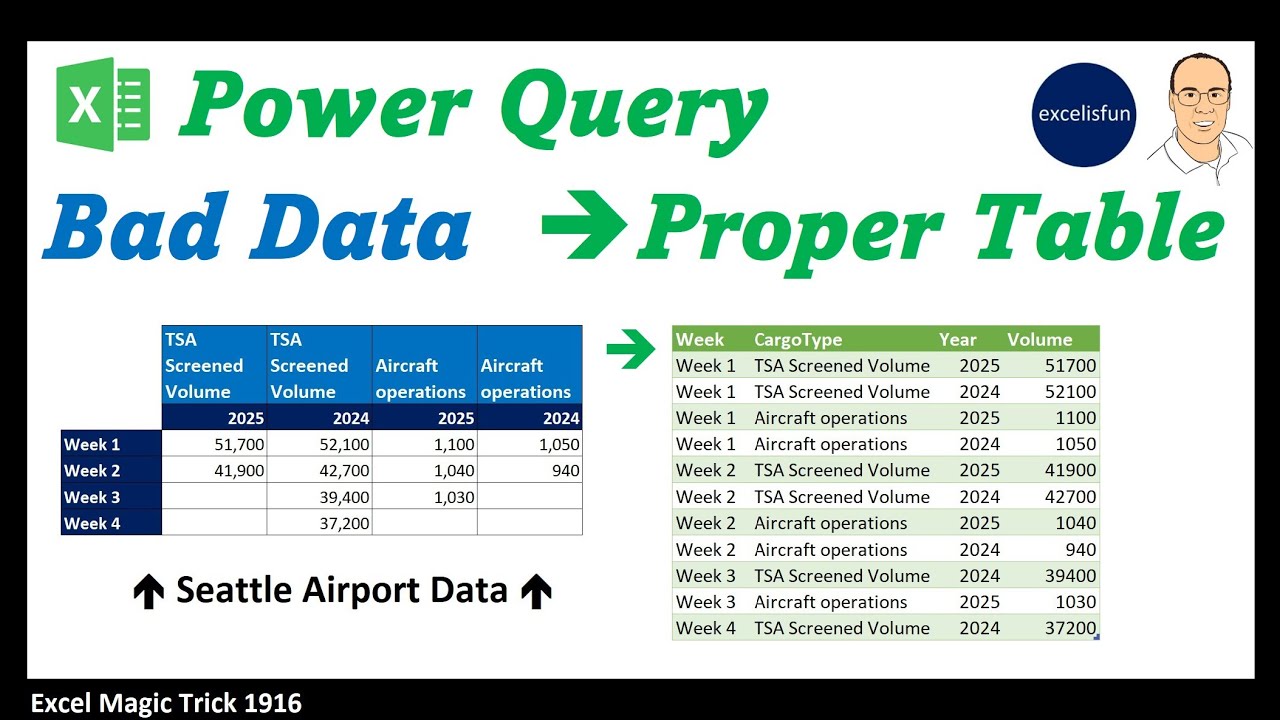
Welcome to Excel Magic Trick 1917, 1918, and 1919. In all three videos, we're going to build off last video where we had a cross tab table and we had to convert it into a proper data set. It's easier to analyze once we have a proper data set. Now, in this video, we have multiple CSV files and they're all cross tab. So, we'll use the techniques we learned last video, but we'll have to build in this video a custom function. And we'll build it manually. Then next video, I'll show you how to build a mega formula in a custom column without a custom function. And we'll top it off with 1919 where we learn the power of adding a parameter to a custom function. Now, in this video and the next two videos, we're going to be using a lot of M code. That's the coding language behind the scenes in Power Query. And I have a full book that I've written, The Transformative Magic of Mode in Power Query Excel and PowerBI. Hey, here's the links to buy the book. They're also available below the video. Now, on the sheet goal, here's the goal of the video. We have four CSV files. Each one is a crosstabulated table, and we need to somehow get them all into a single table. Now, you can download this file. It's a zip folder. If I open it up, oh, here's some files we're going to add later to see if everything will automatically update. And we will start with these four CSV files. Now, in order to understand exactly what's going on, let's open one of these CSV files. Now, if you doubleclick it, it opens in Excel, but that does not show you the structure of this file. Right click, open with I'm going to choose another app. I want word and home paragraph. Let's turn on non-printing characters. The reason it's called CSV, comma, separated values, and the commas separate the bits of data. That hard return means a new record. So, we have four of these files. Now, on the sheet, three ways. I'm going to show you three different ways, all to accomplish the same goal. We'll build a custom function in this video, and I'll show you how to do it manually. Then I'll show you that sometimes you want to just go straight to a custom column, nest some functions back to back and it gets the job done. And in the final video in 1919, we'll see the difference that a parameter can make when building a custom function because it is just flat out easier to edit when you make a mistake. All right, I have all the answers 17, 18, and 19. And if we go up to data over to queries and connection, click queries and connection. Here are all the answers. I can collapse the folders. And now we can start from scratch. Step one, we need to import the different CSV files. So data get transform, get data, drop-down, and from file, the amazing from folder feature. Now we're going to doubleclick and then take the second one by double clicking. You can see backtoback Seattle airport data. But now we have Power Query pointing at that folder and it will import all the files in that folder. Click open. We don't want to click combine or load. We want the opportunity to work in the Power Query editor. So we click transform data. Now we've opened a new window, the Power Query Editor. We can collapse the folders. And if we select on the left Seattle airport cargo data, this is the query we're going to be working with. Now I want to rename this multiple CSV cross tab into table. Enter. Now when we point to something on our computer like a file or a folder, if we click on source up in the formula bar, you can see that's an onremise folder path. That means it's pointing to a particular location on my computer. your on premise folder path will be different. Now what we get is everything in that folder. If I click off to the side not on binary I can see sure enough there is a preview. We have name extension. If you might have other extensions besides CSV then you want to filter to only get CSV but we're good. And if we scroll over, there are some other attributes that we would see like in Windows Explorer. But here's the deal. We're going to build our custom function by extracting a
Segment 2 (05:00 - 10:00)
single file, then doing the same steps we did last video, but we'll add the custom M code to convert it to a function. Now, if you click on binary, the actual green link, it extracts that one file. Now we can work with this and then go up to advanced editor, copy the code and build our custom function. Step one, we have to transpose the table, take the two variables in the first row so they become variables in their own column. We want to go up to transform and there it is. Transpose. Over in applied steps, I want to select the last step F2 to put it in edit mode. We need to remove the spaces to make the code easier to read. F2 backspace enter. Now we click back on transpose table. And now we have what we want both variables in different columns. Now we need to promote headers. These will be blank but we'll rename them. So this will bring the weak variable up into the column headers. Upper left corner of the table. Use first row as headers. Now I want to double click. We're going to name this cargo type. Now, in the last video, I asked if anyone knew how to name columns with a keyboard, and our pal DMC clean gave us the tip. It's enter, right arrow, F2. And we'll call this year, and enter. Thanks, DM. Clean. Go team. Now we can select year, hold shift, click cargo, rightclick, unpivot other columns. And now we have our table with one, two, three variables all as a record with value in each row. Now let's come up to the formula bar. Table. unpivot other columns. I don't want to call this attribute. And add a separate step. So I'm just going to edit the M code. We'll call this week. doubleclick value. We'll call this volume and enter. Now, we want to go look at the volume column. Let's click the filter. And here's our trick to check and see or look at the unique list. And last video when we did this, we had a null. And the reason why is we took data from the worksheet, convert it to an Excel table, and the code interpreted empty cells in an Excel table as null. But we imported this from a CSV file. So it's not null, it's blank. But we definitely don't want that blank. So I'm going to uncheck. Click okay. And you can see the difference in the code. Volume not less than greater than double quote double quote. That's the syntax for blank. Now we need to add data types. I select volume. Hold shiftclick cargo transform detect data type. I'm making sure that each data type is correct. Now before we go up to advanced editor, it's easier to edit here. So I removed all the spaces. Now let's go to home advanced editor. Now up here in advanced editor, this is all the M code that was created when we use the user interface. Now when we create a query like this, Power Query uses the let statement or let expression to write all the M code for us. And what the let expression does is it allows you to define variables. Those were the querystep names that we created. Always making sure to not have a space. Then there's an equal sign. And usually there's some function like table. transpose or table. promote headers. But any M code is fine. But at the end of each line there's a comma. That comma means hey I'm done. Now you can go and define the next variable. Hey, that variable equal sign, there's the M code, there's the comma. Now, these variables can be used in the query. For example, transpose table. Well, the result once you put the comma is a transpose table. In the next step, promote headers. Well, it's acting on that variable transpose table to promote the headers. Now, when we get to the last step, you cannot have a comma at the end. Check that out. no comma. That no comma means, hey, I'm done. And you better put the word in. That's the keyword that says, hey, we're done with defining all the variables. And whatever comes after in, that's what the query delivers. Now, in this case, it's just delivering the last step. But you can put any M code there that you want. Now, that's how let works. But guess what? All of this we're going to copy paste it create our function and then use that function on every file. This first step that's the only step we're going to keep in multiple CSV ct into table query.
Segment 3 (10:00 - 15:00)
We'll come back later to this query and actually use our function. Now watch this. Copy and as a trail enter backspace enter. I want to leave all this code here as a note. So you use a forward slashster entertrlv enter backspace asterisk forward slash that's a note. That way we can come back later to the place that we created the code and look at it if we need to. Now in video 1917 we'll see a different way to do this. Now we want to cut controll X and we need to end this query in space enter tab and after the in keyword we type whatever we want this query to deliver for us it's the source step all of this is code now we can click done and look at that the error is helping us it says you can't have a comma before in which is exactly what I just said but forgot guess what this is the last step there can be no comma before in. So we remove it, click done, and there it is. We'll come back after we create our custom function and use that custom function on each file. Now we're going to create a new blank query. So I go up to home, new query, new source, other and blank query. Advanced editor, highlight everything but lettv. Now we don't need this. So I'm going to highlight and backspace delete and then before let click enter up arrow now we have the M code to create a custom function and in that M code will be a variable and we'll put that variable in this first argument. So instead of that on premise path it'll be an input. So whatever file we have we put a reference to that and the function will do its thing. Now to create a custom function you have to open parentheses and in the parentheses you have to define the variables. You can give the variable whatever name you want. I'm going to put CSVC file because this word is inside a parentheses that becomes a variable. If after the parentheses space, we use the goto operator, the go-to operator is equal, greater than, and anything after this goto operator is the map or the directions for how to use this variable. Well, guess what? Doubleclick copy. We want to use this variable inside the let statement. So, we want to put it inside CSV. doccument. very carefully. I want the close parentheses and the comma controllv. Now the clever thing is because we put this custom function syntax up here when I click done power query will know this is a function. Now I want to do one other thing because we can define what type of mcode value the input should be and the function output should be. So after the variable name, I'm going to say as binary. Binary means an input file like a CSV file. Notice the color coding. That means I got the keyword and the MC code value correct. Now for the function MC code value type before the equal sign space as table. And there you go. There's our function. Now we haven't named it yet. But watch what happens when I click done over here on the left. that f ofx means power query knows that's a function. Now we could invoke the function right here but that's not what we want. We want to invoke it inside of our query across the columns. Now let's name our function something like fx get and transform csvct file and enter. Now this is available throughout the power query environment but now we're going to use it in our query. There is a column with 1 2 3 four binary CSV files. So we go up to add column. We want to run this function in each row. Bam. They have invoke custom function. Click. We can name the new column. That's the name I gave it. But you can name it what you want. But check this out. I can choose from amongst the different functions in this workbook. There it is. There's the one we just created. Click. And it's polite. It knows we need an input and it already guessed because in this table it senses a binary. So it already got the content column. When I click okay, this is amazing. Don't click on the green table off to the side. There is the completely transformed table.
Segment 4 (15:00 - 18:00)
That function is doing its thing in every row. Now, after renaming the step, we want to take all the tables from this column and append them one on top of each other. Now, to append these tables, I'm going to need to from this table here, which is named invoke custom function, I'm going to need to look up this column. And to do that, F2. I need this field name. And I F2 copy escape. Now, let's come up and we're going to add a new step by clicking the F ofX button. Notice that's the name of the previous step because it assumes we want to do something to that previous step. And we do to that table. I want to look up that column. We use square brackets. Those are called field access operators. CtrlV table field access operators with the name of the field. When you do that, it'll look up that column and return it as a list. So when I click the check mark, that's perfect. The table is in each row of the list. And the reason it's important that it is a list after the equal sign, the function we're going to use to append is called table. combine. Well, I wish they called it append because that's the proper verb, but combine is a synonym for append. And look at that. This argument requires what? Tables as a list. So, delete. That's what we're going to give it. Close parentheses. And when I hit enter, there's our finished table from multiple CSV files. We built a custom function advanced editor. You can see the code there. And then we invoke that custom function, created the tables, and then built our final step. Table combine append. And bam, there's our finished result. Now I'm going to rename this. After renaming that step, we come up to home. Close. Close and load. Close and load too. I want to import the data as a table in a new worksheet. Click okay. And if we go up to the filter dropdown for cargo type 1 2 3 4. But let's test. Let's drop two other cross tabs into that folder. Refresh and see if the whole process updates. All right. looking at just the first Seattle airport data folder. I want to take these two click shiftclick copy doubleclick and when I controllV and power query is looking at that folder. So when we refresh we should get all six files. Here's the table. Rightclick refresh. I can see it working over here. Ah that looks like more records. When I click the drop-down, sure enough, now we have six. That is amazing. What a way to deal with cross tab tables, converting multiple CSV files into a single table. All right, we'll see you next Excel magic trick.