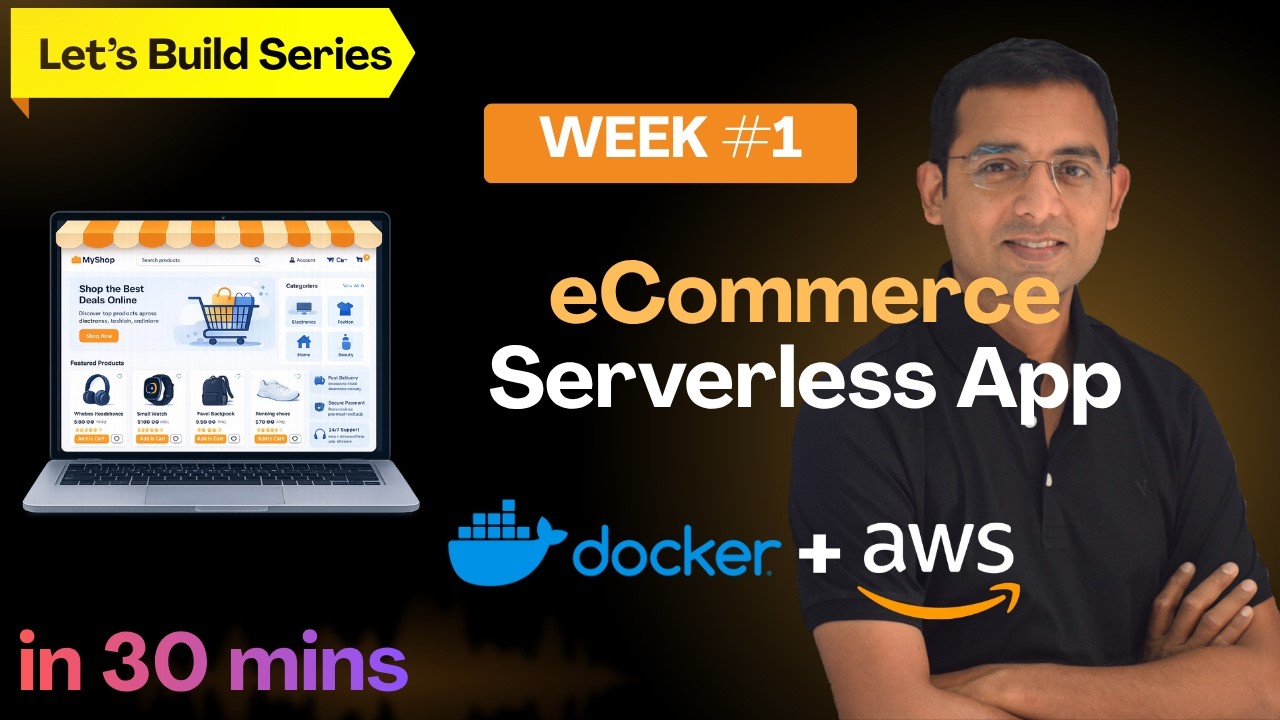
Starting this new series to build and deploy real-life applications on AWS. These videos will provide that much needed experience to confidently go into AWS / DevOps interviews and talk about what you have done.
Try to complete all these short projects over next few weeks and I guarantee you that no one can challenge your AWS knowledge and experience.
AWS Services used: Amazon S3, CloudFront, Elastic Container Service (ECS), DynamoDB, Amazon RDS, API Gateway, Route53, ACM, Simple Notification Service (SNS)
So let's get started !
Important links for this project:
1. Git Repository: https://github.com/awswithchetan/ecommerce-local-app/blob/main/README.md
2. Full deployment on AWS: https://www.udemy.com/course/build-ecommerce-application-on-aws/?referralCode=361CDE8C3A9653255373
Happy learning !
In this video:
0:00 Introduction to the eCommerce Application
2:30 AWS Architecture Walkthrough (using AWS services)
7:32 Local deployment architecture (using Docker and LocalStack)
8:52 Pre-requisites for the deployment
11:52 Deployment steps and Git repository
12:23 Clone git repository
12:55 Install tools (docker, node etc.)
14:13 Setup User Authentication using Amazon Cognito User Pools
16:35 Deploy backend services (docker compose)
20:09 Test the application using cURL
20:35 Configure and deploy Frontend locally
22:23 Start the frontend server and Test the application
25:35 Clean up
26:26 My Udemy course for deploying eCommerce Application on AWS from scratch (Link above)
Оглавление (14 сегментов)
Introduction to the eCommerce Application
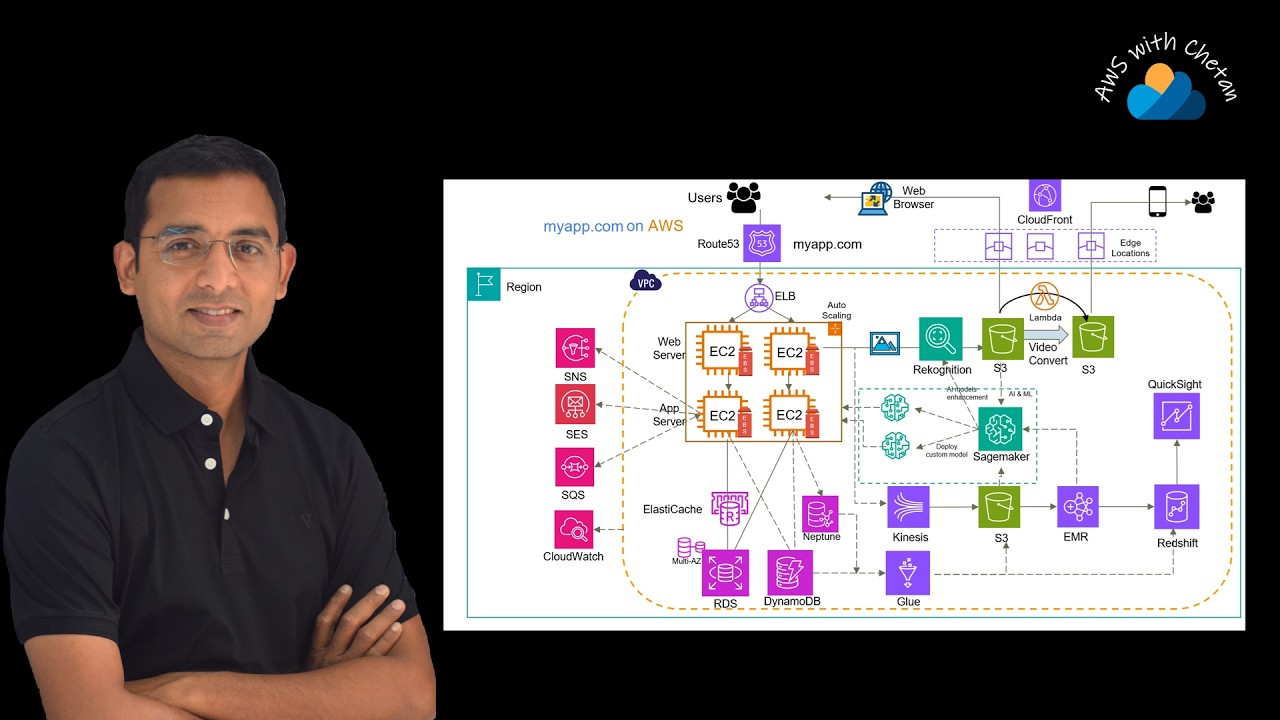
Hi. So, in this video, let's build fully functional e-commerce application from scratch. Hi. I'm starting this new series, let's build. And my intention to start this let's build series is simple. Next time when you step into your interviews for AWS or DevOps, you should have full confidence about your knowledge and about your experience. And this will only come if you really build real systems in AWS. And that's where, over the next few weeks, every week we are going to build real enterprise-grade application in AWS. And as a result, after few week, you will be at different level with respect to your knowledge and experience to which nobody can challenge. Now, because this is a first video in this series, so let me walk you through how we are going to build these systems going forward week over week. So, typically for every application, I will provide you Git repository with all the code. And then repository will also have the readme document, which will contain all the deployment steps. Now, in this videos, I'm going to explain you why we have built the application architecture in a certain way. And also, I will walk you through all the deployment steps. Now, while showing those steps, I will also explain the reason behind choosing a particular service or different options that you get while configuring particular AWS service. So, it will be thorough experience as you go on deploying these applications in AWS. Now, for some of the application deployment, you might have to pay the AWS bills because they may contain the databases. And in those cases, I'll be providing local deployment option as well. Where we are going to simulate AWS services in the local workstation in the form of Docker container. And for that, we will use LocalStack tool. And if you see for this e-commerce application as well, there are two versions. The first version, which you can fully deploy on AWS, but it will take a lot of time up to 3 to 4 hours. And that's where I have rather created a course to deploy this application end-to-end. However, in this video, we are going to deploy the same application, but locally. Otherwise, if you want to build the complete app on AWS and also deploy that on AWS, then the architecture for this application will be like this. And if I have to walk you through this
AWS Architecture Walkthrough (using AWS services)
application architecture quickly, then everything starts with the user. So, user on the left side will make a request through the browser by hitting the URL for your application, for example, www. yourapplication. com. And this request will be resolved by the AWS Route 53. And it will return with the IP addresses of the CloudFront, which is a CDN service. Now, in our application, we have hosted our front end on the S3 bucket because our front end simply contains the static React files. So, our content will be on S3, and this S3 bucket will be behind the CloudFront. So, that means application will be accessed through the CloudFront. And I'm sure you know the benefits of using Amazon CloudFront, which is a CDN service. All right. Now, once the browser gets the front end code, it will execute that code in the browser. And the next thing that the code allows user to do is to sign in or sign up using the email ID. And for that, we have integrated Amazon Cognito with our front end. So, at this point, user will be redirected to sign up, and this flow will be completed using Amazon Cognito. Now, once the user sign in successfully, then the front end will execute an API call for different back end services. Now, if you see, all our back end services are hosted in the ECS using the containers. And we are going to run the Docker containers for different services. So, this application has a product service, cart service, user service, and the order service. Now, we are not exposing these services directly, but rather we are exposing these services using the application load balancer. And this application load balancer will further be accessed using the API Gateway. Which means all the back end services are exposed through the API Gateway public APIs. And for anything that you want to do in this application, the browser will make corresponding API request. So, whenever you add item to the cart or you place an order, there will be corresponding API call, which will hit the back end service. Now, if you look at the back end service, it also has a database. And depending on the type of the data we are storing, there will be the NoSQL database, that is DynamoDB. And also, for storing the orders and user profile related information, we are going to use RDS database. And that will be PostgreSQL RDS database. All right. So, we have the API layer, we have the back end databases. And finally, after putting the order, we can integrate this application with any third-party services or even we can send notification to the user. So, for that, we have this integration layer. And there, we can use Amazon SNS, that is Simple Notification Service. Or we want little complex workflows, then we can also use Amazon EventBridge. Now, in this case, we can simply use the SNS, and we can then subscribe multiple SQS queues to this SNS topic so that the same order event can be processed by multiple back end systems. And one of the flow that we are going to cover is to send a notification. Now, for sending the notification, you can again use different AWS services like Amazon SES, that is Simple Email Service. Or otherwise, we can also use SNS itself to send the SMS message or mobile push notification or even the email. All right. Now, apart from that, to make the application secure and to allow different components to communicate with each other and access other AWS services, we are also going to use IAM. Then, in order to manage the dynamic parameters as per different environments, we are going to use System Manager Parameter Store. And finally, we are going to collect all the logs from all these back end services in the CloudWatch logs. So, ideally, this is how the application architecture should be. And this is still a scaled-down version of the e-commerce application because if you are watching my videos few weeks back, I had released this YouTube video where I covered the entire architecture including the machine learning, analytics, everything that you should typically see in any enterprise-grade e-commerce application. However, due to limitation of the cost and time, I have just scaled down the same application architecture into this form. All right. Now, as I said, if you have to deploy everything that you see here into your AWS account, it may take 3 to 4 hours easily. And it may also cost you few bucks because we are going to deploy RDS databases, then we are going to set up the VPC in which there will be the NAT gateways, then there will be application load balancer. So, all these components have cost. And whenever possible, I want to give you an option to deploy the same application locally. And for the same reason, in this video, let's deploy this application using the
Local deployment architecture (using Docker and LocalStack)
containers in your local workstation. And here, of course, you might have a question, how are we then going to use AWS services like DynamoDB or RDS or API Gateway? So, the answer is, for this, we are going to use this tool called LocalStack, which basically simulates AWS services locally by deploying them into the Docker container. So, it doesn't use actual AWS services from your AWS account, but all the API interface remains exactly same. So, your application doesn't know that it is running locally. So, there we are going to use LocalStack for most of the components. And just one service that we still need to use from actual AWS account is Amazon Cognito because it is very difficult to simulate this service in the LocalStack. So, we are only going to use Cognito service from your AWS account. And there also, we are going to use free service because every month there is a free quota to use Cognito service, which means you won't have to pay anything to deploy this application locally. All right. So, I hope you are clear with the architecture and what we are going to do. And with that, now let me take you through the prerequisite of this deployment so that you are good to proceed. And then, let's deploy this application locally.
Pre-requisites for the deployment
All right. So, essentially, there are just two prerequisites. One, you need to still have your AWS account because, as I said, we are going to use Cognito service from there. And second, you need to have your local workstation. And it could be Linux, Mac, or even the Windows. However, if you are using Windows, then you can create the Ubuntu VM inside your Windows using WSL, that is Windows Subsystem Linux. And if you don't know how to create WSL system, then it is very easy. You have to just go to your Windows command prompt, and you have to type WSL {dash} install Ubuntu name of your VM. And once the VM is created, you can simply connect to that using this WSL {minus} D command. So, that's it really about the prerequisites. And if you are ready, then let's move forward. And let's now look at all the deployment steps. And for this, there are these six to seven steps that you need to follow. So, the first thing, we will just clone this Git repository, which has all the code for all the back end services, for the front end. And after cloning the repo, the first thing that we will do, we will install the tools that it requires. So, it requires Docker, it required Node, and also it requires AWS CLI. Now, here because we are using the local stack, we are not really using the real CLI with real credentials, but just that in order to interact with local stack deployment services like simulated DynamoDB, we still need to run the AWS CLI. So, there we will simply have the dummy credentials. All right, once we do that, then we will go to Amazon Cognito and we will create Cognito user pool. This will basically allow us to sign up and sign in into the application. Then we will bring up the backend services, and all the backend services will run as a Docker container. And we will bring up these containers using Docker Compose command. Now, once all the backend services are up, we can also assume that the local stack container is up, and that means local DynamoDB service is running. So, once DynamoDB service is running, we can populate the DynamoDB tables with some sample product data. So, that we can see all those products listed onto the main page. And then we will just configure our front end so that it knows how to redirect user to the Cognito for sign up and sign in. Finally, we will build our front end, and then we will run our front end locally into our VM. And there it will run on the port 3000. So, we can access the application using this local URL. And at this point, we expect that application is fully working, and then we will test the application end to end where we should be able to see all the products onto the front page, then we should be able to add items to the cart, and we should be able to put the order. Right, so these are all the steps now we are going to do. And for detailed instructions, you can just refer to the
Deployment steps and Git repository
readme document in this repository. So, with that, now let's deploy this application. All right, so if you simply open the repo URL, and if you go to the local deployment directory, readme file, you will land here. And here in this readme, you will see all the prerequisites, and also all the deployment steps. So, now let's get started, and let's do the first thing where we need to clone the Git repository. So, let me do that now.
Clone git repository
All right, so I'm into my Ubuntu VM, and you can just see that I'm into my home directory. So, let me just clone this repository. All right, repository has been cloned, so let's just go to the main directory, and you will see all the code here. Now, the first thing we need to do, we need to install all those tools that I talked about. And if you want, you can install all those tools manually, depending on your operating system, but for easy installment, I have
Install tools (docker, node etc.)
just provided this script that is install-prerequisites. sh. So, I'm simply running this, and this may take some time because it downloads a lot of packages, and then install those packages. All right, so let me provide my password for the username, and now it is downloading all those packages. So, let me pause this video here, and let me come back again after [clears throat] this script finishes. All right, so the script has finished, and if you see, it has installed all these packages. Now, just one thing that we might to do after this script runs is that we need to exit from the current shell and re-login. That's because my username will be added in the Docker group, so that I can run the Docker command without the sudo prefix. So, let me just exit, and let me just login back. All right, let me just go here, and let me see if the Docker is installed. For that, I can just simply do docker ps. Now, right now there are no Docker containers, so it shouldn't show anything, and that's fine, but Docker is installed there. All right, so the next step is to just
Setup User Authentication using Amazon Cognito User Pools
create the Cognito user pool, and we will just create the user pool, and it will automatically create the app client. So, the app client is basically the one to which we are allowing to use this user pool. And once we create that, we will just record their IDs, and we will configure those IDs in the front end in the later steps. Right, so now let's just go to the AWS console, and create this Cognito user pool. All right, so first thing you need to make sure is that you are into the right region that you want to use, so I'm using Mumbai region, and you can choose any region that you want. So, let me just open the Cognito console, and if you just go on the left side, go to the user pools, and just create a new user pool. Now, here application type is single page application, and you can just give some sensible name. So, let's say e-commerce app, and we want the user to login with email, so let's select the email there, and we also want users to sign up on their own, rather than we sending the invitation. And in order to sign up, we will ask for user's email as well as the name. So, select these two attributes, and here for the return URL, you can simply put http localhost 3000 because that's where our front end is running. So, with that, let's create this user directory. Now, internally, this will also create the app client. So, if you just go to the user pool, you can just go to the app client there, and in this app client, we just need to modify the authentication flows. So, just edit that, and instead of this choice-based sign in, let's allow the sign in with username and password. So, make sure that you have selected these three types of the logins. All right, that's it really, and let's save the changes. Now, in the next step, we will need this client ID. So, at this point, you can just simply copy this and save it in your notepad. So, first user pool we need to store, and second client ID. So, let me also copy the user pool. And for that, let's go back here, and let's copy this.
Deploy backend services (docker compose)
All right, so this is done. Now, let's go to the next step, that is starting the backend services. Now, this is very simple where we are using the Docker Compose, and internally Docker Compose have all those containers defined, which will run our backend services. So, for us, we have to just go to the local deployment directory, we have to define the AWS region. Now, again, as I said, this is just for the local stack to simulate the AWS environment. So, provide the region in which you are working. However, as I said, it doesn't really actually do anything into your AWS account. So, let me also do that, and after this, we should see our backend services running. All right, so let's just clear the screen. Let's go to the local deployment, and let's say AWS region equal to your region name, and let's say docker-compose up minus d. Minus d is for detach mode, and let's run it. Now, this step will take long time because it is downloading a lot of images from the Docker Hub. So, let's give it some time, and let's come back here again, maybe in 3-4 minutes. So, let me pause this video here. All right, so it took around 3 minutes for this to run, and it has done everything hopefully, so let's just try to see the Docker containers. So, let's do docker ps, and it should show seven containers. So, you can see here the Nginx, which basically simulates the API gateway and the ALB, and then there are five backend services, that is order service, notification, cart, product, user. And finally, there is a PostgreSQL as a service, and also there is a local stack service, which is simulating the DynamoDB and other AWS services. All right, now that all the backend services are running, let's proceed with the next step where we need to load some sample products into the DynamoDB table. So, let's do that now. And for that, we have to just go to the data directory and run this command. So, just let's go to the data. All right, so now let's run this script, that is load-products-local. sh, which basically accept the region as parameters. So, provide your region code, and this script basically first checks if there are DynamoDB tables like e-commerce products and cart, and if they do not exist, then it will create it, and then also load the products table with some sample data. So, let it create all those 20 product items there. And once that is done, I think we are good with the DynamoDB table, and which also means that our backend is fully set up. Now, before we test the backend services through the API, one thing that I want to show you is this command. Now, this looks like AWS CLI command, but there is this endpoint URL, which is redirecting all our command to this local endpoint, which is served by the local stack. And that's where all these DynamoDB, SQS, SNS are the local services and not the actual AWS services. All right. Now, before we go to the front end, let's quickly see if the back end services are running and for that we can test it through the API. And if you know our API server is running on the engine X, so let's fire the command curl
Test the application using cURL
http localhost. It is running on port 8080 with API endpoint and the products endpoint is this. So, ideally it should list down all the products which are available in the DynamoDB table. And you can see that this is a list of all the products. So, this means that our back end is good and with that we are good to move to the front end.
Configure and deploy Frontend locally
So, for the front end the first thing that we need to do is to go to the front end directory and update this AWS config. js file with the Cognito user pool ID and the client ID and then we will build the front end using NPM and we will simply start the front end application. Now, by default it will run on the localhost port 3000 where we can access our application. So, now let's do this. All right, so let me just clear the screen. Let me go back to the front end directory which is here inside the React app and let me update this AWS config. js. Now, this file contains this placeholder for user pool ID for the Cognito. And if you remember, I had saved that in my notepad. So, let's just copy it from there and paste it here. And same with the client ID. All right, that's it. Let's save the file. And now we are ready to build the front end and then start the front end. So, for building we just need to say NPM install. Now, this will take long time because again it is installing the NPM packages. So, let me pause this video for maybe couple of more minutes and then I will come back here after the build is done. All right, so build has been completed and there are some warnings which are okay to ignore. So, the last thing that we should do is simply say NPM start.
Start the frontend server and Test the application
Which basically takes my active window, but that's fine. But here it should open the browser and we should see the application there. So, let's check that. All right, so you can see that the application is up and running. I can see these 20 products onto the front page and if I just go to say cart service, of course it will ask me to login because cart and order APIs are protected by the authentication. So, this is good and let's just sign in. Now, so far I don't have my sign in. This has been populated using some cached information. So, let's create a new user account. So, let me create my account with my email ID and some password. And [snorts] my name. All right, so let's create an account. Now, this will basically send me an email and this is happening through Amazon Cognito and I have received the code which is 712 282. Let's confirm. And now you see I'm logged into this application. All right, that's good. Now, the next thing that we can do, we can simply try to add some items to the cart. So, for that let's just select any of the item and you see that the item has been added to the cart. So, let me add a few more items there. And there are three items in the cart. You can see that and let me place the order. Now, of course this is a dummy application, so there is no payment system, but you should be able to see your orders here. And for the notification, because we are not using the real Amazon SNS or SAS service, it won't send us the notification, but instead it creates the order related notification file in our local workstation. So, for that let me go back to the terminal. Now, here because I ran the front end in foreground, it took my basically screen, so I need to open another shell, so let me do WSL minus D VM local. Let me go to this directory and if you go to the local deployment, you should see this emails as a new directory, so let's go to the emails and there let's just get this file and you should see that there is this order event. So, this is basically notification which again we simulated in the form of file instead of sending the actual email. However, when we deploy this in AWS, at that time we should see the notification coming to our email. All right. So, this means that we have fully functional application running now locally and that's what really we wanted to achieve in this exercise. Now, before I let you go, make sure that you turn down everything that you created. So, there are quite a few clean up steps
Clean up
which I have also listed down here, so you need to bring down all the containers using the Docker compose down command. You can just come out of the front end using control C because we ran it in a foreground. Then you should delete your Amazon Cognito user pool. While there is no cost to that, but you should still delete that. And finally, you can also just remove this virtual machine if you created that using the WSL. Otherwise, if you are doing this exercise into your Mac system or any other Linux system, that's fine, right? You can just keep the code in the repository as it is. All right, so that was the goal of our exercise and as a next step, I would strongly recommend you to deploy this actual application into the AWS using all the AWS services and there we should use basically this
My Udemy course for deploying eCommerce Application on AWS from scratch (Link above)
architecture where we are going to deploy enterprise grade application into the AWS. And everything that you need is covered in this course that is available on Udemy. So, if interested, I will see you into the course into the Udemy. But otherwise, if you would like to have more videos like this, then just like this video, make a comment around what next you want to see and also subscribe to the channel and share with your friends. So, thanks for staying back and I will see you next week. Thank you.