I Built an Entryway Bench With Hidden Features (DIY)
17:44

I Built an Entryway Bench With Hidden Features (DIY)

Matthew Encina 12.04.2026 78 867 просмотров 3 898 лайков

Machine-readable: Markdown · JSON API · Site index

Поделиться Telegram VK Бот
Транскрипт Скачать .md
Анализ с AI
Описание видео
Sharing the entire process of building my custom entryway storage bench from design to finished build. Details 👉🏽 https://www.modmusings.com/blog/diy-storage-bench-with-hidden-robot-vacuum 
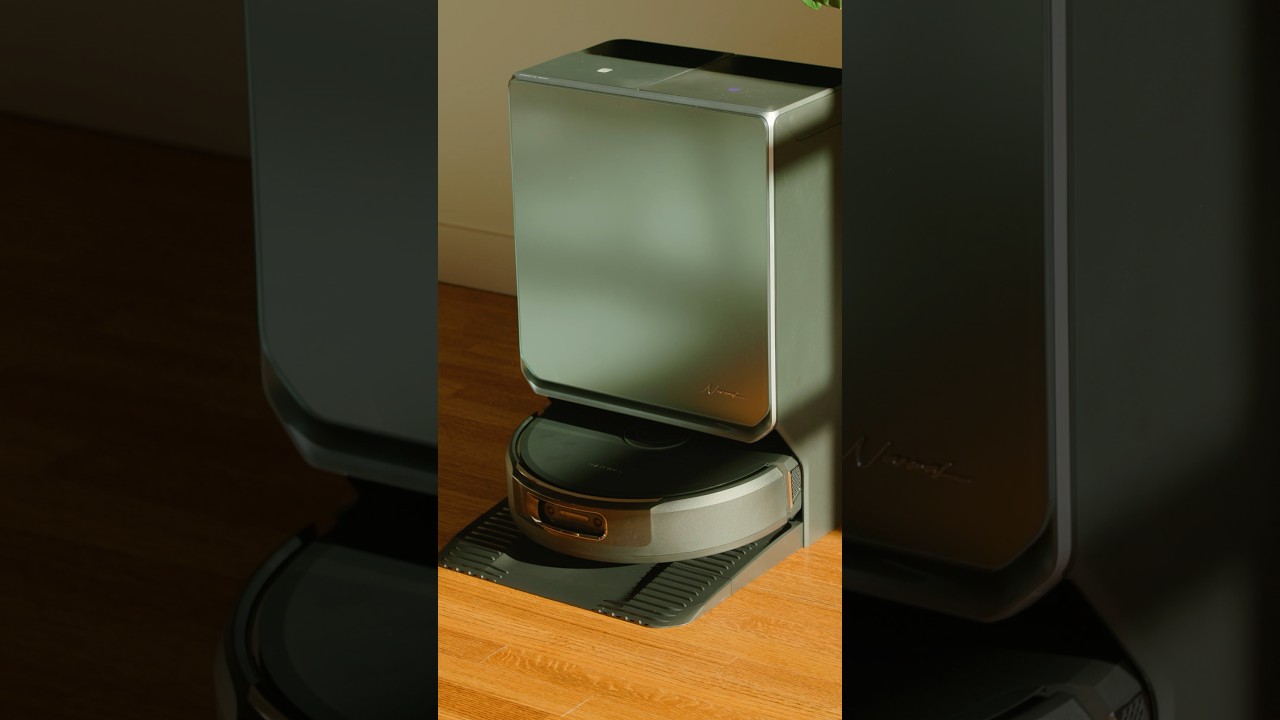
Thanks to Narwal for sponsoring this video. Details below: Narwal Flow 2 Launch Special Offer (Apr 13 - Apr 28) 💰 Special Launch Price: $1,099 USD / $1,499 CAD (Original Price: $1,499 USD / $1,799 CAD) ✅ 3-Year Warranty ✅ FREE Premium Accessory Gift Bag (Value: $200+) 🔗 Shop Now US DTC: https://bit.ly/4dntAfl AMZ: https://amzn.to/4lX9drG CA DTC: https://bit.ly/4cp20fF AMZ: https://amzn.to/4lShtcl ▬▬▬▬ Video Overview ▬▬▬▬ 
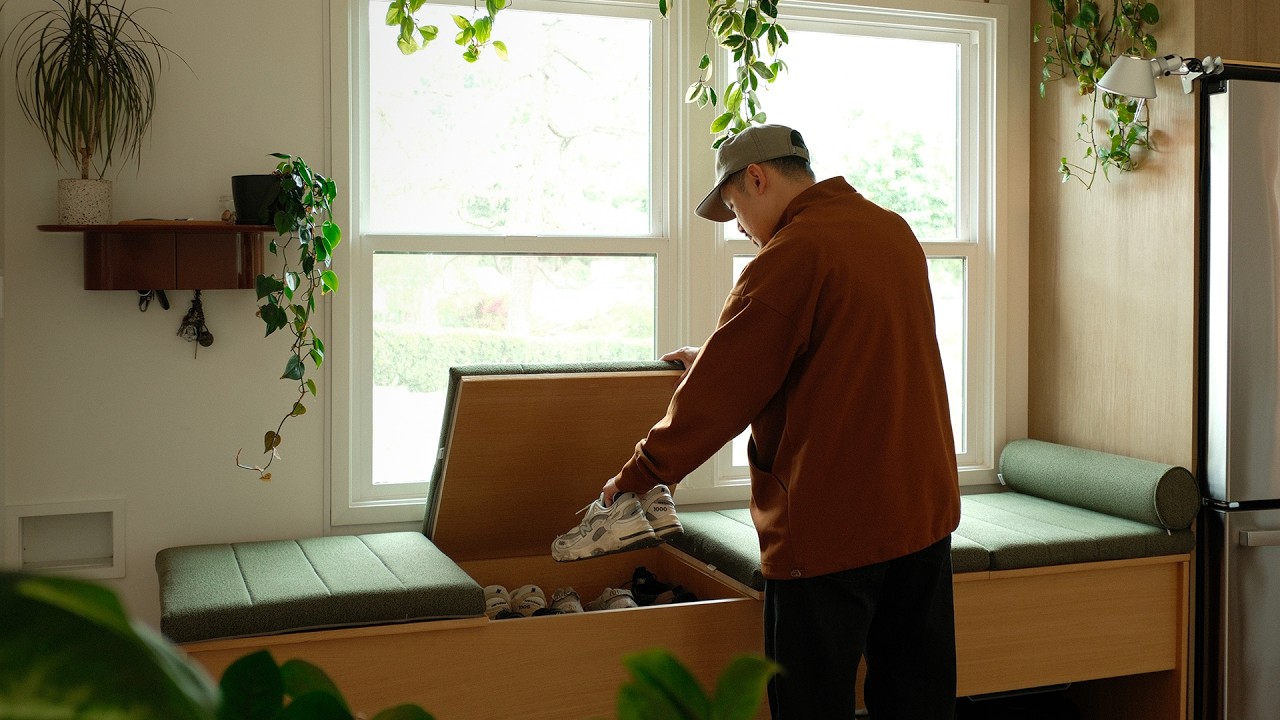
In this video, I design and build a custom DIY entryway storage bench with shoe compartments, cozy seating, and a hidden bay for our Narwal Flow 2 robot vacuum. Along the way, I repurpose wood from my old studio worktable, upgrade my cutting setup, and work through a few stressful measurement mistakes that force me to adapt the design mid-build. We finish the corner with lighting, styling, and an overhead shelf, and I add one final personal detail to commemorate my dog, Chuy. ▬▬▬▬ Links & Resources ▬▬▬▬ Using some of the links below, I may receive a small commission at no extra cost to you. This is the easiest way to support me and helps me continue making content like this for you. Thank you 🙏 💻 Full Details and Project Breakdown Companion blog post: https://www.modmusings.com/blog/diy-storage-bench-with-hidden-robot-vacuum 🛠️ Power tools by Makita: https://amzn.to/3ADWpmv 🎧 Do you like the music in this video? It's all from the Epidemic Sound library. Use my link to get your first 30 days for free: https://share.epidemicsound.com/matthewencina 🎥 My video gear: https://kit.co/MatthewEncina/matthew-encina-s-essential-video-kit 📝 The Notion Template I use for my videos: https://www.modmusings.com/video-production-template ▶️ Related Videos DIY Desk Setup & Home Office Tour: https://youtu.be/eP8DH3n0Eu4 Multifunctional Creative Workspace – Office Tour 2023: https://youtu.be/lWcOmX3cSvc If you're reading this, drop a coffee ☕️ emoji in the comments. ▬▬▬▬ Video Chapters ▬▬▬▬ 00:00 – Intro: DIY Entryway Storage Bench (Shoes + Seating + Hidden Robot Vacuum) 00:48 – Goals + Design Challenges for a Cozy Entryway Corner 01:32 – Designing the Bench in Fusion 360 (8ft Shoe Storage + Vacuum Bay) 02:04 – Repurposing an Old Worktable (Reclaimed White Oak Plywood) 02:38– Cutting Plywood: Makita Plunge Saw + Pocket Hole Joinery Tips 03:41 – Big Mistake: Robot Vacuum Clearance Problem (Fixing the Bench Height) 04:38 – Sponsor: Narwal Flow 2 Robot Vacuum (Real Home Cleaning Features) 05:56 – Sanding + Edge Banding Plywood (Furniture-Grade Finish) 06:36 – Finishing the Wood (Water-Based Top Coat, Thin Coats + Cure Time) 07:03 – Assembly with Pocket Hole Screws (Keeping Everything Square) 07:23 – Lining Shoe Storage with Vinyl (First Attempt Fails, Second Works) 08:26 – Installing Piano Hinges + Leveling the Bench (Playing Card Spacers) 09:26 – Upgrading Storage: DIY Angled Shoe Racks (3D Printed Brackets) 11:01 – Custom Cushions Gone Wrong (How I Trimmed Upholstery Foam to Fit) 
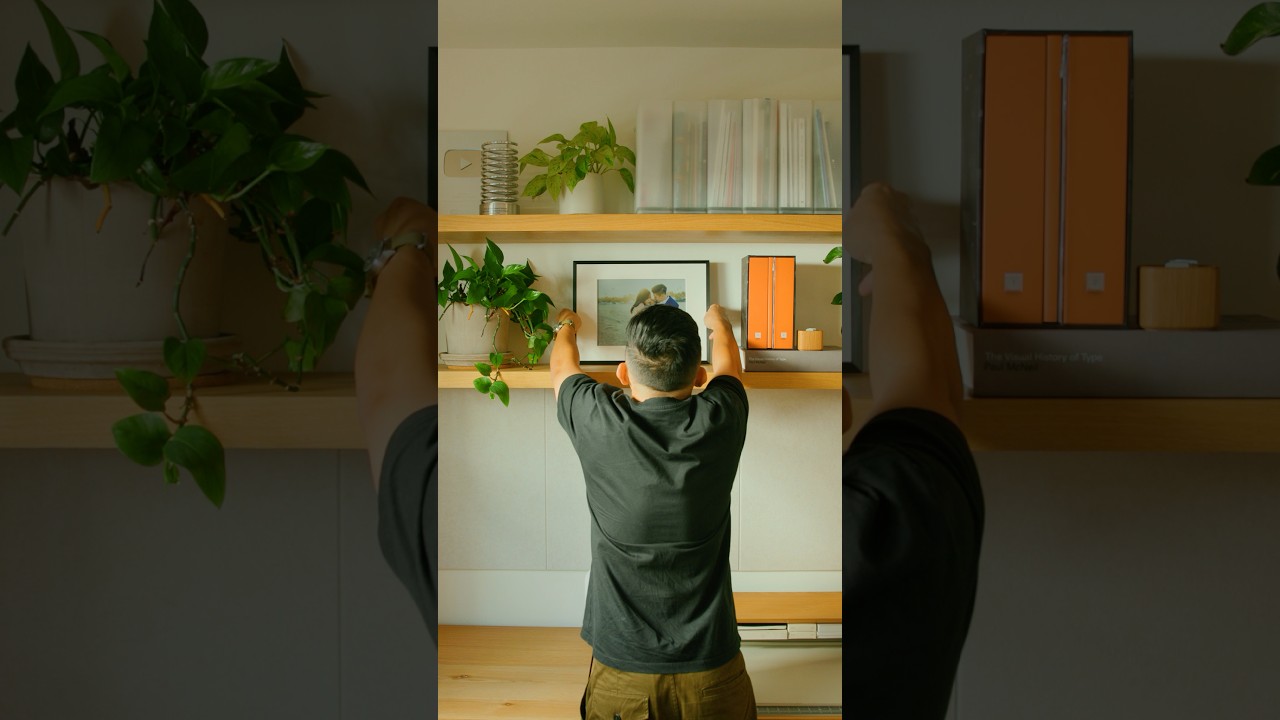
12:25 – Styling + Lighting the Entryway (Figma Mood Board, Hue Bulbs, Pendant + Clip Light) 14:06 – Overhead Shelf + Plants (Brass Brackets + Using Leftover Offcuts) 15:06 – Tribute to by Dog Chuy (3D printed golden badge) 16:45 – Final Reveal + Parting Advice (Measure Twice, Read the Fine Print) ▬▬▬▬ Follow for more ▬▬▬▬ Personal Instagram: https://instagram.com/matthewencina/ Design Studio Instagram: https://instagram.com/modmusings/ My design studio and blog: https://modmusings.com Personal Website: https://matthewencina.com ▬▬▬▬▬ Credits ▬▬▬▬▬ Created by Matthew Encina © 2026 Mod Musings, Inc. #DIY #storage #home #woodworking #modmusings #matthewencina #designprocess

Оглавление (18 сегментов)

Intro: DIY Entryway Storage Bench (Shoes + Seating + Hidden Robot Vacuum)

The entryway is the first and last thing you see when you walk through your door. It sets the tone for your entire home. So, I built a custom bench that stores our shoes, is relaxing to land on, and hides our robot vacuum. But, the plan almost fell apart when I made a few critical measurement mistakes. And somewhere in the middle of building this, it became more personal than I expected. Hello, I'm Matthew Encina. In this video, I'll walk you through the design, build, and how we styled this corner into a warm, functional space. Thanks to Narwal for sponsoring this video. At the end of last year, my wife and I bought this traditional American home from the 1940s. And if you've been around this channel, you know what that means. I look at every space as a potential future project, and the entryway is the first

Goals + Design Challenges for a Cozy Entryway Corner

big one. We needed storage for all of our shoes, seating that also doubled as a daybed, and a catch-all spot for keys, wallets, and whatever's in our pockets. Before I build anything, I set a few constraints and design challenges. First, repurpose material from my old studio worktable, which was built from lumber core white oak plywood. I didn't need it as a table here, so I want to transform it into something new. Second, the bench needs a dedicated bay for the robot vacuum. And third, I want to figure out the styling and lighting for this corner. My intent is to make this space feel cozy and inviting, somewhere you'd actually want to hang out. So, with my goal set, I start designing.

Designing the Bench in Fusion 360 (8ft Shoe Storage + Vacuum Bay)

For the last few years, I've been building furniture for my spaces, and it's starting to form a signature. White oak, clean lines, subtle depth details that add strength without looking heavy. The bench measures 8 ft long, 2 ft deep, and 20 in high. Inside, I land on four compartments, each just shy of 2 ft. Three for shoes, and the last one is an open bay for the vacuum, so I can dock, deploy, and access it when I need to refill or empty it.

Repurposing an Old Worktable (Reclaimed White Oak Plywood)

Repurposing material isn't free wood, it's a puzzle to solve. My old worktable was made of three sheets of plywood, but it came with baggage. Pocket holes, worn edges, even a bit of water damage. I could take it apart easily, but then I had to design around what I actually had. So, I measured the usable panels and ran them through Cutlist Optimizer to see if my design would work. At first, it didn't fit. So, I went back to the design and tweaked dimensions until the bench worked without buying more wood.

Cutting Plywood: Makita Plunge Saw + Pocket Hole Joinery Tips

To make this build smoother, I upgraded my tools. I used to break down plywood with a circular saw and track adapter. It worked, but always needed calibration, which is annoying when you want to move quickly and be precise. So, I invested in a Makita plunge saw and track. And the first few cuts tell me everything. Cleaner, more consistent, and less fighting with the tool. From here, I get into the flow. Measure twice, cut once, then measure again for assurance. I label parts as I go, then I drill pocket holes. Pocket hole joinery uses angled pilot holes that let you drive a screw from the inside of one panel into another. As the screw tightens, it pulls the joint together, acting like an internal clamp. Strong, fast, and clean. Because this is reclaimed material, I try to use existing pocket holes where I can. And for new ones, I place them about 6 in apart along the edges that need to be joined, mostly on the underside, back, or inside faces. Anywhere you won't really see them once the bench is assembled.

Big Mistake: Robot Vacuum Clearance Problem (Fixing the Bench Height)

Then, the vacuum arrives. But, I can tell right away something's off. It looks taller than I imagined. So, I measured it against the bench design and realized I made a huge mistake. I designed the bench 2 in shorter than the clearance I needed. And the worst part is, I already cut the wood. That's the moment where stress hits, and you can feel yourself starting to spiral. I go back to the design and try to find ways to add the extra height with the least impact to what I have cut. Luckily, I still have a few offcuts left over. I think if I increase the height of the legs and the middle by about 2 and 1/2 in, that'll give me the clearance I need, and it actually adds a little access for cables underneath. The trade-off is the seat ends up a little taller than my normal sitting height, but at this point, I'm choosing what works over what's perfect.

Sponsor: Narwal Flow 2 Robot Vacuum (Real Home Cleaning Features)

If you've been following my home and office projects, you know I'm always trying to make my spaces feel calm, organized, and clean. Narwal, the sponsor of this video, sent me their Floor Two vacuum, which fits beautifully in my home and helps me maintain it. Compared to other robot vacuums I've used, the biggest standout is the FloWash system, which can clean up even the most challenging messes. Unlike a traditional static mop, the rolling track mop cleans itself in real time, so it's always washing the floor with a fresh surface, not redistributing dirt. The Narwal Mine Pro autonomous system recognizes different types of objects and adjusts as it goes. It'll clean closer to stable items, such as table legs, and give more space to things you don't want disturbed, such as cables or your dog. It also gets right up to the edges and baseboards, which is always the first place I notice. The Flo Two has a strong suction, which can pick up the crumbs and dust from everyday life. The dock handles the messy parts in the background, and the indicator light keeps me updated on the cleaning status, so I can focus on my work. It keeps the house calm and clean with less effort. Check out the Narwal Flo Two, linked in the description.

Sanding + Edge Banding Plywood (Furniture-Grade Finish)

Coming back to the bench, I prep everything for assembly. Reclaimed panels always have something. Rough spots, old marks, little surprises. So, I sand down the problem areas and make sure the surfaces feel consistent. And because I'm working with plywood, I edge band every exposed edge with real white oak veneer. It has a heat-activated adhesive backing, so I apply it with an iron and trim it flush. Then, I break and soften the edges with a little sandpaper. It's slow work, but it's the difference between something that looks like a plywood project and something that reads like finished furniture.

Finishing the Wood (Water-Based Top Coat, Thin Coats + Cure Time)

Before assembly, I want to protect the surfaces. I'm using a water-based General Finishes top coat, the same one I used on the original worktable. It doesn't tint the wood much, and it won't amber over time. I apply two thin coats to each surface, allowing an hour between passes, with everything fully curing overnight. It's not the most exciting step, but patience is key here. Thin coats and proper dry time give you the best results.

Assembly with Pocket Hole Screws (Keeping Everything Square)

Now, it's time to assemble. Here, we use our pocket hole screws in the holes we drilled earlier, and use clamps to make sure everything stays square. As with many of my projects, my dad likes to be a helping hand. We've built a few things together, and I've learned a lot from him about being patient and resourceful. I cherish these memories I get to share

Lining Shoe Storage with Vinyl (First Attempt Fails, Second Works)

with him. While planning the bench, my wife suggests lining the compartments with vinyl to make them easier to wipe down. Since we'll be storing shoes, the inside will take a beating. So, while everything is still open and accessible, we apply the adhesive vinyl before moving on. I've never used this stuff, and the first attempt goes badly. Wrinkles, bubbles, and then I tear it. So, we start over. The second attempt goes much better, working slowly, starting from one edge and smoothing as we go. This vinyl is actually very forgiving and easy to peel back if you need to correct mistakes. In the end, we're able to apply the vinyl evenly without bubbles or wrinkles, and I love the look of this sage green color. I was hoping to finish the project here, but I hit a snag. The hinges I ordered for the doors are too large, so I have to stop, reorder the correct ones, and wait for them to arrive.

Installing Piano Hinges + Leveling the Bench (Playing Card Spacers)

arrive. A few days later, I'm ready to install the doors with the correct hinge size. A continuous piano hinge is one long piece that runs almost the full length of the door, and for this bench, that matters. Instead of having two or three separate hinges pulling in slightly different directions, the load is evenly distributed across the full length of the door, which helps it stay straight, reduces twist, and keeps the gaps consistent over time. And because these doors are about an eighth of an inch apart, placement really matters. We use a stack of 10 playing cards as spacers between doors to keep the gaps consistent as we install the hinges. Then, we move the bench into the entryway. But, once it's in place, I notice a wobble. I already had foam grip feet planned for the bottom to keep it from sliding around and to protect the floors, so the feet end up doing double duty. I stack a couple on one corner to level everything out.

Upgrading Storage: DIY Angled Shoe Racks (3D Printed Brackets)

out. I thought the bench was done until I started loading shoes in. The compartments were large, but not optimized. I couldn't quite fit two rows, and there was wasted vertical space. So, I had a new design challenge. How do I fit more shoes in here without rebuilding the bench? The solution I immediately think of is angled shoe racks, using 3D printed brackets holding 1/4 in panels. The concept comes from a previous project when I designed a booth for my company, Mode Designs. I developed these tension fit brackets that hold wood panels through friction without fasteners. I prototype the brackets, realize they need more support, and that the panels need to be about an inch longer to use the full depth. After a few iterations, I print the final brackets in a dark green PLA. For the panels, I finish them with Minwax polycrylic. It's water-based, so it dries quickly, doesn't yellow the wood much, and it's easy to apply in thin coats. And since these panels are going to get scuffed by shoes, I want a finish that's practical to touch up if I ever need to. So, I do three thin coats about 30 minutes apart, and then let everything cure overnight. The next morning, everything slides in perfectly. I add grip tape to the bottom of the brackets to keep them from shifting, and with the shoes angled, I'm able to maximize the storage. At this point, I install my Flow Tube vacuum into the last compartment, and it's a perfect fit.

Custom Cushions Gone Wrong (How I Trimmed Upholstery Foam to Fit)

To make the bench more comfortable, I order custom cushions. And this is one of those moments when you realize custom doesn't automatically mean correct. When they arrive, they're bigger than the measurements I gave, anywhere from half an inch to a full inch. Enough that they don't sit cleanly on the doors, and the bench won't open the way I designed it. And they've also got straps that I wasn't expecting. I go back and forth with the vendor, but they tell me the size variance is within spec, and that's when it hits me. I missed the fine print. I didn't read every detail before I placed the order. So now, I'm stuck with them. I study the cushions to see if I can still make them work. The covers seem fine. The foam just feels overpacked. If I trim it down, the cushion should relax into a smaller size. After a little YouTube university, I learn the best tool for trimming upholstery foam is a bread knife. So, I grab a straight edge and make the first cut. Then another, and another, a little at a time. I cut off the straps as best as I could, then slide the foam back into the covers. And now, it's the moment of truth. I set the cushions back on the bench and slowly lift the doors. This time, they clear. They're not perfect, but they

Styling + Lighting the Entryway (Figma Mood Board, Hue Bulbs, Pendant + Clip Light)

work. With the bench finally working the way I intended, I can zoom out and start thinking about how the entire entryway feels. To help me visualize it, I build a mood board in Figma. The base palette of our home is already taking shape, oak floors, deep greens from the trees outside, and our indoor plants. So, I lean into that and add a few warm accents to complement it. The first anchor piece is this brick red catch-all shelf from Hay. It's a spot where keys, wallets, and the random things in your pockets can land, so the rest of the bench can stay clean. And to make the entry feel a little softer, I added a red runner rug from Ruggable. It adds comfort at our feet, pulls in a warm red accent, and since this is such a high-traffic area, the best part is it's machine washable. Then comes lighting. I lean clean and modern. My wife prefers a little more vintage. And honestly, I usually resist until I see it in the space. We found this reeded green glass pendant with a brass finish. It feels classic, still fits my taste, and in a 1940s house, it just works. Yes, she was right. I added a Philips Hue Edison bulb, so I can dial in the warmth and brightness and sync it to the rest of the house. I still want a softer, more focused light aimed right at the bench, so I added a Tolomeo lamp by Artemide. It clips onto the cabinetry nearby, has a long cord, takes a standard E26 bulb, and the head articulates enough that I can aim it exactly where I need it.

Overhead Shelf + Plants (Brass Brackets + Using Leftover Offcuts)

I already know I want more plants here. I just don't know how to integrate them. And then I remember I still have a few long offcuts left from the studio worktable. So, I trim one down, add edge banding, sand it, and finish it with the same polycrylic, so it matches the rest of the corner. Then I smooth it out with some printer paper after it's all cured. To tie it in with the brass we already have in the lighting and the hardware throughout the house, I find a set of brackets with a subtle aged finish that feels right at home in this space. I use a laser level to align everything, then mount the shelf. Now, I can bring plants in from around the house, give them a proper place to live, and fill the vertical space with a little life. The lamp cable being visible has been bugging me, so I get a white channel to route and hide it in, and it looks so much cleaner.

Tribute to by Dog Chuy (3D printed golden badge)

Just when it feels like the project is wrapping up, it becomes more personal than I expected. During the process of building this bench, my dog of 16 years, Chewy, passes away. He was my best bud, my office mate, and a constant source of light in my life. So, I wanted to give him a place in this project, something we'd see every day. When we received his ashes, they came with a paw print. I want to use it, but I don't want to risk the original. It's too easy to damage, and there's no replacing it. So, I try something new. I download a 3D scanning app and experiment with different modes. LiDAR doesn't capture enough detail at the scale, so I switch to photogrammetry. Photogrammetry works by taking a lot of overlapping photos from different angles that software stitches together into a 3D model. The scan isn't perfect, but it's surprisingly detailed. So, I bring it into Fusion 360, clean it up, and turn it into a small badge I can 3D print. Finishing it takes longer than I expected. Print, sand, prime, sand again, and again. I try to work down the printed layer lines for a while before admitting I'm not going to get it flawless. But honestly, that ends up feeling appropriate. Nothing about this season of life is perfect, and I don't need the badge to be perfect. I just need it to exist. So, I finish it in a subtle metallic gold spray paint and install it on the side of the bench. Now, when we walk in the door, it's there. A small reminder of Chewy built into a piece of our home.

Final Reveal + Parting Advice (Measure Twice, Read the Fine Print)

By the end, the entryway feels complete. Everything has a home now, shoes, keys, and the things we use every day. It feels calm, intentional, and sets the tone for our home every time we come in and every time we leave. If I had any parting advice from this build, it's probably this. Measure everything twice, then measure it one more time before you cut. Read the fine print before you order anything custom. And when you mess something up, don't spiral, take a breath, and focus. There's always a way through every challenge. If you like this video, I'll be building more projects in this house. Subscribe if you want to follow along. Additional details and links are in the description, and if you have questions, ask, and I'll do my best to answer them. With that out of the way, it's time to get back to work.

Другие видео автора — Matthew Encina

Ctrl+V

Экстракт Знаний в Telegram

Экстракты и дистилляты из лучших YouTube-каналов — сразу после публикации.

Подписаться

Дайджест Экстрактов

Лучшие методички за неделю — каждый понедельник