Bounding boxes tell you where an object is. This video adds SAM 2 to the pipeline and converts every box into a precise pixel-level mask.
We extend the Notebook 1 pipeline: Grounding DINO detects the objects, each bounding box is passed to SAM 2 as a prompt, and SAM 2 returns a binary mask following the exact boundary of the object. We test the full pipeline on all three image types from the previous video — natural image, H&E pathology, and electron microscopy — and see the same pattern: the pipeline works well where Grounding DINO detects reliably, and breaks where it does not.
We then introduce SAM 2's point prompt mode as the solution to the EM failure case. A single click on a mitochondrion produces a precise mask even though automatic detection was impossible. This is the human-in-the-loop workflow: you provide the location, SAM 2 provides the boundary.
The video closes with a side-by-side comparison of boxes versus masks across all three images, making the progression from Notebook 1 to Notebook 2 visually concrete.
Notebook: https://github.com/bnsreenu/LLM-Assisted-Scientific-Image-Annotation-Tool/blob/main/02_dino_plus_sam2_masks.ipynb
#SAM2 #SegmentAnything #GroundingDINO #ImageSegmentation #GoogleColab #Python #DeepLearning #Microscopy #Pathology #AIforScience
Оглавление (3 сегментов)
Segment 1 (00:00 - 05:00)
Hello everyone. Welcome back to my channel Digital Shreni and also welcome back to our applied LLM for scientists series of videos, tutorials, and this is the third in that specific series. And in the last one, we have used the Dino, the grounding Dino model, to just enter a little short prompt to detect the objects that we are interested in. And for detection, what do we mean by detection? We put a bonding box around them. And now in this tutorial, let's actually take it to the next level by applying a SAM 2 model in these bonding boxes to actually paint the pixels around the object of our interest. So, this is basically what we are after, right? Semantic segmentation or annotating your entire object of interest. Okay, so let's go ahead and jump into the code and continue the discussion over there. And if you have watched my last tutorial, again, I seriously like I hope you did, then most of the elements we're going to, you know, discuss here are pretty much are used here, not even discussed, you know, are from the last tutorial. So, the only thing that's additional is extending, you know, adding the SAM 2 step. So, let's focus a bit more on that step and then wrap this video up. Okay, so the workflow or the pipeline here is text prompt. You use ground grounding Dino to get the bounding boxes and use those bounding boxes as input to your SAM model because SAM can take like individual points or a grid of points or it can take a mask as input or a bonding box as input along with your original image to give you the pixel masks, and that's exactly what our plan is. Okay. Now, to install this, again, let's go ahead and run these uh If you're working in Colab, it's very easy because you don't have to install a lot of libraries. Most of them come pre-packaged with Colab. If you're doing this on your local system, obviously no need for me to mention to install the the you know, the libraries in your local environment. Okay, here we're just checking whether this is exactly the cell we did execute in the last tutorial also. We just want to see if the Transformers is properly installed. If so, what the version is, it should be definitely greater than 4. 51. It should be 5. something. So, once it's loaded, then let's go ahead and import the next bunch of libraries like torch, numpy. All of these are pretty standard version 5. 0. Great. And from Transformers, we are getting auto processor, auto model for zero-shot object detection. That's pretty long, but that's exactly what we use for our grounding Dino and SAM 2 processor and SAM 2 models. Uh also, you know, from here. And CUDA is available. Again, this is on Google Colab only if you make it available under your runtime, right? Change runtime, change it to GPU. So, once you have that, now let's go ahead and load both models. The last time we looked at loading only the first one, IDEA research grounding Dino base, but now we have from Facebook, we have SAM 2. 1 HIERA small. Uh you can explore a couple others like you can do large, for example, but small actually works okay. The obviously the larger the model, the better it is. Same with the grounding Dino, right? I mean, the larger the model, the better it is. Okay, let's go ahead and run this. So, it downloads the Dino model, and then we will also run the SAM once this is done. So, this is still running and grounding dino and let's go ahead and also run this cell so it downloads the next model and I'll continue I'll pause the video and continue once those two are ready. It should be literally a few more seconds. — [snorts] — Yeah, like I said few more seconds and it's all ready. Now, let's define some helper functions so we can call them and create our pipeline nice and easy. The first one is again detect. This is the one we had from our last tutorial. This is the grounding dino which takes our input image text prompts and whatever the threshold that you want for both the box and the text thresholds. Text threshold usually something I don't change not much of an effect. I can go ahead and read the documentation about it but box threshold of course does make sense. So you need to adjust this based on the type of images you're working on. So that's of course is an input that goes into our function right there for detect and again we are providing our prompts just like you know lower case text but what we are doing here is
Segment 2 (05:00 - 10:00)
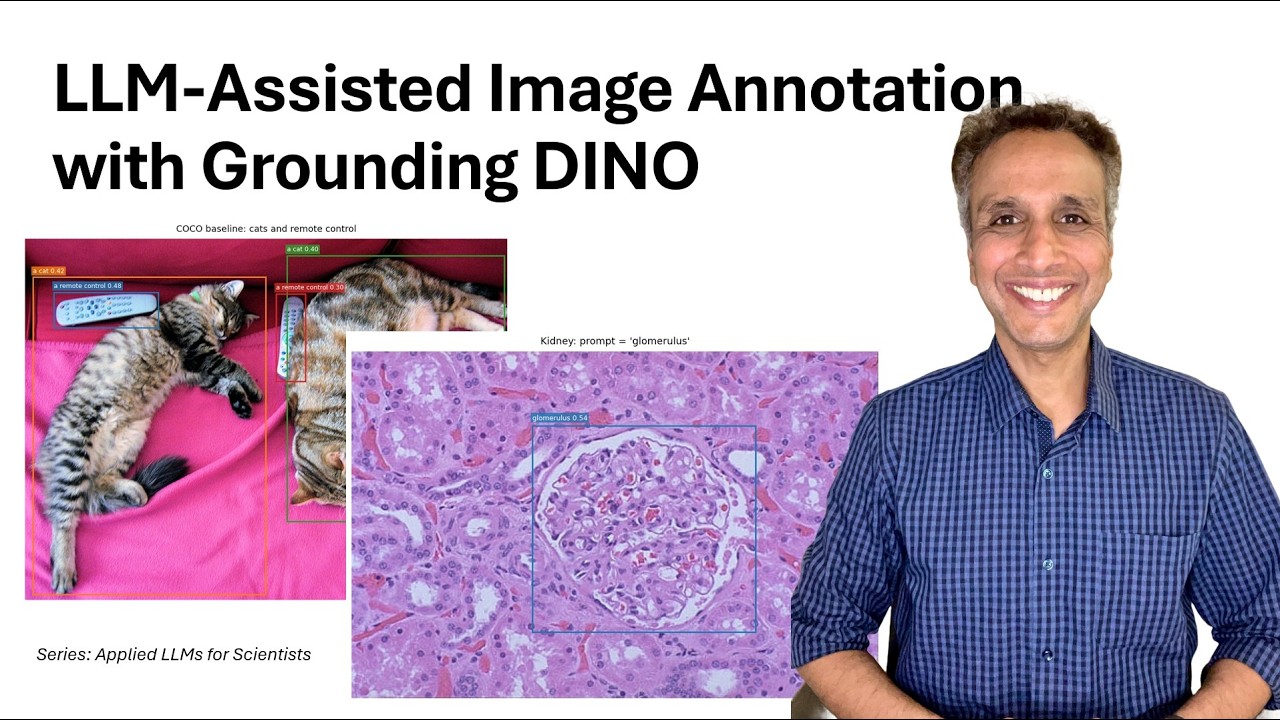
to our prompts we're actually adding a period because that's how the inputs to grounding dino need to be for it to be effective. And now we have our inputs grounding dino processor and then once you have your inputs that goes as an input into your grounding dino model like our pro post process grounding object detection. And that's it and that's your grounding dino. That's again from our last tutorial. On top of that I added a few more functions like filter large boxes. Again in some images maybe detects the almost the entire image as an object. So this is there to clean that up if that's of a concern. You don't need to use that and apply NMS, the non-maximum suppression is also if the same object being detected multiple times, obviously you don't want that. You want to take the highest probability one and just suppress the other ones, and that's what I'm trying to do here. And SAM 2, these are the new ones. The SAM 2, the segment with SAM 2 function right there. This is very straightforward. All it needs is an image as input and the boxes as tensor, the coordinates of your boxes as a tensor input to That's it. That's pretty much it. And as you can see, the SAM 2 processor, it takes our image and the boxes list as the input, and that's pretty much it. And it provides us the when you apply when you mask, and that's the mask we're using to just plot it. I There's not much explanation here. I mean, I don't know what else to explain, so let's go ahead and run this uh block. And I mean, we are actually printing IOU values. So, that's one thing. And show masks is just a plotting function. Okay, so once you have that I mean, I also added one thing called run pipeline here. So, when you call that, of course you're providing the input image and the prompt and the box threshold. And the pipeline actually runs the detect first, which is our grounding dino. And then that goes in as an input, the results from there input to our filter large boxes and apply NMS, right? So, now you get the results, actual results from your grounding dino. And those results actually you know, also contain the information about your boxes, right? The coordinates for the detection boxes, and that's what we kind of extract and provide as input to our segment with SAM 2 along with the original image and it does its magic and you get your masks as output along with the IOU scores and we are just plotting the masks right there along with the IOU scores and original image. So, nothing fancy. Now, let's go ahead and test this on our Coco image, the one that we tried the last time, the one with cat and remote control. And this is our original image and let's go ahead and apply our pipeline onto this image with prompts, a cat, a remote control. Again, I'm not putting a period here because I'm adding that as part of my you know input pre-processing in a way. And the threshold, let's leave it to 0. 25 and let's see how the output looks like. Previously, we only had the bounding boxes and now you have the bounding boxes, of course, you can hide them if you don't want, but the cat is colored, the cat is colored in green in this case and the remote is colored boxed and colored right there. So, that's exactly what we mean. Extending our bounding box into a you know into a mask right there. Now, let's get into our kidney pathology. Again, there is no more surprises left. We checked in the last tutorial that we can actually detect the kidney, you know, not kidney, the glomerulus within the kidney just by providing a prompt right there, glomerulus and I think with a threshold of 0. 25 it should actually work and we are running this entire pipeline, which means we not only get the bounding box, but we also get This is amazing how SAM 2 is so nice, you know, look how it detected this object. Now, you have a mask. Now, you have detected that. You can save this mask, which Again, stay tuned for the next tutorial. We'll bring all these concepts into nice app that kind of I packaged. So, you can actually use it right away to annotate and save masks. And now electron microscopy, again this is a dataset we worked on in the last tutorial. And you can see this is our slice one that we are going to work with and let's go ahead and do our first attempt. We are running the pipeline and we are providing a prompt called mitochondria and a threshold of 0. 25, okay? And no
Segment 3 (10:00 - 12:00)
detections above the threshold, try lowering the box threshold. For now that we know that okay, by lowering this we may detect a couple of these objects. Attempt two, very low threshold forces some detections to show SAM two. I mean it actually provides something to SAM two, right? So let's go ahead and decrease the threshold to 0. 05. All I did is basically change the threshold right there, yeah? And there you go. It detected some of these mitochondria, painted them, so now you have a nice mask to these mitochondria right here. So, pretty good decent IOU scores right there. Object segmented eight and side-by-side comparison and let's end this video. This doesn't sound as exciting as the last one. Hopefully the next one will be exciting because we are just adding the SAM based you know annotations or masks right here. So, all we are doing here is showing these two side-by-side so you can actually see exactly what we have done. This is what we did, the left-hand side in the last tutorial, the right-hand side in this tutorial where we apply this mask which is a lot more useful if you are focused on semantic segmentation than just the bounding boxes, yeah? Or even instant So, in our next tutorial let's go ahead and bring all of these together and create a nice maybe using PyQt. I haven't done that so I shouldn't promise a lot yet. Let me go ahead and create that possibly using PyQt. So, we stay within the Python environment, and then let's fire up the user interface, and let's load an image, and try to detect these objects, and see how many objects can be detected in an automated way. And if some of the objects are not detected, let's use the classic SAM to click and actually get the detections done. So, I'll see you in the next tutorial. Until then, please do not forget to hit the subscribe button, and thank you very much.