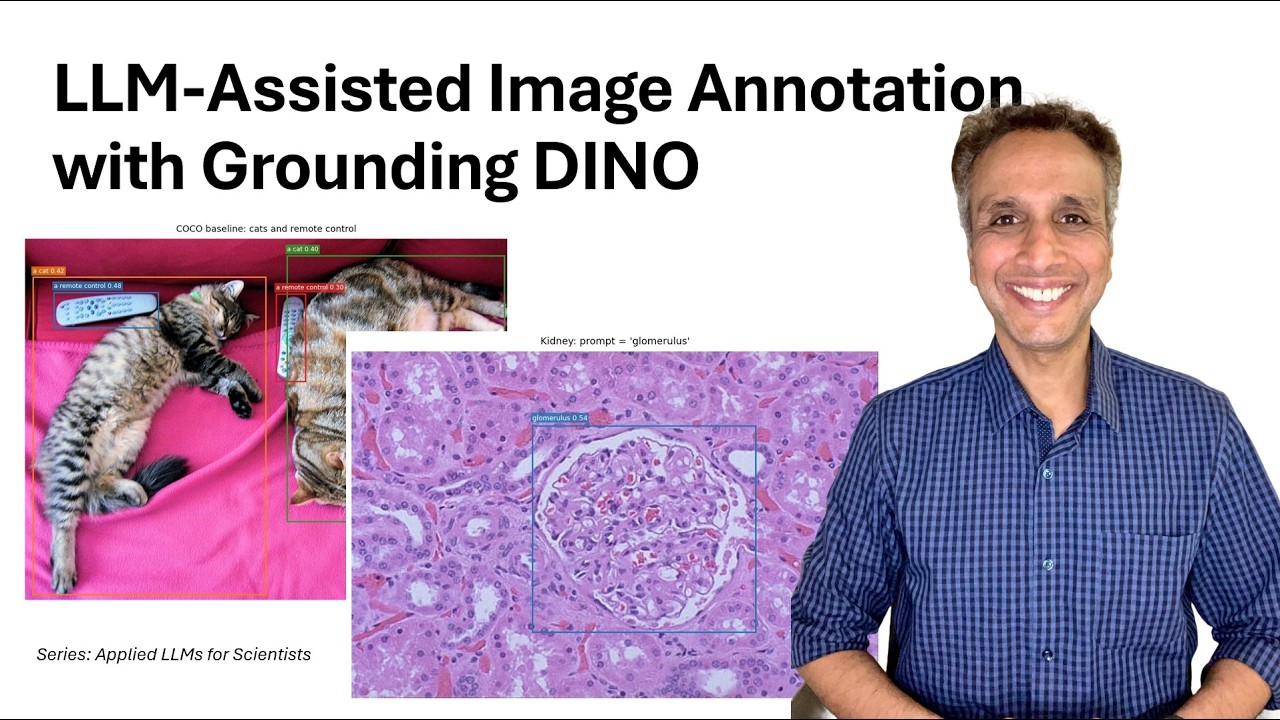
In this video we build the first half of the annotation pipeline from scratch in Google Colab: Grounding DINO for open-vocabulary object detection.
Grounding DINO can detect any object you describe in plain English, with no task-specific training. We load the model via Hugging Face Transformers, test it on a natural COCO image to confirm it works, then push it into territory it was not designed for: an H&E kidney section and a Lucchi electron microscopy stack.
Along the way we work through every practical detail you need for real use: how to format text prompts correctly, what the box threshold and NMS threshold actually control, how to filter out whole-image false positives, and how to interpret confidence scores. We show the results honestly — including where detection fails and why.
The notebook is ready to run with a free Colab T4 GPU. No prior experience with object detection required.
Notebook: https://github.com/bnsreenu/LLM-Assisted-Scientific-Image-Annotation-Tool/blob/main/01_grounding_dino_bboxes.ipynb
#GroundingDINO #ObjectDetection #ZeroShot #GoogleColab #Python #DeepLearning #ImageAnnotation #Microscopy #Pathology #AIforScience
Оглавление (4 сегментов)
Segment 1 (00:00 - 05:00)
Hello everyone. Welcome back to my channel Digital Sreene and also welcome to the second tutorial as part of our applied LLM for scientists series. And please watch the first video if you haven't already. And the plan here is not presentation. We'll directly go on to Google Colab. I'm doing this in Colab so you can immediately reproduce what I'm going to show you. And the third video is going to be not on Colab but regular Python, but wait for that. Um the plan is to get familiar with the Grounding DINO, how to import that model, how to actually apply that to a couple of images, and then that's it. And in the next tutorial, let's actually do exactly the same except instead of providing the bounding boxes, we are going to use the SAM model to actually convert them into masks. Okay, let's go ahead and jump into our Colab notebook. And here is the notebook. And again, the link to this code is down under description. And I tried to annotate this as well with the use of AI, of course, as much as possible. The goal again is to load the Grounding DINO via Hugging Face and test it on our natural images and then go ahead and test it on a couple of scientific images. So, the step number one is to install and import. And again, on Colab, it's a bit straightforward because you don't have to take care of your Tensor not TensorFlow, the PyTorch. That's what you need. And GPU, everything is already there. And I should stress, please go ahead and change the runtime and make sure you select GPU, like right here. Select the four GPU. And it makes things a bit faster. That's pretty much it. You need these libraries, like Transformers, Accelerate, and TIFF file. TIFF file just to read our files, right? And from the Transformers, we are going to I mean, it requires uh Transformers greater than 4. 51. 0. So, all we are doing at this point is basically checking if the Transformers is okay, if everything is fine. That's all we're doing right there. And the next thing to import is like torch. Torch, I know Google Colab actually already has it. Otherwise, you have to obviously install on your local environment, but everything else is pretty much uh there's no surprise right there. Yeah? So, let's go ahead and run this. Uh the only thing is from Transformers, we are actually getting auto processor and uh you know, the auto model for zero-shot object detection. Uh for now, let's say that's pretty much it. And checking your CUDA, yes, we have CUDA right there. Great. Loading the model is pretty straightforward. Again, uh I haven't downloaded them prior and then using That's what I recommend if you're doing it on your local system on a regular basis. You don't want to be downloading and overloading their servers. So, go ahead and download the models first and then point them here. But, for now, uh the model is uh I'm actually downloading the model. So, the model ID is IDEA Research Grounding DINO base. DINO actually offers two models. I think one is called tiny, the other one is base. I'm going to use base right now. Yeah, the tiny and the base and uh the base is what we are using from the IDEA Research guys right there. And I'm defining a processor here and auto processor from pre-trained and I'm just giving the model ID. And model ID being this. And that's how you are going to get your model. And uh I am actually defining my actual model as auto model for zero-shot object detection and it's coming from this pre-trained uh model the right there. And we are pushing that to our device, which is our GPU right here. And that's it. And model. eval right here. So, this downloads the model and you will see that it is going to download right there and it's downloading the weights. It's about uh 1 gig actually, so it's pretty fast if you do it on Colab, the downloads. So, it says the weights are ready right here. Pretty fast. Nice. And we can define again two reusable helper, you know, functions right here. One is called detect because I mean, the detect actually runs the grounding dino on any image that you actually provide it, so it helps us not to, you know, it's pretty straightforward. And show detections is where we visualize these bounding boxes on the images around the objects that it actually detected. So, how does it actually perform the detection? And again, the way you provide, I think one thing, I don't know if I explained it yet, is maybe I did write it down somewhere. I thought of writing it down. Yeah. So, one rule you must follow, the text prompts that you actually provide must be lowercase and they should end with a period. Like for example, you do a cat and then a period right there. You don't just do uppercase a cat. Okay? What happens if you violate it, it
Segment 2 (05:00 - 10:00)
slightly degrades the results and that's what they suggest doing. And if you have multiple prompts, multiple, you know, of these, so a cat, period, space, a remote controller, period, space, something else, period and so on. Yeah. That's how you should do and that's exactly what we are like the way I actually showed you here. Okay? We should actually put a period right next to it. So, it's looking at those and the inputs is basically our processor and our input image, the text string, whatever the text string is. This is a single string, not a list. We are taking that list and we're kind of providing them iteratively, but this is a single string and uh device. And uh the next thing is uh your results. Like, that's your inputs. The inputs actually go into your um where do I see? The inputs go into right there as an input. And then uh and uh this is your processor post process grounded object detection from your pro processor. And that's how you're going to get your results. Again, you can take this uh copy as is, and if you want more details on exactly what other parameters, go look at the documentation, or ask Claude, for example. But, this is exactly what we have. And once you have the results, let's apply that as an input along with the original image to your uh you know, next function, which is show detections. Let's run this, by the way. And uh here, go ahead and display it. This is just a matplotlib plotting function. There's not much. So, those are just the two primary functions we defined. I Actually, I should have added the information up here. We have two other helper functions in addition to these two, which I had to add later on after seeing the results. Uh I started seeing uh multiple boxes around the same object, because it kind of gave multiple probabilities. So, I have uh non-maximum suppression added here. So, per object, you get like the one box, and that box represents whatever the maximum highest probability is between all those boxes. That's exactly what NMS does, and hopefully you have done this. Uh if you did the you know, this type of detection in the past. And also filter large boxes. I added this when I realized in some cases, depending upon the threshold that you actually set, uh it may actually detect half of your image as uh as an object. Obviously, that I mean, unless you have such large objects, in which case you should not do this. Typically, that's not the case. So, I'm like, "Hey, if the box uh area fraction is 70%, that's probably not an object that I'm looking for. So, go ahead and remove those boxes. " So, this is just post detection filtration that I'm doing here. So, we are running those functions right there. Now, moment of truth. Let's go ahead and test this on an actual natural image, and this should do a good job. Not a good job, a great job on natural images because that's what it's trained on. So, I am getting one of the images from uh the Coco uh dataset. Again, you probably know what Coco if you don't know what Coco dataset is, it's a bunch of images that has different types of uh things in it that people usually use to train, you know, these object detection models. And since you have ground truth, you can kind of validate against them. So, in this case, we are fetching one of those images right there. And this specific image has a uh cat and a remote control right next to it. So, let's uh give a prompt of a cat a remote control. I'm just giving these prompts without a period because I'm adding that period right here just to make sure uh that I add that to all I think Yeah, right there. Yeah. So, whatever the prompts you give, it adds a period. So, we don't have to give those uh you know, at the time we are providing. So, I added an extra function right there or extra line of code to do that. That's it. And once you have this, we call our detect function. And once it detects, now you have the bounding boxes, we apply NMS. And uh let's see how uh how this performs. So, let's go ahead and run this. First, we should actually see a uh well, I thought I was printing two images before after, but it's easy to see right now. You can see a cat right here with uh a score of 0. 42 and a remote control 0. 48. And oh, there are two cats with two remote controls, and it's actually doing an amazing job. And all we did here is provide a prompt. Yeah. This is This is amazing, actually. I hope you appreciate this. It's taking our prompts, converting that to embeddings. So, it's not segmenting the image. It's not doing anything. It's not It's basically taking our prompts and detecting those uh uh you know, items based on the embeddings. That's it. Okay, great. Uh we have lots of ways of detecting cats
Segment 3 (10:00 - 15:00)
and all of these. So, does it actually work on a glomerulus image? Again, I Google searched for an image and I'm fetching that image here. Hopefully, when you run this, uh you should actually uh you know, this image should still be available out there. If not, just go ahead and download or point to a different image. Uh I think uh I got this from Tel Aviv University web path right there. You can see Tel Aviv University. And uh let's go ahead and plot the image first, so you know exactly what we're talking about. So, this is the uh kidney H& E uh image. Looks like H& E image right there. And this structure is the glomerulus. And again, in the This is uh from a kidney. And in kidney, you have these glomeruli, if it's plural, a glomerulus in this case, one glomerulus. And the goal is to detect that by providing just a single prompt. So, we're providing a prompt called glomerulus. I'm not saying, "Find an object blah blah blah. " I'm just saying one word, glomerulus. And sometimes it may not work, then you may have to describe uh find the round uh thing or whatever. I don't know. I can't think right now while I'm speaking, but you may have to describe it, which we'll do later on, actually, for a different image. But, this is what we have. And once I get the results, I'm going to filter the large boxes because in this case, it may find like this entire image to be a glomerulus because it See, this doesn't look that different from rest of it, except it has nice boundary and some additional subtle things that are different. That's why it may detect the entire image as uh a glomerulus in which case I am filtering that out and I'm also applying NMS in case we get multiple detections for a given glomerulus and I'm just showing the detections. That's it. Okay, go ahead and comment these two out and see how the result looks like so you know exactly what I'm talking about and there you go. Glomerulus 0. 54. I have much better you know confidence in detecting glomerulus than detecting cat or the remote control. That's I was surprised. I mean obviously I posted this on LinkedIn. I'm like hey guys, this is how cool it is, you know, and I still think it's pretty cool and yeah, that's where I thought okay, that's fine. How does it work on a different glomerulus or a different image? Um possibly I think this is the one with multiple glomeruli. How does it actually work? And I [snorts] I have an image uploaded to my Google Drive and make it made it available right here and rest of it is pretty much the same. I'm just plotting, detecting glomerulus again. I changed this box threshold. This is something you have to pay attention to, okay? I changed this I think I'm loading the IHC image. This is not H& E image anymore. So and I changed the threshold. So that's one thing. Here what threshold did we use? We used a threshold of 0. 25. So go ahead and play with this threshold because the if you drop it down, it may detect a lot of this background as glomeruli so you have to adjust that parameter for your specific image. So let's go ahead and run this part, my custom image and let's see how this actually works out. And this is how the custom image looks like. Again, this is obviously not an H& E image. That's an IHC, but you can see the glomeruli right there. So as you can see, it worked kind of well. The I said kind of because I don't like this being detected. And it's a low probability of 0. or low confidence of 0. 08. I chose to include that because if I go bring my threshold to 0. 09 or something, then I would lose some of these. Like I would lose this one, I would lose that. So for now I left it right here. Later on I can just click and delete it when I get to real production mode of actually doing the annotations. So it's easier to delete a couple of them here than adding a bunch of them. Maybe in this case we still need to add a couple of these. But right out of the box doing nothing with just a prompt that says glomeruli it is or glomerulus, it's actually doing an amazing job as you can see. Um in fact, let's actually change this glomerulus to glomeruli and see if it makes any difference. I don't know. I should have tried this but earlier but let's see if it actually makes any difference. Yeah, now it actually picked only one. Don't ask me why. This is a language model and probably it saw a lot of annotations of images in published journals with glomerulus and not glomeruli and that's why it actually worked very well. That's why testing these is very important using different types of prompts. Yeah, as you can see it's very sensitive. So it's very strong when I say glomerulus compared to glomeruli. Okay. So now
Segment 4 (15:00 - 19:00)
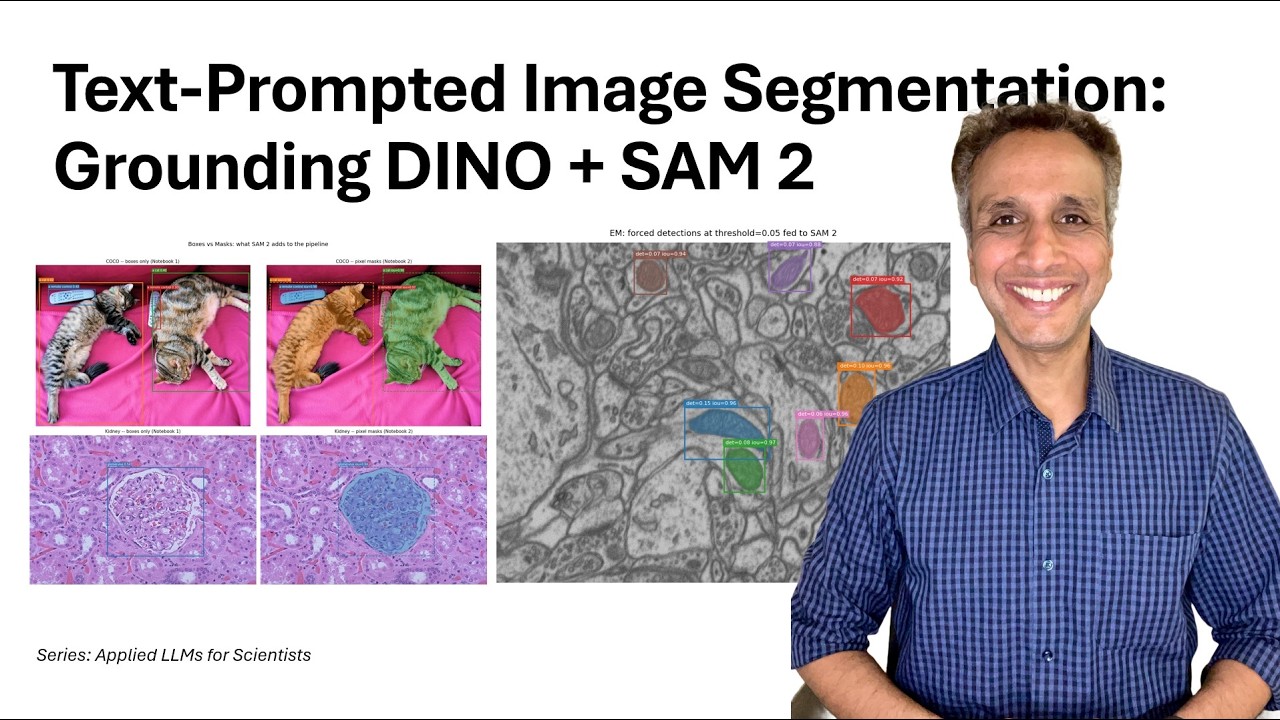
let's go ahead and I mean I added some text in terms of what happened if you did not detect anything and so on. On your own images go ahead and read that. But now most importantly let's looks at let's look at electron microscopy data set and again this is from uh the group the Lucci group I believe from EPFL in uh Yeah, I think that's uh where these images come from. So, I kind of I downloaded them and I um the full data set and I extracted only like 10 slices or 12 slices and you'll see the slices down here. So, I just wanted to make sure we look at these first. And uh yeah, I downloaded them right there and let's go ahead and look at um all the slices that I have so you know exactly what we're dealing with and then let's work with one slice at a time. You see they all look very similar because this is a Z-stack and things don't change a lot as you go from one slice to the other. So, let's work with slice number one. And that should be fine. So, that's what I'm doing right there. From slice number one, that's what uh and then selected slice and uh let's go ahead and uh show the slice right here. This is what we're dealing with. This is the image. Obviously, these are the mitochondria. We can tell as experts as human experts, but uh can the can uh you know, the Dino model do that? So, I am setting threshold to 0. 25 and let's go ahead and run it. I'm not seeing anything. In fact, this is the time to play with this, right? So, let's change this to 0. 1 and does it actually detect something? Oh, that's not bad. It detected two mitochondria right there by changing the threshold. So, play with the threshold. That definitely helps right there and uh the prompt is just mitochondria right now. Okay? What if the prompt is something else? Let's say I'm not even saying mitochondria, I'm just saying a dark oval structure and elongated dark region and I put a box threshold of 0. 2. I just various ways of providing your prompts, right? I mean, if it may not know what mitochondria is, but it probably knows what a dark oval structure is and elongated dark region is. It's actually doing uh a decent job. It detected 1 2, 5, 6, 7, although it detected this large one as I should have actually applied. I only applied Oh, I did apply filter large boxes. Maybe you should just change the size to something else. It's probably not 70% right there. But this is exactly why I have this large boxes thing right here and to clean things up. And NMS is not a problem in this case. It's not applying multiple things to the same at least I mean obviously we are cleaning it up. Let's do one more. I think I have another one very low threshold of 0. 05. Again I'm going back to mitochondria and let's go ahead and check things how the result looks like. This is pretty good now, right? So it detected all of these mitochondria and what happens if I actually go even below 0. 05? go to 0. 02? It probably picks up some background stuff. You see all this background stuff which we don't want. So you need to find that threshold and 0. 024 I don't think it changes much. I did change a little bit. So 0. 03 probably does the job. No, it's not. So let's go back to 0. 1 for now or 0. 05. You got the point. I mean go ahead and play with this threshold and also prompts. The type of prompt that you actually enter. So that definitely you know, helps right there. So again I mentioned why it likely fails but you know, you can see the things that actually control are the threshold and the threshold sensitivity right there. And let's actually change the different I forgot I added this part. On the cat image let's actually change the threshold sensitivity because that's easy to see. We are doing thresholds 0. 1, 0. 25, 0. 4, 0. 55 and 0. 70 and for each of these thresholds, hopefully you can see on your side you know in the video for each of these we have you know these detected very low thresholds as you go to high thresholds you see this remote control is not detected at the threshold of. 4 and once you go to. 55 it didn't even detect the cats. We know that I mean we saw a threshold of. 48 I think for the cats and point something else for these. So I think that's pretty much it right now and in the next tutorial let's take this to the next level not just put a bounding box but let's actually convert that into an actual mask. So I'll see you in the next tutorial and thank you very much.