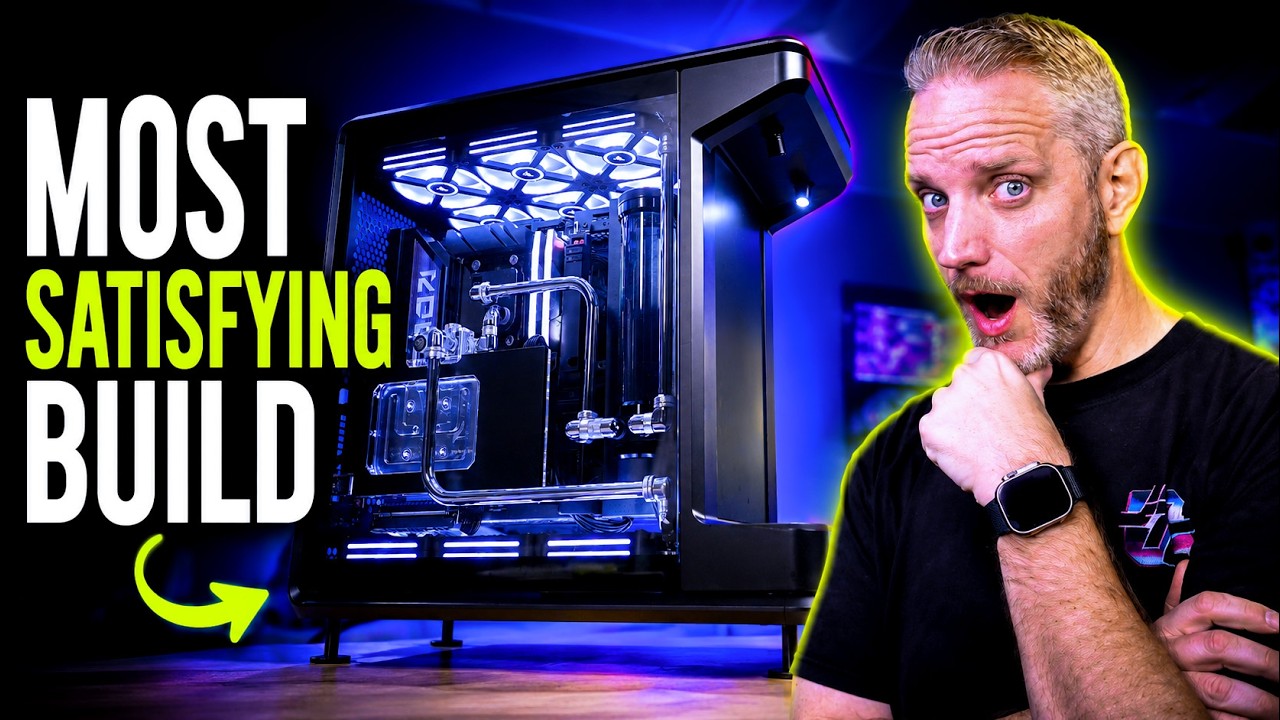
I finally finished the most Epic PC Build of 2026... (Still needs a name) and even though this took forever, it was DEFINITELY worth the wait!
Thank you to Performance-PCs.com for sponsoring most of the watercooling parts used in this build!
Parts List
CPU: AMD Ryzen 7 9850X3D
Motherboard: ASUS X870E Crosshair Hero BTF
GPU: ASUS RTX 5090 Astral
PSU: Corsair HX1500i Link (Seriously awesome PSU!, more than I expected)
SSD: 2TB Gen 5 990 Pro Samsung
RAM: 32GB Corsair Vengeance 6000MT/s CL36
Case: Cooler Master MasterFrame 360 Stage LCD
Cooling Components
CPU Block: Alphacool Core 1
GPU Block: Bitspower 5090 Astral
Radiators: 4x Corsair 360mm V1
Pump/Res: AquaComputer UltiTube D5 Combo
Tubing: 14mm Nickle Plated Brass Tube
Fittings: Various Corsair / Bitspower / AlphaCool Nickel Fittings (truly an assortment)
Fans: Corsair QX120 iCue Link x 12
○ Get your JayzTwoCents Merch Here! - https://www.jayztwocents.com
○ Join this channel to get access to perks:
https://www.youtube.com/channel/UCkWQ0gDrqOCarmUKmppD7GQ/join
○ Join the official JTC Discord! https://discord.gg/jayztwocents
○○○○○○ Items featured in this video available at Amazon ○○○○○○
► Amazon US - https://amzn.to/43wnUsz
► Amazon UK - http://amzn.to/Zx813L
► Amazon Canada - http://amzn.to/1tl6vc6
••• Follow me on your favorite Social Media! •••
Facebook: http://www.facebook.com/jayztwocents
Twitter: http://www.twitter.com/jayztwocents
Instagram: http://instagram.com/jayztwocents#
SUBSCRIBE! http://bit.ly/sub2JayzTwoCents
---
00:00 I'm Finishing This Today
03:06 Figuring Out The Loop
16:37 CPU Plumbing
23:26 GPU Plumbing
26:38 Cable Management
30:50 Build Showcase
33:20 Nuances of Build Process
34:52 Temps Under Load
40:11 RGB Setup
41:24 PSU Rail-Switchable OCP
43:47 Stage LCD
45:19 Wrap-Up
.
Оглавление (12 сегментов)
I'm Finishing This Today
All right, I promised you guys the updates on this were coming. And look, my goal whether it kills me today, which might to get this done today. Um, like I said, there were some delays cuz I was waiting to see if the 9950X3D2 was going to be worth putting in here. Then I went on vacation, then came back to a whole bunch of stuff I had to get done before Compyex. And Compyex is next week. So, I'm like, I want to get this done. Uh, so let's go ahead and talk about some things that have happened since you guys saw this last. I did a little bit of work on here. Remember where we left off? I got this tube in here, which is a perfect run. Matches symmetry with the other side. It's really pleasing to the eye. I started to figure out my run right here. Um, this gap really bugs me right here cuz it's not a EATX board, so it doesn't fill in right here, which if this was a EATX BTF would have been sick because there would have been no cables here to worry about. I guess if I really wanted to, I could take there's holes right here that are threaded. I could take a piece of ABS plastic and cut it to fit in there and like screw it down, which I might do if I have time today. Uh, RAM. I had a set I have a set of Crucial, not Crucial, um, GSkill Trident Z5, which is not Neo. Neo is like specifically for AMD. It works on Intel and AMD, and they pretty much are validated QBL validation on both for these motherboards. But for the best compatibility, you'd want to go with a Neo for an AMD build. And this is a 9850X3D. But I have a set of Z5 XMPP 7200 MHz, but I think it's like CL36 or something like that or mega transfer. Sorry, you guys get triggered when I call it mehz. It's interchangeable. Like it's just that cycles. It's the same sort of thing, right? But anyway, um but I didn't like the way it looked in here. the black with the white writing just really kind of clashed. So, because it's a 9850 X3D, if you guys aren't aware, X3D does not benefit from really fast RAM the same way traditional CPUs that are not uh 3D VRAM built into or 3D Vcash built into the CPU. So, you don't have to go with something super crazy fast. It's marginal at best even a noticeable difference in benchmarks, let alone real world scenarios. So, I have this set of Crucial Vengeance, which I think looks nice in here. It's more of a gunmetaly color. Has no there's no loyalty to it being Corsair, but the benefit is because I'm already going to be running IQ, which a lot of you dubbed I crap. It's fine. I'm still running at home. Still haven't had a problem with it with the latest versions. Uh, it means I don't have to then worry about running Armory Crate to control the RAM and then IQ to control the fans. I can just use IQ to control this and then I can install the ASUS uh SDK in Corsair to be able to control the motherboard as well, which is what I do at home. Although I'm running Gigabyte, it's just a Gigabyte SDK. So, I should be able to get away without having to run Armory Crate at all, which would be great because having IQ is bad enough. Having IQ and Armory Crate on the same system, well, you're just asking for trouble as far as I'm concerned. But these look nice in there.
Figuring Out The Loop
So, I started figuring out the loop order. Remember, this is the return line. So, this is coming from the top rad returning to the reservoir. And then this is the out, which is going to go into my CPU. The center hole, if you have a CPU block that's offset like this with the holes, the center one is always the inlet. Sometimes they'll be on the side or one that's like spaced out evenly and then you have to look at the manual to figure out or look down and it sometimes it's pretty obvious. If you see the jet plate, you're like, "Okay, that's the inlet. " Um, so what I always like to test fit and I always see people comment on my builds over the years of builds I've done saying if you run a tube across your ram you won't be able to get your ram out. And that's never been the case until now based on the height of this ram versus the shallowess if you will of where the 90° coming off of my pump is. So right here it I would not be able to remove that get that RAM out which really sucks because I like the way that this looks and that lines up perfectly on the same plane to where just a single 90 would have gotten it done. But my RAM would be trapped and I don't want that. I need that's the thing about water cooling system. You give up some level of serviceability and things that need to be easily accessible as far as I'm concerned needs to be drive and RAM. Now, what sucks about this one, especially being a rigid tubed build, is we have an M. 2 slot right here, which I have the cover off because we're actually cloning a drive from a working system right now. So, I can get this up and running faster so I can do some thermal tests cuz I ideally I want to get you guys some thermals to know what four 360s do to a 5090. We have like four more M. 2 drives slots down here that are going to be completely inaccessible. I mean, what's going to sort of block it is going to be the riser cable, which in there, and then obviously the GPU right here, and the tubes that are back there. Now, because it is toolless, I might be able to like Nope. Because of those tubes, that is not going to happen. Like, there's going to be a tube right there. I am not going to be able to get this cover off and out of there. And that really sucks because that means there's access to four drive slots right here. But I'm putting a two TB up here. I could have put a 4 TB, but again, that's overkill because I have never filled two terabytes of a drive personally. But that doesn't mean in the future that wouldn't happen. So, I'm not too worried about it. Um, and whether or not I'm going to have drive accessibility problems, but this is where the toolless aspect of this is really, really nice. I got to say, trying to get a screwdriver down there would have been a problem. Same thing with even trying to get a screwdriver in there to screw down the drive once the GPU and everything is in there. So, my recommendation to you is if you want to water cool, but you need the ultimate accessibility to your components, soft tubing with quick disconnects is about the only way you can get that done. What I've seen some people do, which looks really slick, is they'll do like a short piece of soft tubing on rigid tube, and then they'll have it uh quick disconnect into that. So, you have some flexibility to get the tube out if you need to. And then you just take the rigid tube and put it right in there. Uh cuz they do make they're rare, but they do make compression fitting rigid quick disconnects. But again, I they're very, very rare. I've only seen them like a couple of times. and the water cooling industry has recoiled so much I don't know what's even out there anymore. So, the other thing I have not been able to figure out how to get in here is a drain. And all of my builds always utilize a drain because it just makes life that much simpler when you go to have to um to drain the system. And this one is like There we go. I was like, it is not moving. I have these guys right here. This one here, which as you can see is a Y fitting technically. So, we got a straight pass through and then we got a 90 that comes off of there. The problem is I thought about putting it right here, right? That would work. But then I can't get the side panel back on. Like it interferes with the length of this guy sticking out. And then it starts to look really kind of cluttered right there. But let me show you because I have to redo this now and figure out how to get clearance for the ram to come out. Uh, I have to sort of what I'm thinking is I might do so I've got this 90 right here and then I might use this extension just another 90 like that which might get me enough of the distance that I need which means I would have to use if I can find if I have another one hopefully if I don't I'm really screwed cuz actually this would go here but I need the space. See, this is the classic I'm short one freaking fitting that I need. Okay, before we worry about that, how about we talk about the GPU because this is another part where you guys were like, I want to know what your plans are for the GPU. Okay, so here's the GPU. Um, so you can see I've got this 90 right here because when it's in there, that is going to just 90 to here. It's going to be tight, but I'm pretty sure I've got enough length to do it. I hope. Otherwise, we are going to get really interesting because I could like point them right at each other. Technically, it would fit, but I don't know if that would look dumb because there's not really any 45 angles on this system to sort of work off of. So, um that's something I'm going to figure out. Also, now this GPU support, it's kind of crazy that I did an entire review of this block and showed you guys the temps and everything of it and the installation process without noticing one key feature, which I didn't even know till accidentally. This is just a magnetic cover. It's metal and this is just the acrylic block. So, here's what I did. I took that bracket I showed you guys. I wanted to use maybe this is just a Singularity computer's like fan bracket for mounting reservoirs and stuff. And there was already an existing hole in here and I just put a nut and a screw on there that goes here like this. It just slides up and down cuz there's some height adjustment built into it. And then there's an elongated hole right there for the screw hole to give you some adjustment up and down. So initially I just had the GPU resting on it and I was like that's still floppy. So, what I did next was I actually put this on there. I mounted the GPU down in its spot. And then I made a scratch like sticking through this hole right here. You can see I chamered these holes and I counter sunk them and I made a scratch that hole on the bottom of the plate and found where it lines up. And then I drilled and tapped my own M3 hole right there. And I had to counter sync it because the screw wasn't long enough, right? So, I needed a little bit more depth. So, I counter sunk it. One, so the screw doesn't stick down. And then two, it gets it closer, you know, up to this metal piece right here. And I'm probably going to put a little Loctite on there just to keep it from getting coming loose. But I really have to crank the sucker down without stripping it. It's just surprisingly it's surprisingly robust without stripping with how much I have tightened like really turned on it for such a fine thread. Anyway, then what I do is I do this. Put that right back on there. Screw that guy down. And then I can adjust the height of it. Right. So, here's that bracket right here. And I can just find where that has the most level position by going anywhere. Look, I'm shaking the table. So, and the cool thing is it has because there's only one screw, it has a little bit of adjustment because it just sort of hinges and it doesn't look incredibly out of place and it doesn't interfere with my riser cable. So, that's my GPU solution right there. It was literally simply drill and tap one M3 hole and counter synink another hole. And the reason why they're both counter sunk is cuz I counter sunk the wrong one first. Now, here's the other problem, too. My drive goes there. There's going to be a tube here. And even without the tube, because the heat sink for it is so large, I can't really Hey, I might be able to actually do that. It would not be easy to get the drive out. I guess we could do a test run right now with another drive. Lord knows I have enough of them floating around. Okay, it might be doable. And I know the stickers are still on. That's not my drive I'm using. And then, ha, — nice. — Okay. It's not pretty. It's more thought than a German automotive maker puts into servicing their cars. So, just saying. Anyone that's ever worked on a German car knows, look, I love or hate ASUS. I really don't care. It's your opinion. You're entitled to it. Their quick release stuff is so good. All right, let me get the GPU back out of here because I need to figure out my CPU loop first, then I'll focus on GPU. I'm trying to work from back to front, if you will. So, now that you guys can see, I I'll talk about this retention system right here. It's so nice. So, load the drive in and then just push and just push. That's it. That — future is now. That mechanism is the only reason I have a chance at getting this drive out later if I need to. If it required any screw or any turning of a thing, nope, never going to happen. The CPU block is so nice. Alpha Cool's — really stepped up their game on their aesthetics and it's got their new logo. The only thing that triggers me about me using Alphacool um fittings is they have the old O cool. — Oh yeah. — But oh well, it's fine. You can't really see it in there. It's a mixture of Bits Power Corsair and Alphacool fittings, but because they're almost like all identical and they use the same knurling on their base, I can get away with it with chrome. If they were black and they had a stamped color, like gold or white or whatever on there, it would be a problem. But I'm getting away with it. I got a new tool. It's not intended for this technically, but it's a soft enough metal. It chers the edge and it leaves it a little rough. And then I just have to give it a sand cuz I sand all the ends of these tubes anyway to get a little more friction on the O-ring. But again, brass. They're brass tubing under there, so they're really soft. Okay, so what I'm testing now, it kind of bugs me the way it crosses the ram like that. But I don't have a choice. I can't get from there to there and not cross the ram. And I'm not going to like I could, but here's the problem. Because the 90° bends, there's only one bend per tube, and I can't bend the metal tubing. I've said that a million times. I'd be running a bunch of these. And I'm curious that this would make it really bulky and ugly looking. Like too many of these, right? So, there'd be one up there, and then there's going to be some down here. I guess that just that's the question is, is that going to look like too much? Cuz I think the chrome tubing and fittings really is the accent in this build. It's like the jewelry. But I only have so much tubing, right? I've got one more tube. And I've got this guy and the one that's in there. And that one's not long enough to reach where I need it to right here. It would probably be long enough vertical, though. And then I've got this one tube. This is what I have left to get it done. Now, what I technically can do is I can cut the 90s. 90 part out if I need to. But oh man, that just it's going to add more time. So, I might as well put the GPU in for now because I've got to figure out that 90° 2. What I did right now is I just drilled a hole in this bracket so I can zip tie the cable to it, the RGB cable, so it stays out of the way. Now, somebody brought up a valid point in the comments. They're like, "Dude, is one D5 enough for this? " I think so. Um, I've put D5s through some hell. They're really good at pressure, but they are not necessarily the uh they're not necessarily the highest flow. So, you kind of trade off flow for a lot better pressure through resistance. So, if I if you want pressure, you go D5. If you want flow, you go DDC. The problem with the DDC pump is it doesn't overcome resistance very well. So, kind of got to take your pick your poison. I've just always run D5s in my builds and uh a second D5 would absolutely be insane amounts of flow. Fun fact though, my system at home, I'm noticing because I have a flow meter, my pressure, my um flow is slowing down slowly. Remember how it was like 2. 2 to 2. 3 L per minute? Now it's down to like 1718. Makes me wonder if I've got some buildup happening in the blocks or something. But I can see into my block, at least the CPU block, it's perfectly clean. There's nothing in there. I didn't use any colored coolant. So, I don't know what that's all about, but uh has me going, do I need to investigate?
CPU Plumbing
Okay, so this actually lines up perfectly right here. I just used a double rotary 90 to come down. Uh which there's not used anywhere else in this build except down here to offset this off the radiator to get me lined up with where I need for this fitting right here. Um, I think that lines up. Hopefully it does. Oh, no. That's two 45s. Okay. So, that's the only one in this build. Uh, anyway, that so it just be a straight tube. The problem was I took out my 90 and the radius was not tight enough to actually make that like the fitting would have been like right here and it wouldn't have worked on the curve. So, that's cool. I guess it doesn't look too out of place. Um, I was going to I was thinking about like going like that, right? And then having a tube there to one of these, right? These are just compressions on either end of a 90 that you have tubes go in and make your own bends. Hiding that back there and then just having, you know, a tube come straight across here and have it sort of hidden like coming underneath the GPU like that. But I kind of almost more like the idea of it coming down in front of the block. It's a little different. You can see more of the tubing that way. I feel like that's going to be the thing right there that people are like, "Oh, I hate that. " Or, "Oh, I love that. " I don't necessarily want to throw it all the way back here and hide it because I can't even use the 90 if I wanted to because it's not long enough as you can see, right? It doesn't even reach. Okay, I'll come back to that area. I still have to finish the CPU. I already know I've got the GPU now connected to the block. I now have to connect the block to the reservoir. This, as we already discovered, I had to push out. If I don't push this out, I can't get my RAM out. Okay. So, if you didn't saw the saw, dude, if you didn't see the other parts, uh I use acrylic to create a template piece because like I don't want to cut the metal pipe a bunch of times. It's easier for me just to trim down the acrylic to get it right and then um mark from the acrylic onto the metal tube and then cut the metal tube once. So, one thing I know is where the nurling starts on this side is where the depth stops when the tube goes in. So, it gives me a pretty easy external measurement. I'm kind of holding this up on the center of that right there. Like, I'm eyeballing this and intentionally going to make it too long. That way, I can cut it down to the appropriate length. First line is right about there. Okay. So, those are the only cuts I'll be making. And I'm actually going to use one of these to get the length right on that short one I have to make. So, I've got this, which is from Primo Chill. I don't think it's Primo brand. I think they just source it somewhere. This is a perfect tool that goes on both the inside and outside of the tube. Spin it with a drill and it will basically put a chamered edge all the way around. It makes it nice and smooth. But I can also push on it and we'll just start just slicing away tube links. So I can make micro adjustments this way. I couldn't chuck this back up easily and cut off like a millimeter if I needed to, but I can with this. So just it see how it's all melted plastic and stuff in the heat of the blade. Sounds like it reminds me of like an old um those little handheld games you used to get like the grocery store. It's like pong. — It sounds exactly like you actually see the rim color change. It's actually I think just right. I'll show you now what I mean about being able to shorten this. So, I'm going to make a mark with my Sharpie just so I can kind of give myself an eyeball of where to stop. So, I'm just going to do a little bit at a time. So, that's my reference point of where to stop. Now, here's the thing. I should be doing this with safety glasses right now. This is acrylic. If I push too hard, it will shatter. PETG just like plastic. So, I'm having to do this slowly because acrylic. But again, if you push too hard, it will literally shatter. And what I'm sort of doing is kind of like rocking it as I go. But look, it's like literally melting the acrylic. Right. Come on. Get in there. Now, that got kind of ugly because I was pushing hard on it. So, I sort of You can see the melting marks and stuff on there. So, now I'm going to use the manual tool to just slowly kind of smooth that out cuz all I don't care if this is pretty cuz this is nothing but a reference tube. I don't want this plastic making it into the loop cuz that will then give something to clog in there. But now you can see the edge is all ugly because I was pushing on it too hard versus the other side. That's because I chose acrylic. If I had used PETG, it would have been a lot cleaner. But whatever. I just grabbed what I grabbed. Yeah. See that bottom piece is still pushing down ever so slightly. But I think that's the weight. That's the downside of doing this crap. Part of it, too, is look at how easily this one wants to sag. So, if I can find another bits power Ah, I got one. The Bits power fittings are way better. So, look at this one here, right? It's just like easy to move. It's because it doesn't have as tight of an O- internal O-ring on there. See that difference? So, if this is rigid and this is rigid, I think now this will be able to hold the weight to keep that up. So, I'm going to tape this. If we know that it is like that spot on, I need this to not move. Okay. All right. It's all covered in fingerprints and stuff, but look at that. That's not bad. See, — I like it. I like it a lot. Looks very arc, not arc reactory, but like a reactor of some sort in there. Okay, let me clean this tube. Get these O-rings on and get this one mounted into place. Actually, no. Before I do that, I need to do that one. This will just be in the way. Just going to rinse repeat now with the spare piece of acrylic that I have here to get that length marked. And it's going to be pretty easy to get these marked. And I have now cut myself. It's happened. The build will be done today. I don't know. I just looked down. I'm like, I'm bloody. What
GPU Plumbing
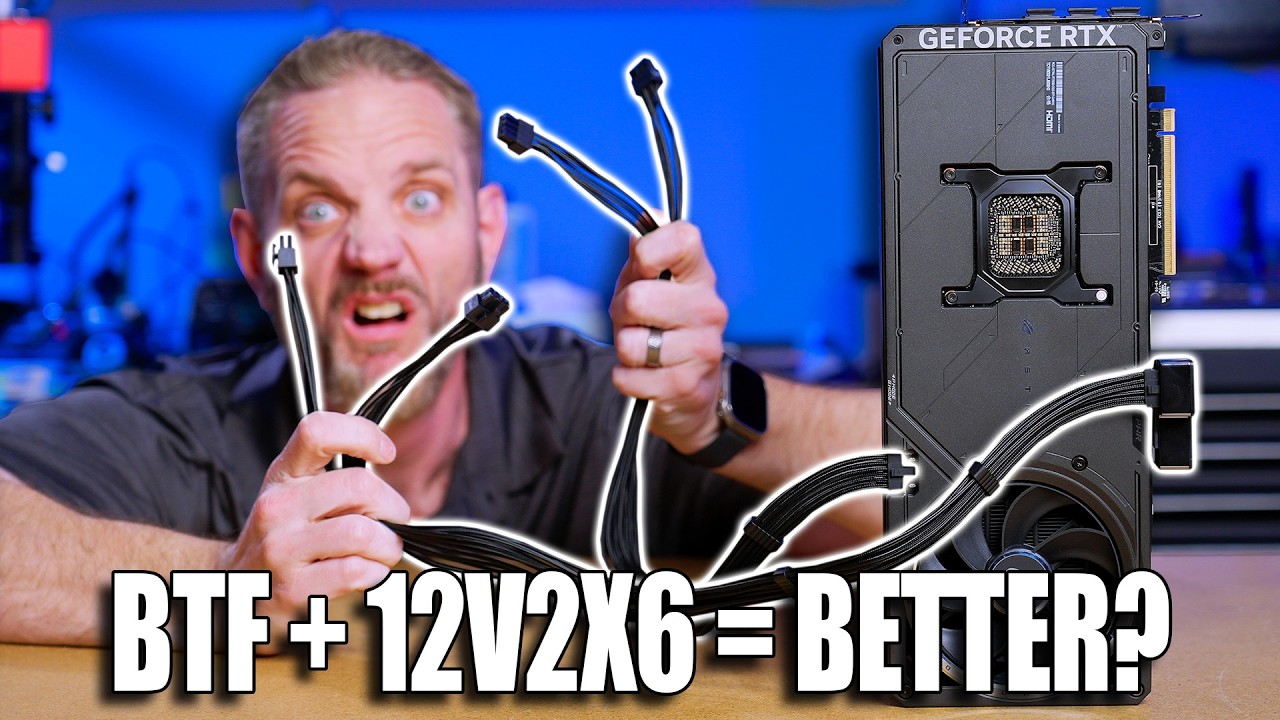
the — I can't wait to the get to the cable management part. There's l literally like nothing to do. Plug it in the back. Zip tie it tight. Done. Where's my file? — In the computer. So, I'm going to get this one on there first on the GPU side. Tighten that one down. And then I should be able to just rotate that into place. Boom. Look at that. And now that the top of the GPU is attached to something there and the bottom and the back. Yeah. — Like look, you shaking the table. — I have no concerns about that like getting loose or anything. Okay, here's what we're going to do. Oh god. Okay, now it's in there. Okay, so I think before I start focusing on the GPU side, I'm probably going to plug the GPU and then do another pressure test. That way I can just make sure everything up to this point is good. They're not exactly on the same plane. This is slightly forward, so it's not going to be perfect. But because I'm dealing with rigid fittings and stuff, I'm kind of stuck with where I've got this. But it's I hate to use the phrase good enough because it just sounds lazy, but sometimes that's just what you have to do. I don't think anyone's going to be like with a T-square going, you know what? We're good. Okay. The other thing I need to do real quick, too, is I need to get a cable on here. Uh, I think I'm going to end up using one of the 90° cables from Cable Mod. Whoa, hold on before you start feverishly writing your comments. It's not the adapter. It's the Stealth Sense cable that has a 90 built to it. It's not an adapter. Okay. All right. So, I'm going to just save you guys the time of watching me do the 90 again, but it's now going to be from here to here. And then if I end up with a leak somewhere, I know it's here because I know everything back there is now airtight. All right. So, obviously, I've chosen to go in front of the GPU because of tubing length issues. Yeah, it's been a long time since I've done chrome tubing and anything or nickel plated. It looks so good. So, that's the whole loop right there. You know what? Now that I see it done, I'm I don't mind it crossing in front of the GPU because this is RAM. Okay, pressure test time. Moment of truth. — That doesn't look surpris. — Yep. We good. — Hold on. And — cool. I'll spare you guys the boringness of putting the wires in the back. I'll just show you what it looks like when I'm done. So, I'm now going to open up the back, get the power supply in here, get the cable management in, and then I'll just show you guys that. I'll fire it up, see if it posts first time, cuz I have not tested any of these parts. Okay, we'll be back. Well, it's not the
Cable Management
cleanest cable management, but it'll get the job done. So, I had this 1500i shift power supply from Corsair. I didn't even know we had it, honestly. But it got me thinking. I was like, "Oh, if I use the shift, which means all the cables come out the side like that. " Um, typically that would be for the, you know, bottom mounted PSU facing this way. But this allowed me to keep all the cables from coming out the back and cluttering up through this visible hole right here. I don't have time to make a panel for that today. Uh, but I can come back to that anytime. And I could use these screw holes which are already here to like screw it down. I've got the piece of acrylic actually. It's right here under the box. See? Not a piece of acrylic, but ABS plastic and I can make it out of that. But um I didn't even know this and I kind of wish I'd done a standalone video on this now cuz it's pretty cool. Look, love or hate Corsair. They have some cool stuff. They really do. Like the hub. This is the I the IQ hub for the link. And it's cool because it's literally it requires a six pin PCI Express cable to power it because it can handle so much more lighting and um digital signaling, but it needs more power to do that than what the you know a USB header or um like the fan headers or the RGB header can handle. So this is the control hub for it. And this really simplifies wiring up RGB fans when these are all daisy chained and stuff. All 12 of these fans only operate off of these two cables like this. But you see, I just unplugged it from the power supply. It has a hub built into the power supply, which makes perfect sense. Why wouldn't they? So, all I had to do was take these two because I only have two cables. If I needed more than two, I would have to run a short cable off of that to uh a splitter and then I could split into each one of those just like as if I was running a splitter off this hub. And that means I just run the USBC cable from the back of the power supply to down here into the USBC. And then Phil was looking at the manual. He's like, "Oh, it's even cooler than that. This is configured out of the box as a dual rail PSU. " And because I'm running a 5090, it recommends using a single rail configuration, which I literally do in the software. So, it's kind of a happy little accident that we figured that out because although a single 5090 not being overclocked or exosed or anything, this would handle it just fine. But why not switch it to single rail? So now we just do that digitally. And because I installed the USBC plug, you know, to the USB header, um, it's funny. It's USBC to USB 2, but whatever. I can now configure that. So now I've got the power supply configurable by IQ, the fans configurable, configurable by IQ, and the RAM. So that wasn't even by like choice. Like that just had ended up that way. If you're wondering about these pieces of electrical tape right here, they're on the back of those screws I used to plug the hole the holes that I drilled wrong because they were starting to rattle and I don't want them rattling around. But you see how this is kind of uglyish. Let's make it disappear now, shall we? Cuz the cool thing is these fans are going to illuminate some of the backside here. And that means with this pretty tube run right here, we actually will get to see it if you ever see the back side of the case, I guess. But everything is easily um serviceable now cuz all those harnesses are bundled together for 12 the 24 pin, the two PCI, excuse me, the two CPU. I don't need both plugged in, but I did it anyway cuz I was there. Oops. But everything is individually routed. That way I can get to it if I ever need to to, you know, track down a bad wire or something like that. This turned out better than I was expecting. Honestly, when I first started doing this build, I was like, man, I want to build it because it's weird. But as I was going, I was like, that's the problem is it's weird. But I became more like just impressed with the capabilities of this case and then some of the components I'm using along the way. That's why I like doing these builds. Even though builds are difficult to do right now and gain interest in because, you know, it's so expensive, it's still my hobby. And uh I'm really happy with how this one turned out. We got white lights.
Build Showcase
— Hey, we got post. Cool. Okay. — Nice. — All right. Now it's time to fill this. Heat. N. Yeah. Heat.
Nuances of Build Process
Well, here it is all prettied and white. Like the white lighting I think goes so well with this. It catches all of the reflections of the tubing. Didn't want any RGB puke or anything happening. Just a clean, solid white aesthetic with these matte black parts everywhere. I'm really happy with the way that it turned out. The fact that the only cable that you can see is the one I just touched the glass. Dang it. And it's so clean. It's going to be one little fingerprint. Just boop. Anyway, um it's so clean. I like stuck my finger into it. The one cable coming up off of the graphics card, which we already talked about 100 times, but the vertical mount looks really good here. Um I think it was a little like some little bubbles kind of like stuck right there in the graphic. not bubbles, but like smudge or something on there in the card. That's going to be on my nerves now. Anyway, uh all the So, the cool thing about glass reservoir, if you can kind of see in there, it doesn't bubbles don't stick to it like acrylic reservoirs. It's just something to do with the glass surface tension is much slicker than acrylic um when it comes to like glycol based coolants sticking to it. So, the bubbles are gone already. Like I've got the system fairly well bled and that's the fastest I've bled a system in a long time because I'm I even with the four rads I thought for sure I'd be sitting here tilting and no I got all the air out right away. I totally forgot that this CPU block doesn't even have RGB lighting on it and I'm okay with that because it looks so good and clean like this. Glad there's no lighting in the reservoir shining up or anything like that. It's just so simple and that's what I really love about this build so far. Um I have been
Temps Under Load
running Steel Nomad in a static scene right here. like it's continuing to run, but it's just static camera mode. The graphics card is staying just barely under 50C. It'll probably hit 50 here. It's been running for a bit, though. Uh about 11 minutes right now. Um it hasn't hit full equilibrium. There's a good volume of coolant in here. I have a feeling this would pro there's 50 right there. probably cap out in the very low 50s, which is really a testament to how good the Astral cooler is. This is an ASUS Astral if you don't remember 5090. Um the ASUS Astral card with the fans at 100% in like an open air test bench will stay at like 58 59 60° in our 72°ree room. So that just shows you how good the air cooler is when four 360 mm radiators is still keeping it right around the 50° mark. So if I take a look at the Oh, I thought it'd be logging this whole time. It didn't. But it, like I said, it's been running for just about 12 minutes now, and we've still reached about 50. That's where we stayed. Our memory is at 68°, 66,68. Um, voltage is at 1045. GPU is at pegged 600 watts. So, this is like the worst case scenario. And that's why I like using Steel Nomad for temperature stress testing because it is sure it's not using RT, but it is such a hard raster test to run. Like even the you know 3D Mark developers have said this is the hardest test they have ever developed and it is shows it. That's why I love to show it. It's better than like Firmark or anything like that when it comes to stressing the GPU because it doesn't drop the clocks. If you look at my clocks right here, you can see I'm running at over 3,000 MHz sustained. So, and look at my pin distribution. Remember, this is the card I repaired. So, I'm still so excited about this. — That's good. — It's really good. Look at that. 8. 9 and just under 8. 2 two as the biggest like discrepancy right there. Um CPU right now chilling at 50. 9 degrees. Um and that's of course you know we are going CPU first then GPU. So there's your there's your proof right there that it doesn't matter if CPU is before GPU or GPU's after CPU. The equilibrium temperature of the well once you reach equilibrium the temperature of the coolant rises. Therefore the components inside will rise slightly. Doesn't matter which touches which first. Um but look how fast it cools down when I turn it off. So, keep your eyes on GPU temperature right here, which is highlighted. When I stop the test, 50, 39, 36, 34, 33, and that's just what the coolant temperature is. I guarantee you right now that's what the coolant temperature of the loop is, which is why it's stopped at like right around 33. And the fans are currently tied to GPU temperature. Um, I don't like to use the built-in temperature sensors on the fan because although both these fans are pulling temperature through the radiator, I find that speeding the fans up fools the sensor into thinking that it's cooler than it is because just more air flow is coming through. So then they find I find that they don't ramp up the way I would like them to. It's just a nice to have to see like, oh, what's the temperature of coming through on the rad? Um, if I really if I wanted to, I could have hooked uh there is a temperature sensor that plugs into the back of the power supply cuz remember it's also the IQ hub like we talked about. There is a T- probe sensor on the back of a normal hub as well. If I wanted to, I could have plugged in this loop a similar to what I have at home where I have a temperature sensor and flow meter, a digital one in line in my cooling loop so I can keep an eye on all that. I could have then gone with the T probe output into there and then controlled fans based on fluid temperature. Um, which means right now while I stopped the test, the GPU temp dropped, therefore the fans came down real quick. Whereas the fans could have been more like a turbo timer in a car where it has, you know, they keep the engine running for a bit after you turn off a car that has a I'm going back a while a ways now, early 2000s, but oil cooled turbos get really hot if you've been driving them hard. So, you turn off the car, but the engine would keep running to keep the oil circulating through the oil cooler rather than just shutting down a hot turbo with hot oil in it. Similar to what this could have done if I had a temperature sensor set up to that, it would allow the fans to keep running faster until the coolant temperature came down. But that's true for any water cooling system. It's just not something I plug plugged into here. Even my system at home, I don't have that plumbed in. I just keep an eye on the temperatures myself because it doesn't matter. Look, and that whole time I've been talking, it's already about to drop below 30°, 30. 4. 4 30. 3. So any minute now it'll be at like 29 28 degrees C. So that obviously we're not dealing with the extreme temperatures like you have with a turbo. Okay. I just I don't know why I always bring it back to cars, but I do. Let's go ahead and do a Ciment loop real quick just so we can see what the CPU is kind of jumping up to. I do have PBO enabled. I do have the default scaler. I do not have any sort of undervolting going. Um and I have Expo enabled. So, just turned on PBO, turned on Expo. That's it. Very dirty way of getting a few extra MHz out of the CPU. TCT die 778 78 that's 79. So, yeah, clearly way under its uh 90C it's able to run. So, clearly plenty of cooling for the CPU. No worries about that at all. By the
RGB Setup
way, this might have been the quickest, cleanest, easiest setup I've ever had of IQ. Corsair is not paying for this. I don't even talk to Corsair anymore. We haven't talked to them in forever. It installed. It recognized the Hey, I It told me at the beginning of the installation, hey, it looks like you've got Corsair Vengeance RAM, you've got Corsair fans, and you've got a Corsair power supply, and you got a hub. The hub shows up separately from the power supply because it's just integrated, right? It said, "All four of these need firmware updates. " And I was worried about the RAM because we've seen RAM RGB break during IQ updates. Uh, it showed some blinking sequences on the RAM to show you which RAM was being installed, like updated at the time. Shows a little progress meter on the LEDs. And then it just moved on to the other stuff and it said, "Please do a system reboot. " And I did a system reboot and everything worked. They didn't break anything. It didn't take forever. It didn't crash. It didn't freeze or all these things I used to deal with in the past. Um, the power supply, remember how Oops, I just turned it to gross mode. It looks like cops. Bad boys. Anyway, uh, okay. So, now that I got it out of mural mode, which is where it just takes this moving thing on the screen and says, "Hey, copy these colors of this moving image to the lighting. "
PSU Rail-Switchable OCP
Uh, the power supply, I talked about the fact that it has dual rail and single rail. So, by default, it's on multi-rail OCP, single rail OCP. So, you're not actually changing the power distribution of the rails. That's clearly physical. I cannot click a digital switch to change a physical connection to the power source, the things that are being supplied by power. But what we are able to tell it to do is instead of multi-rail OCP, which is where let's say we've got 1200, let's say we got 12 or 1300 watts of 12vt and then a couple hundred watts dedicated to 5. 5 and 3. 3, right? That's kind of how the distribution tends to go. And then of that 1,200 watts that's left over, it might have two 600 watt 12vt rails in there. Now, obviously something like a 5090, if it's plugged in and it's only plug, it's got multiple 12volt 2x6 connectors on there. Let's say one each of those are wired individually to two different rails. It could say, "Okay, well, if I overclock this card and let's say I put a matrix or something like that in here, that's an 800 watt card or a,00and watt lightning or something like that. " You could be triggering the multi-rail OCP pretty easily because that one rail that card is plugged into is seeing too much load. So instead, you tell it digitally, hey, combine the OCP of both those rails together as a total overcurren protection value, which is really neat to be able. Now, a lot of power supplies do this digitally, but Corsair is one of the few that I've seen that allow you to just literally trigger a button like this in a dashboard to now not be potentially dealing with shutdowns. Cuz I think that could be something that is happening with some people when they start dealing with higherend GPUs. Like, man, I'm getting random shutdowns when I'm playing my games and stuff. you might be dealing with multi multi-rail OCP with a graphics card that's a little bit too above the headroom of the OCP per rail. So, might be worth talking about in another video if I can more accurately and consistently recreate the scenario which that happens. If you guys want me to make that video, comment down below. I think it might answer a lot of people's problems as to why they're feeling like their systems are randomly turning off or restarting on them. Anyway, there's that. Um, it's really simple. And then same thing with Armory Crate. I had to run Armory Crate. Oh, this was still running the whole time. What's our temp? Okay, still at 78°. So clearly 154 watts of CPU heat is not going to be enough to raise the temperature of this loop. So it's just going to run at that temperature indefinitely. Basically, the fans are also going super slow. So yeah, that there's obviously no cooling issues
Stage LCD
whatsoever. What else did I want to talk about here before I get out of here? Oh yeah, the front screen thing. So I didn't enable it right now, but the front of this, remember this is the Master Frame 360 stage. It's got these RGB lights under here which are also set to white. These are like spotlights, right? Um, this screen right here, it has two GIFs that you that come kind of pre-installed in the folder. If I was to double press the buttons underneath, uh, it turns that into basically a storage device that shows up in Windows, which has all the drivers and couple of video files in there. It even comes what they call a CM converter, which is it's basically a utility that they bundle with the screen that allows you to take a video file and it converts it to the right format and resolution and all that to play on that screen. I didn't do that with this today. Um, but it's pretty neat. But, um, I like this. I mean, this is Bubbles. It's kind of going back and forth between Bubbles and this like kind of a claw looking thing. But, obviously, we have the stage and we need something to put there. So, most people would put a neat figurine or a collectible or something like that. I've got something that I think is appropriate to take this. I don't even know how much the system costs. I truly don't. This is a hobbyist build because I'm a hobbyist. This is not a copy this build for an efficient build guide, but I have the perfect display piece, I think, for this. We'll display our 5090 FE with our 5090 Astro build. Okay. Obviously, that's just inest. Get it? Just ingest. Oh, there we go. Okay, so time to get
Wrap-Up
out of here. I think it's a pretty neat unique case. Oh, the other thing I forgot to show you guys, which I guess you can see, you saw in the B-roll, the backside. I've never had a system that I have built where the back of it is almost like as pretty to look at as the front of it. Normally, that's just the mullet of a PC. All the in the back and business in the front, right? And obviously this is like you can look at it from any angle and be pleased with what you see. So, all right guys, thanks for watching. I'm actually kind of getting a wild hair up at my ass and I kind of want to do some modernization to Skunk Works now. I don't know why. I just can't let go of that system. Like, I just it's been around as long as the channel has been around almost and it just I was sent a new Dro plate a while back from Singularity Computers to deal with an issue I was having with the middle DRO plate. Now, I kind of want to take the guts out of my system at home and put it in there. As much as I love that um that Haven 420 case, it's no skunk works. All right, guys. Thanks for watching. I hope you enjoyed this build log. I'm going to keep doing builds even though it's I know you guys have a hard time doing them because it's just it keeps me happy and it's uh it's hard to stay happy these days. So, thanks for watching. We'll see you in the next one.