End of Real Photography?
12:05

End of Real Photography?

PiXimperfect 01.03.2026 90 752 просмотров 4 624 лайков

Machine-readable: Markdown · JSON API · Site index

Поделиться Telegram VK Бот
Транскрипт Скачать .md
Анализ с AI
Описание видео
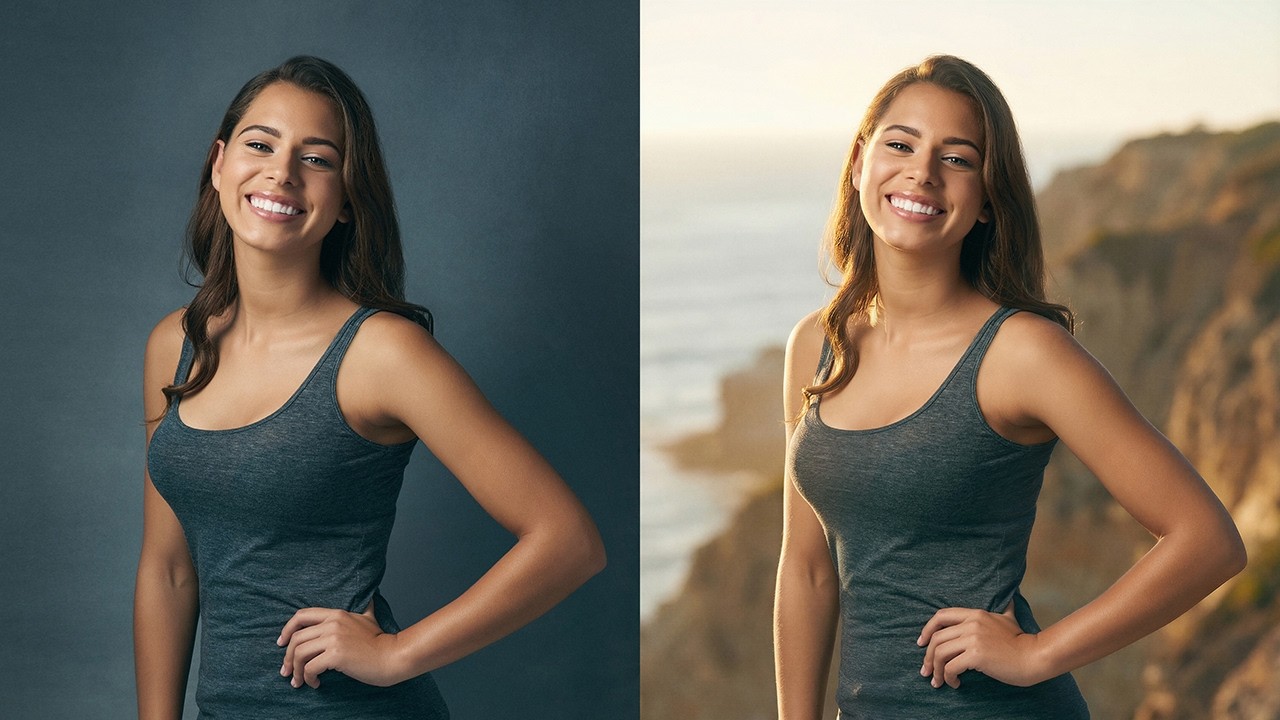
Can AI truly replace studio photography, location photo shoots, and portrait photography as we know it? In this video, we’ll take real photos and test whether AI can place them in entirely different locations and backdrops with a seamless match of lighting, colors, and pixel-level precision. Using detailed prompts and 8K AI workflows, we’ll transform a simple studio shot into natural outdoor scenes, street photos, luxury interiors, and more, while preserving the precise original features. We’ll see what it does well and where it falls short, so you can make your own judgment about where this technology is heading and what you wish to do with it. I hope you enjoy this video. Thank you so much for watching :) ► Check out Nano Banana with Freepik: https://pix.live/freepik - Some plans have unlimited generations for certain resolutions. - You can also try Adobe Firefly, but it does not support 4K, as of recording this video. 🚀 Join PiXimperfect Pro - The Ultimate Photoshop Training Course: https://pix.live/pro ► TIMESTAMPS: 00:00 Is AI Taking Over Photography? 00:25 Transform Studio Portrait to Outdoor Shoot 01:39 Restoring Original Features in Photoshop 03:27 Fix Low Resolution with 8K Upscale 04:44 Background Replacement for Group Photos 06:50 Testing AI with Spotlight Lighting 07:41 Fixing Results with Prompt Engineering 09:33 Where AI Falls Short 10:11 AI Backdrop for Harsh Lighting 11:10 Is This the End of Real Photography? ► RECOMMENDED SOFTWARE & CREATIVE RESOURCES: ✅ Official PiXimperfect Compositing Plugin: https://pix.live/pixcomposite ✅ The Best A.I. Powered High-End Portrait Retouching Plugins: https://pix.live/retouch4me ✅ Unlimited Photoshop Actions, Plugins, Brushes, Assets, etc: https://pix.live/envato ✅ The Best Professional Plugin for Color Grading: https://pix.live/infinitecolor ✅ Try Photoshop for Free: https://pix.live/photoshop ✅ Music Used in PiXimperfect Videos: https://pix.live/music ► THE GEAR I USE: ✅ My Graphic Tablet: https://pix.live/wacompro ✅ Recommended Budget Tablet: https://pix.live/wacomlite ✅ Primary Microphone: https://pix.live/mic1 ✅ Budget Microphone: https://pix.live/mic2 ✅ Audio Interface: https://pix.live/audiointerface ✅ Camera: https://pix.live/camera ✅ Lens: https://pix.live/lens ► DOWNLOADS: High-Res Generations with PSD: https://pix.live/aibgsample ► LET'S CONNECT: Instagram: https://www.instagram.com/piximperfect Facebook: http://facebook.com/piximperfect Twitter: https://twitter.com/piximperfect

Оглавление (10 сегментов)

Is AI Taking Over Photography?

I'm not here to tell you what is right. I'm also to do. But I think as creatives, photographers, photo editors, it's important to understand what is happening in this creative industry and not stay unaware and oblivious to the entire AI generation. When it comes to professional photos, I tried changing their backgrounds with AI just to see whether it can maintain the pixel level precision that we do here in Photoshop or actual studios. Let me take you on a journey of how it is today and what can

Transform Studio Portrait to Outdoor Shoot

be achieved. So here's our photo and the very first thing we're going to do is to have a solid prompt. So, let's go to chat GPT. I'm going to drag and drop in that same photo right there and ask it to analyze this particular photo and write me a prompt to bring in a new outdoorsy background that matches with that of the subject. Now, you can modify to your liking. I'm just going to copy the entire prompt. Control or command C. And let's paste it into an image generator platform like Freepick. Click on image generator. You can use the latest Nanobanana 2 or Nanabanana Pro. Completely up to you. Now, you might ask, why are you not doing it directly inside of Photoshop? Because Photoshop does not support AI models in 4K resolution. I'm just going to paste the prompt here. Pick how many images you want to generate. Keep in mind this consumes a lot of credits. Four is fine for me. 4K resolution is important. And now simply drag and drop your photo and click on generate. I'm sure there's an automatic note-based workflow that you can use for this, but in this video we are just seeing what is possible. Look at the four options. It's so hard to pick one. First, second, third, fourth. I think the first one retained the most of the original lighting. So, let's go ahead and choose that. By the way, if you do want to test these models in Freepic, I'll leave some discount links in the description. If you don't like Freepick, you can also try it in Adobe and there are many other platforms. I'm going to leave some links in the

Restoring Original Features in Photoshop

description. Here we are back in Photoshop and I've downloaded the photo. Let's drag it and drop it over the original one. Now, here's the test. Zoom in quite a lot. This is the original one and this is the processed one. I would say they look very Oh my gosh, I was not expecting this. And if in case you wanted the original, let's see if it can be done. First of all, change the blend mode from normal to difference. You want to make sure everything is aligning. Press control or command D. You can always move it here and there just to make sure things align perfectly. Once you make sure that happens, hit enter or return. Change the blend mode back to normal. Now, maybe we can try bringing in the original one if the lighting has not changed much. Let's click on the mask button. Take the brush. Black is the foreground color. With a soft brush, let's bring in the original image. And it kind of works. See? So, everything you see on the face is the original one. Here's the before. Here's the after. It's not changing. Let's bring some more original stuff here as well. Maybe a little bit there. Even her dress and everything. We can bring in the original parts. And it just works. Now, on top of that, if you did want to match it with the original absolutely much because here's without the mask, here's with the mask, you can always use curves to match it if you want. So, just above the background layer, click on the adjustment layer icon and then choose curves. Maybe I'm just going to make the shadows a bit brighter and the highlights a bit lower. And if you want it a little bit of color in the reds, just bring it slightly up. And in the blues, let's bring it slightly down. This just helps it match it a bit more, ever so slightly. And just with that, it matches everything perfectly. It's the original eye. It's the original nose. It's the original lips. And the background has been

Fix Low Resolution with 8K Upscale

changed. Now, there's still one problem though. From this distance, everything looks nice. But if you zoom in too much, maybe you can tell that this is AI generated. Maybe it's not as high of a resolution. So, what do we do in that case? Back in Freepix, click on use image and upscale. And inside of the magnific image upscaler, we want to choose precision so that it doesn't change the details much. No extra sharpness or grain. Let's click on upscale. Now let's bring in this upscaled version inside of Photoshop. So this is what we had done so far. I've also brought in the upscaled version. Let's zoom in to see what changes the upscaled version does. Here's the original Google Nana Banana version. Here is the upscaled. Oh my gosh, look at the hair. That's crazy. Now, we do know that the upscale version is also based on the AI generated version. So, we can use the same masking here as well. So, I'm just going to hold the alt key or the option key and click and drag the same mask into the upscale version and turn off the older 4K version. Now, let's have a look at all the details around the edge. Everything is just so tac sharp. It's crazy sharp and it just works. And if you were to compare it with the original, here's the original. Here's the I generated. I don't know what to tell you. I'm going to make this available for you to download so you can zoom in and pixel peep yourself. So

Background Replacement for Group Photos

I've chosen a studio photo. Again, wanted to see if you can change it to something outdoorsy. Again, I've open chat GPD, uploaded this photo, and asking it to create me a prompt where nothing changes except the background. And actually, you don't have to use multiple platforms. It can all be done in free pick with some nodebased workflow. If you want a video on that, let me know in the description. Meanwhile, I'm just keeping it simple for now. And this is the entire prompt. Now while we are at it, I've also asked Chad GPT to create a prompt of an old street and also feed it. Why not? And out of all these, whatever you like best, you pick it first, second, third, fourth, and then even upscale it. Use image upscale. Just as a reminder, we are using precision, not creative. Creative changes details. And these are my favorite settings. Now, this image is already 4K, so it cannot be increased in resolution 4x 8x because there's obviously a limit to it. Back in the professional world of Photoshop again, I'm just going to drag and drop this photo. Let's zoom in to take a look at the result. Oh my gosh, the resolution. That's crazy. But let's see if it aligns. Mostly the position aligns, but it changes the face. Now, if any other person sees it, they might say that these people look similar before, after. But if you show this to the same people, they would disagree heavily. So, how do we get the original people back? Click on the mask button again. Take the brush black as the foreground color. just bring back the features. And the crazy part is the original image is blurriier than the generated one. And you can bring in the essential parts of the subject back like the face. And that should do it, right? Similarly with this little one. Boom. And obviously the real tattoo, we want that back. And sometimes AI can mess up big time with things like watches. So let's bring that back as well. Now you can use some remove tool and other things to correct it. But overall this is crazy. Before after. Now will it be as precise as the original location and the photo? Of course not. There are many details that it changes but we can bring back certain details. But is it good? I have no words. I don't know what to say. Make your own

Testing AI with Spotlight Lighting

judgment. Now time for a little challenging photo. She has a harsher light on her like a spotlight. If we place her outdoors or grand palace, the lighting is completely different. So, can these models handle it? Let's see. I'm just going to use my own prompt where I ask it to change the scene to a palace and match the lighting of the palace to the lighting to the existing lighting that is on this subject. Let's see if he can do that. And also, I'm going to try Nano Banana 2, which is the newer model, and generate one more time. Now, I'm not going to comment on any of these models because by the time you watch the video, by the time tomorrow's sun rises, everything might change. All of them created weird shadows in weird directions, and none of them look real. In this image, it has made the subject giant. The shadows are going somewhere else. This image slightly off. This image completely off right there. And none of them, what is it doing right there? None of them actually look okay.

Fixing Results with Prompt Engineering

So, what if we try some different level of prompting again? Let's get back to chat GPT and ask that to create a prompt for us for an indoor luxury palace. We are going to take the prompt from here. So, that is the thing with AI. Even if you don't like the results, you're still burning credits. And that's one of the many reasons I like using Freepic because if you're using lower resolutions, not 4K, but even 2K, you can have unlimited turned on. There are some plans that are unlimited. Now, I don't know how long these unlimited things are going to stay. I'll leave some details in the description. Do keep in mind these generations do cost computing power, so nothing is really absolutely unlimited. Now, one of them is still processing, but these results are absolutely better than the previous ones. Let's go with this one. And we are just going to upscale it as well. Now, this my friend was an extreme case. If we wanted to change the lighting entirely, that could be arranged as well, but we wanted to keep the lighting of the subject mostly the same. Let's drag it and drop it right there. And it absolutely aligns for some reason. Before, after. You see that? Let's zoom in. Look at the details. Before, after. Now, the subject has slightly changed, of course. So, let's change the blend mode back to difference. Press control or command T and let's move the subject so that it mostly aligns. with the arrow keys. Once done, hit enter or return. Change the blend mode back to normal. Now, you can also use auto align, but it doesn't work with smart objects. Now, create a mask with the same brush. Black as the foreground color, soft round brush. Just bring back the original features of the subject. And it's also pretty darn similar to the original one. Let's take a look at the overall image. Here's the before. Here's the after. So the problem that we used to have with hair selection, the problem matching. Oh my gosh, look at the hair before. Selecting this hair would be a nightmare. Impossible. We have to paint it with the brush. But this, I don't know how to feel about this. Now, if you were okay with

Where AI Falls Short

changing the light, you can also write prompts that way. But do keep in mind when you change the light, the facial features changes a bit as well. Maybe with the newer models, it gets better. But here's what it did when I tried to change the light. The lighting has changed, but if you zoom in and have a look at the before and after, here's the before. Here's the after. As you can see, the facial features have changed. The color of the eye has slightly changed. The shape And when you entirely change the lighting, you cannot even use masking because if you click on the mask button, you take the brush, you bring back some of the original ones, it just wouldn't suit because the lighting is

AI Backdrop for Harsh Lighting

entirely different. And finally, I did one more for a harsher light. You already know the process. I've taken you through it and again you can use even more advanced automated processes as well but this is just to share with you what is possible these days and I've done the exact same thing to ask for a concrete background and this is what it did now keep in mind I have not upscaled it yet because this image already was not that high of a resolution 3845760 here's the before here's the after everything just properly incredibly aligned and if you still want the original stuff you can always click on the mask button again take the brush with the black mask. Bring back in the original eyes texture if you feel like it, original lips, original cheek, and it's mostly there. You can bring back the clothes as well. But again, it's mostly there. There you go. What else do you want to do? Before, after. It even created that lights and shadows. You can just at this point do whatever you want.

Is This the End of Real Photography?

I hope I could show you certain possibilities. Whether to use it or not, that is up to you or me. At this point, the way it is right now, it is not actually not as close as precise as the real thing. But this is definitely at a point where most people won't be able to tell even if they pixel peep. And even 100% real photos will be called AI. Unfortunately, people call me AI for some reason. I don't know why. I hope I could show something new. And if you enjoyed this video, make sure to give us a like and also don't forget to subscribe. and not just subscribe, ring the bell so that you, my friend, don't miss any other future tips, tricks, or tutorials. Thanks so much for watching. I'll see you in my next one. Till then, stay tuned and make sure that you keep creating.

Другие видео автора — PiXimperfect

Ctrl+V

Экстракт Знаний в Telegram

Экстракты и дистилляты из лучших YouTube-каналов — сразу после публикации.

Подписаться

Дайджест Экстрактов

Лучшие методички за неделю — каждый понедельник