Hello guys, this is Paul McQuarter with topteboy. com and we're here today to review the Q. Okay, the new Arduino Q. We're going to give it a rundown today. Let you know what our first impressions were. But to start with, I will need you to pour yourself a nice tall glass of ice cold coffee. That would be straight up black coffee poured over ice. No sugar, no sweeteners, none needed. And besides your coffee, I'm going to need you to buckle up because this is going to be a wild ride today. Okay. Now, initially I was planning on calling this video something like what am I going to do with the queue? Okay. So, like I've got the Arduino Q. I play around with a little bit. Then I kind of tell you where I see things going as far as the work I would like to do and things that I might like to do on the channel. But after playing around with a little bit, I thought a better title for today's uh talk would be the Arduino Q, the good, the bad, and the ugly. Okay, let me tell you what my goal is with this review. My goal is to be very honest and at the same time very fair. Okay, I want to be honest in what I say, but I also want to really bend over backwards and be fair in what I say. And therefore, I'm going to talk about the good. bad, and then I'm going to talk about the ugly. Does that sound good? Okay, I hope it does. Well, be me being the optimist, I always like to start with the good. And so, let's jump over here and let's jump right in and take a look at the queue. Let me get out of your way. You can see that we have it plugged in and it's running. And so what exactly is the queue? The simplest way that I would describe it is one board that has a microprocessor and a microcontroller. Okay, I guess let me try to say it more simply. Like if I was going to say it as simple as I possibly could. Imagine that you had one board that had a Linux machine on it about like a Raspberry Pi 3 or maybe the latest Raspberry Pi Zero, something about like that. Not a, you know, not a Pi 5, but also Beagle Bone Black or something like that. So, you're right there in sort of a sweet spot of being able to do some really interesting things. And then in addition to that, we have an Arduino microcontroller. Okay, so on one board, we have a Linux machine and we have an Arduino machine. For you guys that want a little technical uh lowdown on it, the microprocessor, the MPU, it's the Qualcomm Dragon Wing QRB 2210. It's a powerful quad core ARM Cortex A53 SOC running up to 2 gigahertz. We could go blah blah on through the uh on through the specs, but basically think of that microprocessor as something about like a Raspberry Pi 3. Then the microcontroller that is the Arduino side. It's an STM micro electronics STM32 U585 [clears throat] and basically it behaves just like an Arduino. Okay, so that's a quick overview of what that is. And now let me start talking about the good. The first thing that I want to say about the good is bottom line is this is the board. This hardware is the board that I have been dreaming of for at least 10 years. And let me kind of run down why I've been dreaming of something like this. And I'm sure you guys with your own stories have probably run into something very similar. And uh what I was doing starting oh I don't know 10 years ago or so I started a program where we were developing electronics packages and then we were sending them to the edge of space and then we were collecting data and then we were coming back uh coming back to the ground. And basically on our first flights, what we were doing is we had an Arduino, we had sensors tied to the Arduino, then we took a GoPro camera and strapped it to our instrument package, and then uh we had sort of a standalone GPS on it. So what you would do is you would launch this thing, we would get up to 110, 120, even over like over 135,000 ft. And with that, you're above the Earth's atmosphere. We had the GoPro camera on there. You could take pictures. We could see the curvature of the Earth. We could see this thin blue line, which was the atmosphere down below us. And then we could just see the blackness and darkness of space. So, that was really
Segment 2 (05:00 - 10:00)
exciting. And we did it all with the Arduino, and then just a GoPro camera. Well, after a couple of launches like that, we started thinking, man, it would really be neat to do some extra stuff. Like instead of the GoPro, wouldn't it be neat if we could have our single board computer be doing the video itself? And then also, wouldn't it be neat if we could have live telemetry back to our ground station where uh where we're taking video in space and then we're beaming it back live and all that data that's being taken, it would be beamed back live. So, back at mission control, we could be seeing all of our data coming from our sensors, all the status of our actuators, and then we could be getting a live video stream back. Okay. At that point, as much as we love the Arduino, the Arduino just could not carry that workload, right? You're just not going to do video with Arduino. And so, as a result of that, we moved to the Raspberry Pi. The Raspberry Pi could do video. It had the GPIO pin, so it could interact with the sensors and actuators. And [snorts] then it had uh network capabilities, so you could actually connect to your radio. And we were doing Ethernet over, it's really strange thing. over Wi-Fi ham. So, we had a little slice of a handband up there near 2. 4 GHz that was legal for us to use, but dead quiet because there's no equipment there. And then what we were using is that dead quiet channel to beam the live video and telemetry back to the Earth. So, it's really, really cool. Okay, but this was the problem that we ran into with the Raspberry Pi. The Raspberry Pi is very easy for it to become disturbed and kind of glitch. And so as we were going up and you're going through the jetream and the wind is blowing at 170 and 180 miles hour and then at the same time your temperature is dropping to 50 below zero and this thing is moving all around getting slung around. There's a lot that can cause a pi to kind of glitch out. And the thing about a pi is once it glitches out, then you know it's kind of like down for the count. There's not like an easy reboot and reconfigure itself type of uh type of thing. So we lost a couple of instrument packages because the Pi glitched out on us. And so what did we want? We wanted the rock solid performance of the Arduino. It just works. And if there's a glitch, there's no operating system. When it sees power again, it comes up, it runs the program again. So what we had is we had a Raspberry Pi, a Linux machine running Python, and we had it connected to the Arduino. And what the Arduino would do is all of your heavy lifting, right? As far as the uh sensors and actuators go. So anything that was a sensor, anything that was an actuator, we connected to the Arduino. Then that passed over uh over Ethernet that passed over Ethernet the data to the Pi and then the Pi had the camera on it is getting the data from the Arduino and then the Pi is taking the video and it's beaming all of that live in real time back to Earth. Okay, so that was like a really neat project. And what we were even able to do is we were able to get the Arduino to sense if something had glitched out on the Pi, like maybe the Pi [clears throat] had shut down or maybe the Pi had uh a program that stopped running or something wasn't working right. And we actually kind of had a hardware reset where the Arduino would sense that and could kind of bring the Pi back to life. And with that we had 15 successful missions. And like I say, I think there were two of them that we didn't recover. But then what we would do is every launch we would do be doing more and more sophisticated things with the sensors that we had, the data that we were collecting and the video that we were sending back. And this was again this was a group of high school students who worked with me on this. It really a very exciting project. But I digress going down memory lane like that. But what did it come down to while we were doing that all that time where Raspberry Pi and we had an Arduino. And this is actually the Arduino we sent to space. This probably made six or seven trips to space. A little Arduino Nano. So this is a little bit of a sentimental one to me. This isn't the Pi that went to space. This is a Pi 5. But we had a Pi and we had an Arduino. We connected them together and the magic happened. But, you know, all along it's
Segment 3 (10:00 - 15:00)
like I was thinking, man, you got this pie with all this stuff. Why don't they just put the little chip on it? You know, the MPU, why don't they put the Arduino chip and instead of me running cables between these two things, just put them on the same board and then I would have the board that would do anything that I could possibly want. And I was always sort of a little surprised that somebody didn't do that. I was always thinking, well, why don't the Pi guys, why don't they just put a little whatever that chip is, whatever that uh whatever that microcontroller, the STM32U 585, it's pretty simple little thing. Why wouldn't you just slap one of those on the Raspberry Pi? Or [clears throat] why would you not uh take an Arduino and say, "Hey, let's just put a microprocessor on it. " But whoa, I waited 10 years and then [snorts] one day I got word that this UNOQ was coming out and that was like my dream come true. It's like nirvana. Finally, one board that's going to have that rock solid just work aspect of the Arduino, which will work with the sensors and actu actuators and has access to this vast array of tens of thousands of libraries. And no matter what you're trying to do, there's someone out there who's already done it on the Arduino. So, you have this huge knowledge base, user base, and the guys that use Arduino, they're really friendly people. It's kind of like, you know, it's not these kind of ugly software people. It's just like your, you know, your friendly guys that are sitting there talking shop together, you know, drinking coffee together, that sort of thing. So, I love the Arduino user base. hardware, and I love the Arduino knowledge base. Okay? And so, you're going to get all of that over here with the microcontroller. But then at the same time when you run out of steam just with a microcontroller you've got your unit you've got your Linux machine over there that can run Python. It's just like okay nirana. All right. Have I talked too much going down memory lane? But I think some of these reviews they're too much of you know bits and bites and gigs and you know mega this and gig of that and not enough like okay what does this really mean and what can we do with it? Okay, so the good this is my dream board. So I got it with great anticipation, opened it up, [clears throat] plugged it in, and then the first thing I wanted to do is just see old school. Does it behave like an Arduino? Old school, So we will come over here. Let me see if I can show you this so you can sort of see the Arduino at the same time you see my code. So, okay, we're just going to This is probably for many of you the first Arduino program that you ever wrote. Our simple little friendly blink program. This is the thing that like changed my life when I ran this program the first time. It was like, wow, I can do microcontrollers and my life is never going to be the same. So, I wrote this and just seeing that LED blink, it was really quite amazing. Now, this is not a how-to. So, I will say there's a few things you have to do. There's a few libraries you have to install. There's some things you have to do to get to this point, but we can talk about that later. Today is just like the good, the bad, and the ugly. This is not a how-to. So, you want to come down, make sure that you are connected to the Arduino Q. And then you also see we have something new down here. We have network ports. And look at this. I got a network port. It's actually showing me the IP address. So, that's kind of exciting because I'm thinking about the next step. I'm going to because already I can see my IQ address, uh, IP address. And then you look over here and be sure to come over here and set this to the Arduino Q. And again, to do that, you've got to do some monkey business up here to, you know, reload things and download things and all that. But it's pretty that part's uh pretty straightforward, I will say. So, now we have the moment of truth. We are going to come over here and run this thing. And this LED, we want to keep our eyes on this LED here. And so what we are going to do is we have this set to 1,000 milliseconds on, 1,00 milliseconds off. It is looking pretty happy. Looks like it's compiled, but we want to see that it has downloaded. It looks like, man, it looks like that is already working. And then if you look here, 1,00 milliseconds on, off, you know, it's 1 second on, 1 second off, off. Boom. So, what have we done here? We have run an Arduino program using all the tools that we are familiar with on the new Arduino Q. So at this point in my mind
Segment 4 (15:00 - 20:00)
everything that I've ever learned about Arduino in 10 years and all of that knowledge base is right here at my fingertips because if I can blink that LED, then I can do anything. Now, next thing, let's see, can we edit the program? So, let's say that we want it on for let's leave say 50 milliseconds and then let's leave it off for 1,000 milliseconds. So let's run that and let's see if we can actually edit it and you know still just making sure everything is copathetic. [clears throat] Okay, there it goes. Now this is the interesting thing. What did I say? And I that blue one is kind of interfering with your ability to see that very well. But I said to stay on for 50 milliseconds and to stay off for a second. And it's kind of like running backwards. It's it's off for 50 milliseconds and it is on for a thousand milliseconds. So for some reason this program is kind of running backwards on this built-in LED. And so right we're talking about the good, the bad, and the ugly. Now, that is not going to go into good certainly and it's bad because you know that sooner or later this is going to get sorted out. I mean, I can't imagine I made a mistake on the program, but we're going to kind of call it the ugly because here's a new board with a lot of new stuff going on and it seemed like the buil built-in LED is running backwards, but we're sure that that's going to get sorted out and so we're not going to put that in the bad category. We will ugly category. But why am I excited? every single thing that I've ever learned about Arduino. Boom. I can put it here and I can do that. But now, what is the other thing we want to look at? at the Linux side. that microprocessor, that dragon wing. So, let's see what is the easiest way to do it. Putty is a little free program that will allow you to SSH into just about anything. You could probably I could probably SSH into my coffee maker if I was really honest. And if I remember right, the IP address was 192. 168. 88. 95 for me. And then I think that's all I need. I'm just going to say open here. And boom. Even though this is just a black screen, this is a pretty big deal. And the reason it deal is it doesn't just sit there and blink. It's like it's asking me to log in. So, I think I am actually talking to that dragon wing. So, let's see. We know that the username is preset to Arduino. And then I will put my password in my sweet pooky. My sweet pooky 123. Okay. And let's try that. Okay. Boom. It's alive. Look at that. All right. So, I've got a Linux terminal up here and I am logged in. And what do I know? Why was I so happy on the Arduino side? Because all the stuff I already know. Arduino. Now, over here, I'm in Linux. So, right off the bat, just ls. Hey, I've got Arduino apps and I've got lost and found. Okay, I don't have all the desktop guey and home and temp and all that, but [snorts] I've got some folders here. So, let's go down into Arduino apps. So, I'm going to do a CD and a ar. Guys, this is something that I pounded out in Linux for like 20 years until one day I learned that you just type the first few letters and if you type tab, it will take you to the right one. And so, man, how much of my life did I waste not knowing that tab would finish the command for you? Okay, there we are. LS. Nothing there. But, you know, we just booted it, so that shouldn't be surprising. Okay, so I've got Arduino. I've got Linux. I'm really, really excited. Good, good. Okay, now let's see what I can do. Let's see if we can run a Python. So, I'm just going to see if I can enter the Python interpreter. So, I'm just going to put Python ah Python command not found, denied. And you guys are not seeing that as perfectly as you could. And I'm so excited. I want you to get the full experience by seeing things down here. And that is still not easy for you to see. A more adept YouTuber would have had this already up and working. The windows done already.
Segment 5 (20:00 - 25:00)
One more chance. I'm a little picky about this. Okay, there. I think you can see that now. So, Python not found. Now, I know sometimes it wants you to Python will run whatever your default installation is, but it might be Let's see if Python 3. Boom. Python shell. Uhhuh. Look at that. Okay. [snorts] So, let's say that I can I got a chord down there I'm running over. Let's say print the classic hello world like that. Boom. Hello world. We've written our first Python command under Linux on the Dragon Wing. Uh All right. So, I'm very excited about that. I'm a little scared because I don't know how to get out of the shell. Quit. Got it. You never know if it's quit or exit or control C or whatever, but got lucky that time. Okay. So, I'm still in this empty folder, Arduino apps. Let's see if we can run a program. write a program. So, I'm going to do nano and then I'm just going to do hello. py and denied nano command not found. Nano is just a really simple text editor. So, let's just try apt get install. I wonder if I should do pseudo. I never know. Let's just do app get install nano. And you didn't see that cuz let me get out of your way further. Nano and let's see what happens. Okay. app apt get install nano. Let's try that. Okay. So, it wants me to do pseudo. You see, I don't like to do things with pseudo unless I have to because sometimes if you do something with pseudo, then anytime you run the program or work with it, it wants you to pseudo again. So, so let's do the pseudo and I'm going to do app get install nano like that and that's a good sign. So, what did we say? My sweet pooky 123 something like that. Okay, there. Boom. It's installing. [clears throat] Wow. It's like we're sitting here and we're running that uh Qualcomm Dragon Wing. So, that is pretty exciting. All right. So now let's see if I can do a nano hello. py like that. There we are. And so I'm going to say here print hello world like that. Boom. Okay. And now I'm going to controll x enter. Yes. Enter. python 3 hello. py. Pi and hello world. Boom. Look at that. Okay. Now, you guys might just be saying, "Well, that's just you wrote a hello world and you blinked the LED. " Yeah, but what did I do? I did it on the same board. Okay. So, everything that I ever learned about Linux and Python, I can do here. Everything that I ever learned about Arduino, I can do over here. And now what I have to do is I just have to have these two neighbors, these two partners on the board talk to each other. Okay, now this so far I've been talking about the good. Right, it's my dream board. I can do everything that I wanted to on the Arduino side. Everything I ever learned about Arduino, I can do or knew about Linux and Python I can do over on the microprocessor side and now all I got to do is get them to talk together. Okay. So what I did was I worked on this for two weeks and I was fundamentally here doing the way I think is there's Python and Linux and then sitting over here is Arduino and get those two things to talk to each other either through like a bridge library that maybe Arduino would provide or just go back to UART and just do it like you would if you had the Raspberry Pi sitting next to the Arduino and just do some serial port stuff or do some Ethernet stuff and just do a, you know, do a client server over, you know, over Ethernet or do a client server over USB UART. all those different ways over the years that
Segment 6 (25:00 - 30:00)
we got the Linux machine to talk to the Arduino or the PC uh uh Macintosh to talk to the Arduino. I couldn't make it work. And like I'm not a stupid guy, but it's like two weeks I couldn't do it. Now what I understand is I understand that Arduino provided this new thing called the uh what is it the app uh they call it the app lab okay and you're kind of supposed to go to the app lab but it's like I know Linux I know putty I know this I know Arduino I know ID I know this so now let's just all work with where all the stuff that I've learned and I've taught you over the last 15 years let's just use that and now make it all work together. But the thing is, no, you can't do it. Now, if one of you guys was able to make it work, please tell me because like I say, literally, I worked on this thing for two weeks and it almost like I don't want to like sound paranoid, but it almost seemed like that [clears throat] they it's almost like you begin to feel like that they deliberately made it where you couldn't do what I'm trying to do because it's almost like those you art and that serial connection. It's almost like they hid it or they locked it in some way that I can't get to it to maybe force me to use the app lab. Okay. Well, it's like I don't want to be a grumpy old guy, but there's these things I know. I want to move on to the project. I don't want to move on. I don't want to learn a completely new framework for the way that I do work. So, I tried really, really hard to get this work and I couldn't get it work. So, I gave you a lot of good things about the Q. This is a bad thing. Okay. So, all right. If you're going to be that way, force me to use the app lab, I [snorts] better I better. Okay. So, let's see. We're going to see if we can open up the app lab here. Okay. Now you can see kind of the interesting thing is it pops up with the USB or network. That's kind of neat. All right. Uh I'm not saying it was easy to get there, but that's kind of Yeah, look at this. Isn't this is nice. Okay. So, let's look at blink LED. So, we're going to click that. Okay. [snorts] And then it's like you've got an Arduine. It looks like it's board update error. It problems. this. I didn't I don't think I asked it to update, right? I thought I just opened it up, but okay. All right. This thing just like I just open it and it tells me that the update failed. And so what I think is we're not going to call this bad. We're ugly because this is like okay, just everything's new. and uh show logs. Okay. All right. So now, all right. What we're going to do is we're going to try to kill this. So I'm not seeing a kill button. Let's see if I can kill. Okay, I killed it up there. So let's try again here. Okay, let's connect to the board. Okay, please don't pop that thing up on me again. All right, it looks happy. So, let's look at the blink LED. Damn it. Okay, so I did not ask for an update. So, contact Arduino support. Please help me. All right. So, let's see here. [cough and clears throat] The Arduino flasher tool. Okay. So, that is Let's see if something will pop up. Our Dino All right. Okay. What is that darn thing called?
Segment 7 (30:00 - 35:00)
Okay. So, [clears throat] let me uh kind of pause here and my thing. I swear like I just went through this whole thing that I was going to do. Everything show you, I just did it like for an hour. I went through every single example in my mind. I scripted. I story booked the thing out and it was all working perfectly. And uh well, let me see. Let's just be fair and let's say I'm going to close this. Okay, that. And then I'm just going to close the Arduino. I'm going to make sure everything is closed. Don't save. Everything is clean and closed. And then what I'm going to do is I'm going to unplug this. And then I'm going to plug it back in. come over here. And then I'm going to run the app again. Okay, the app lab. No device found. That's okay. It'll I think it'll find it. I hope it'll find it. Happy little beeping noise. That's probably progress. All right. So, there it is right now. I think probably if I waited a few minutes, I would see the network one come up. But we got the USB. Let's go ahead and connect. — [clears throat] — All right. So, let's click this. All right. So, at least that's ah darn it. Denied. Okay. So, guys, I know that you don't want to watch me try uh try to what does it say? Flash the new operating system. Uh, but again, what you just saw happen, it wasn't planned. And what I will say is this is not bad. This is what we're going to call ugly. I did not ask this thing to update the OS. I just opened the, you know, I open the AppLab and I'd open the AppLab an hour ago and I'd run all these programs. And now I open the app lab and it thinks that there's a uh a OS image failure of some sort. So let me uh let me go away and have a coffee and let me see if I can get this fixed and then I'll come back and see if uh see if we can get it figured out. Okay guys, I'm back. And after further review, once it tells you to update the OS, whether you ask for it or not, there's no way around it. It's like you've got to go the whole nine yards here. And so I finally found this thing. It's like this is the address where you can get the flasher and then you can put that in like you need to open a terminal. Okay. is you open this and you need to open it as an administrator and then what you need to do is you need to put that uh let's see if we can paste that in like that. Okay, that is the address. And then let's see if that works here. What? Okay, we got to give it like a command. a command. So, let's see. Maybe I can do this. that just from the All right, guys. Let me go away and I will be back in a minute. Okay, now I am back. [clears throat and snorts] Finally got it downloaded and figured out. And then also I'll say it comes in as a zip file. So then you got to unpack and all that sort of stuff. But I think I have all of that done. I'm not going to show you because it just seems like bye for a second and I'm gone for two hours. But uh what I will say is this is not a how to. And so what we are going to try to do is just see if we can give it this command which is I wonder if I can this is not a how-to. So I'm not going to try to change the font. It's dot slash arduino-flasher. c CLI and then flash latest and then let's see what happens here. Ah, what is that? Okay, let's see. Maybe I didn't unzip it. Okay, maybe I did not unzip that. Okay, I'm doing an extract all there. I thought I'd unzipped it, but maybe it put it in a strange
Segment 8 (35:00 - 40:00)
place. All right, let's try. Okay, I think maybe I got that. But now I need to change directory to Aduino. And that looks like that folder. Okay. Now, if I run that command that I put a while ago, which was this one. Now, maybe it'll go server error. Okay. So, [clears throat] first of all, you know, again, we're talking not bad here, but we're talking ugly. Kind of like the charm of the Arduino was, remember, you got your R3, you plugged the USB in, you downloaded one program, and you were up and writing programs. But now to kind of get to the first use of the you know kind of like to get like very early on in the app lab experience it's forcing me to update something and in the operating system. It has to be done in the command line in a terminal which is like going to be way beyond your casual users comfort level. Now why was this okay? Now, what did I do wrong here? wrong? Let me ls and see what's in here. Maybe I didn't put the word in right. Okay. Well, that sure looks like a Do you think I need exe on there? Maybe it wants the exec. Okay, let's try that. What? Okay, let's pause this and let me go see if I can figure out. Okay, it's been a couple of hours and as I tried to look at this in a little bit more detail what the error is. It says checking for DeSbian de Debian image releases. Error flashing the board. Could not download and extract the image. Error downloading the image. Bad HTTP status from this URL. Okay. And so, uh, what I want to do is I want to try to get this bad HTTPS and let's just put it in a browser and see what happens. Because the thing is that uh, I've got internet, I've got everything connected. I've got websites, I've got, you know, it's just like all the, you know, the internet is working. So let's come up here and let's see if I put a controlV and put that in. What I get is an internal server error code 500. So even in a browser I can't go to this page and then what it's telling me is it's telling me I have a cloud fair cloud flare error and sometimes that is because you know it doesn't like my country of origin right maybe somewhere maybe cloud flare has decided that my country of origin is a problem for them so what I'm gonna do is and first of all I will Okay, I'm not in Johannesburg to begin with. Okay, so now I have connected a VPN. So before I was not on a VPN and I was just straight to the internet. I couldn't get there. So now I am going to I have connected to a VPN and uh let's see what happens. Ah, now it thinks I'm in Singapore, but it doesn't like Singapore any more than it like Johannesburg. But believe me, when I was showing when it was showing me as Johannesburg, I was not on a VPN. I guarantee you. Okay, let's see if we can try something else here. Maybe if we got Italy, wouldn't that be nice? Ah, okay. Look at this. Got the old good old US of A. So, nobody's going to complain about the USA. And so, let's run this again. Ah, Los Angeles. You're killing me. Okay. So again, I want [snorts] I'm really being fair and I'm being honest. Okay. So what I will say is I told you the
Segment 9 (40:00 - 45:00)
good and the things I loved, right? We got the Arduino working. We got the Python working. We were Okay, that was good. And then we came over to the bad that they wouldn't connect to each other. And we're not going to hold this. put this in bad. We're just going to call this ugly. But it's kind of unfortunate that this is not This is the unfortunate thing. Number one, this is the ugly thing. Okay, I'm not going to call it bad. I'm gonna call it ugly. I did not ask for an OS update or upgrade or a new OS flash. It decided to do that on its own because like I say an hour ago I'd run through all of these demonstrations of the app lab and then when I start recording it decides that I need an upgrade even though I didn't ask for one. Okay. Then I had to go through all of this stuff to get this flasher tool, which was not a nice little button on the AppLab, but was a separate download from GitHub that had to be extracted. And then after it was extracted, it had to be run from a command line. And then when you did all that perfectly, it didn't find the it didn't find whatever it was trying to download. Now, [snorts] you know, my first response is it could very well be that I am uh I'm making a mistake or something. But then, you know, well, let's see. Let me look at it exactly and make sure that I'm not there's a colon at the end of JSON, but I don't think that's part of the URL. But let's just put that in to just be safe. Okay. I didn't want to write over the whole thing. Okay, there it is. And then I will put the colon there just because it was in there. See if that makes any difference. does not like me. Internal server error. It says my browser is working. It says my downloads the host is working but the cloudfare flare seems to not be happy with this thing. Okay. So, right. I want to be fair but you know I got to kind of say that this all right. So maybe I should say the good, the bad, and the ugly. very ugly that it's like you're forcing me to upgrade. You're giving me no path to back out of the upgrade. And then you're right, you're giving me no path to back out of that upgrade. And then it sure looks like I'm doing things right. And maybe I'm just a doofus. making a mistake here. But I really followed the instructions very, very carefully. I turned the firewall off. I turned the VPN off. I set the VPN to send me to a part of the country or part of the world that would not have any red flags go up. And it's just like I'm sitting here sort of stuck. Okay, And so what would we do at this point? Because I can't go around the update. I can't download the update and I'm kind of stuck. Okay, so we had the good, we had the bad. I'm gonna like I'm going to upgrade this one to a bad and the bad is you're forcing me to use and then the app lab is not working. So, I'm sitting here brokenhearted, brokenhearted because I can't get this to work. And guys, you know, like I do a lot of stuff, right? I do the man, you want to see the ugliest one that, you know, so far we've kind of gotten ugly here. You want to see the ugliest one I ever did? This [snorts] is the Nvidia Orin AGX. This is like the most monster single board computer on the face of the earth. And trying to get this thing booted up, that was really, really ugly. It took me a month to get this thing booted up. And I actually had the Nvidia guys that were, you know, giving me personal help because they were wanting me to review it. Took me a month to get this thing booted up. So, this Arduino Q is not the worst case so far. It's Okay. So, I've talked about the good and bad and the ugly sort of happened to us in real time. And I swear I didn't like sabotage this. I'm the guy
Segment 10 (45:00 - 50:00)
that loves Arduino more than anybody else. And I just showing you though my frustration. I just I don't feel like that I should just edit this all out and pretend it didn't happen. Also, I don't think that I should call Arduino or write someone at Arduino to help me because I've got a big audience. Is it's sort of like I am sitting where you would be if you sort of ended up in this situation. So, little bit a little bit disappointed here. So, so the bad to me the really bad thing is let me open up Python, Arduino and give me like a really simple little thing. If you don't, you know, just let me do it over the UART. Let me get those two things caught me over the UART. And maybe I'm just stupid, but I spent like two weeks trying to get that thing to work and I couldn't get it to work. Okay, so just let me do it over you. But what I would really love would be if on the Python side inside of Putty, inside of Nano, if I could do just like uh you know create Arduino, load the library, create an Arduino object and then do like a uh do like an Arduino. push and I can push something to Arduino or Arduino. pull and I would pull something from Arduino. And then over on the other side, you could say, you know, Python. put or Python uh get and I could talk and listen and over here I could move things up. That's all I'm asking for, right? I don't have to have the little lights and widgets and gizmos and gadgets and all that. Just let me get these two parts of the board talking to each other. Let's try this again. Just see maybe if we'll get lucky. No, D9. Maybe you can't do it through a browser. Let's try here again. I'll come back to the flash latest denied. Okay. So, couple of things. The one bad is you're forcing me to use the app lab and the app lab isn't working. And so, that's okay. We agree that's ugly, but we won't say bad. The bad part is you're forcing me to use AppLab. Okay, that's the bad part. The AppLab not working. That we'll say is the ugly. But let me kind of All right. I wanted to go into the AppLab and I wanted to show you some of the demo programs there and stuff, but that looks like it's not going to happen today. Maybe in a few days I can do another revisit of this. But let me tell you one other kind of bad thing on this. So like I get this and you know why would we want to use this? First thing we would want to do is put a camera on it. Okay. So the first thing I start looking for is the little connector, you know, to connect the little camera. And what I wanted to do for this demo, for this review, I wanted to connect the little Raspberry Pi camera up. And then I wanted to connect this got a little servo. And what I wanted to do was have a little open CV program that as I was moving a ball around that this thing would track it and keep it in the center. So show you a demo of the you know a demo of client like AI on the queue. But then alas I look at this and I see what I see no connector. Now there's these two huge connectors back here. I think I just unplugged it. Uh there's these two huge connectors back here and somehow someway probably you would be able to hook the Raspberry Pi camera up to these two connectors back here but you know don't know how to do that. And then I looked at the people that did hook up a camera and they say oh you have to use the USB port. Okay. So now I unplug it and I plug the camera in. What what's the problem? No power. Okay. So then you could come in and I guess that you could try to power it through the pins up here and then you could have the camera hooked here. But I'll be honest with you, I don't have a USBC camera laying around and I think most people don't have a USBC camera laying around. So what I saw one person did is they came out with a USB C to a USB like kind of like USB 3. I'm not sure exactly what you would call it. kind of like the normal USB to a little hub and then they plugged it into the hub and then the hub was plugged into power and then the power went to the uh to the USBC and then that little hub also would let the camera talk to it. But you're kind of getting cluji at that
Segment 11 (50:00 - 55:00)
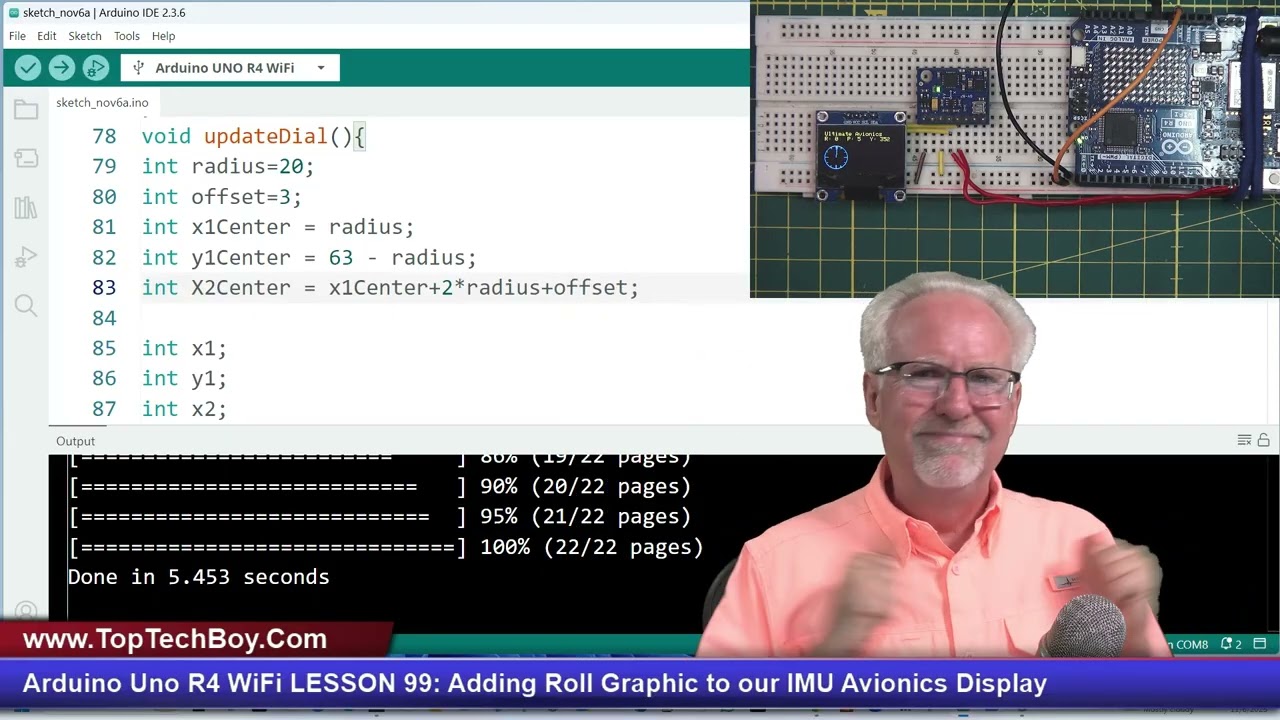
point that if I have to have a USB hub and then wall wart to run that thing and then I've got a wire here and then I got a wire there and then finally I get like a USB camera working. That's a little bit clooji. Okay, so guys I really was not anticipating this problem today in the review. And what I was anticipating is I was anticipating of showing you the app lab and the kind of nice things about it and the things that I could see would maybe be nice for people and then the things about it that I don't like. What I don't like about it is like if I look at the Python program in there, it's like I don't understand that they introduce these new things like a YAML file and then they introduce these things as like bricks and then they give a demo where they have written the YAML file, they've written the Python side, they've written the Arduino side and then you just click run and then you got this beautiful widget that shows up in your browser. Okay. Wow, that's impressive. But when I go in and look at the brick that they wrote, it's like I don't understand it. And then when I go in and look at the Python program, it's like I don't even really completely under. It's like am I looking at Python here? And then on the Arduino site, it had some surprises for me. And so what I see is if you want to go in and just drag and drop bricks, okay, [snorts] you could do like a little demo. But if you want to go in and like really if you want to really go in and write a program, it's like you're going to have to learn the app lab, bricks, you're going to have to learn YAML, and you're going to have to learn this strange way that these two programs seem to these two parts of the board seem to communicate with each other. And then uh I looked at those webbased like they have these webbased gooies and like there was one that had like a really beautiful graphic of the Arduino and then you could sit with little slider bars in your or little uh toggle switches in your browser and you could turn on or off any one of the different pins and it was like really neat. You really I was in there really turning things on and off. But then I thought, okay, cool. How did they do that graphic? Well, when I went in to see how they did the graphic, it seemed like it was doing HTML and CSS and all that sort of stuff. And it's like, guys, you don't want to be doing instrumentation and data collection in HTML. You just don't want to do that. So, let me kind of show you, right? Let me just sort of show you. Uh let's see if I can show you something here. Uh let's see here. Give me just a second. I'm just kind of doing this on the fly. But you guys that are working with me on the Arduino Uno R4, some of you guys R4. And just for kind of comparison, let me sort of show you what I'm doing on the R4. Hopefully. Okay, I'm going to have this in just a second. I think this thing fired up quite nicely. Okay. Yeah. So, let's see if we can come over here. Right here. Okay. This is a cool little project that I'm doing on the Arduino R4. You can see that I have a GY87 10axis IMU sensor here. I have an SSD306. And then just on the Arduino side, this is again the R4. This is not the Q. [clears throat] On the R4, I have it connected to an SSD306. And hopefully you guys can see this, but I've got sort of an avionics display here. So this is a compass. And you can see as I spin the compass, the compass needle always points north. And this is a roll and pitch indicator. You see as I'm rolling and I'm pitching, that is shown. And then this is kind of like an attitude. Are you going up or down? And you see I'm going down towards the ground. I'm going up. And then I get really, really accurate numbers for roll, pitch, and yaw. So that is like really, really cool. But then I'm sending the data over to Linux running Python. And then look at this. This is like graphics that help me on the fly calibrate the sensor. And so if you look at that red as I am spinning that thing, I am making a perfect circle that is calibrating my accelerometers and my
Segment 12 (55:00 - 60:00)
magnetometers. And you see I have this visual aid. And I think I just glitched it. Uh, I have a visual. Hey, there it goes. And the more perfect I can draw that circle, the more perfect I'm calibrated. So, look at that. And then also over on the Python side, on the Linux side, I have got this kind of heads up display. Let me uh let me turn I guess this is turning into a R4 review instead of a Q review, right? Let me see. I need to turn that photo off there. I think would be the wise thing to do. Okay. So, you see as I, you know, if you look up here in the upper right, as I roll, okay, the thing rolls. And then if you look down here, as I pitch, I'm pitching up and I'm pitching down. And then if you look, if I get out of your way and you look over here, I have a compass that as I turn it, okay, it's showing me which direction I'm going. And then up here, I think this is just really cool. Up here, this is a graphic that I made of the Earth's magnetic vector. That is the red line is the Earth's magnetic vector. And then the red uh blue and green is kind of like a coordinate axis of the Earth. And so you see that light blue line is spinning around but the red line that is moving that is a representation of the actual earth's magnetic vector where I am and you see the vector is not horizontal it's coming in at an angle but if I tilt this I can line up my project exactly exactly with the earth's magnetic vector. Now if you look in the lower left you can see that I have an inclination where I am on the earth of 29°. Okay? Because that is where this thing lined up. So I know where I am the earth's magnetic field is coming in towards the earth at 29°. And so this is just like this is like big fun. And what is it? It is. What is this? This is the Arduino Uno R4 WiFi talking to Linux and Python. And I didn't have to learn anything. I did the Arduino on the Arduino. I did the Linux and Python on the Linux. And then everything I knew, I could just crank this code out. And then I could teach you how to do it as well. But unfortunately right now I don't know how to get there. So a lot of you have been asking me for a class on the uh on the queue and that's what I said this was going to be. What am I going to do with the queue? But right now it's just like I'm kind of stuck. Okay. So this is trying to be fair and it's trying to be honest. Okay. I want to be fair to all the incredible work that went on at Arduino and you know I love Arduino more than anything else. I've had you know many millions of people take classes from me on the Arduino but I just can't say right now go out and buy the queue until we get things a little bit more ready for prime time. I'm going to ask you the hard question. Okay, this is a Pi Zero. And then you see the little connector and I've got the little camera hooked up to it. And I can take this and in an hour or two I can have this doing object detection. I can have it doing pose. face mesh. I can have it do expressions. I can have it I can give it hand signals and it can recognize the gesture recognition. I can do all of that on the Pi because what I know how to write programs in Python and I know Linux. Okay. And in this case, I'm not really doing things with uh with the Arduino. So, this is the hard question we have to ask ourselves. This is the hard but true question. What is it that this board allows me to do that this doesn't? Okay. [snorts] One thing I guess you could say is that there's a lot more uh libraries and knowhow out there related to these GPIO pens compared to G these GPIO pens. But this has been out for 10 years and so this that old thing that you don't have the knowledge base and software base that advantage is eroding. Okay. So I think what we have to do is we have to really think and we have to say what is it that would make me want to learn the appl
Segment 13 (60:00 - 64:00)
you know, all of that new framework on the Q when I could just do it on the Pi Zero. Okay, maybe I should answer my own question. Why would I do that? I'd do it because I love the Arduino. Okay, I All right, so I'm not [clears throat] saying that I'm not going to make a class on this. Okay, I'm just saying it right now. And I'm going to say that I'm not going to make a class on it based on the app lab. Okay, because that's too special. That's too like you're in the stove pipe. Let's say that I taught you everything there was to know about the app lab and then you go get a job at Texas Instruments or something and they don't use Arduino. It's like you're in this proprietary mode that's not going to transfer out necessarily real well to the real world. And so uh [snorts] I think the point that I would think about making a class for this would be the point that there was a very seamless way that I could write Python on the Python side, the Linux, you know, Python under Linux on the microcessor side and then I could do the Arduino business over, you know, on the microcontroller side and then I could very easily go back and forth without being forced into the uh app lab. Okay. So, I love Arduino more than any other board, you know, any other, you know, uh framework. I've always done work on the Arduino, right? I've had millions and millions of people take my classes on the Arduino. I will continue to teach the Arduino. Okay? But before I move from the R4 to the Q, we've got to kind of work through some of this ugliness. Okay. Does that sound horrible? I just feel like I just said horrible things. I feel like I said, so I really it's just like the Arduino is such a big part of my life and I I really love it and I love all the things about it and I do intend to continue to uh try to always be the Arduino guy and everything, but right now I got to wait a little bit before I try to teach how to use this. Okay, man. I kind of got feel like I got derailed and off track on this, but just watch it for what it's worth. You guys leave comments down below. Maybe you just booted it up. I saw a guy on the Arduino site that was saying in three minutes I'll have this up and running and he plugged it in and just everything was working. Did not exactly what uh what happened for me. So you guys leave comments down below. Did this thing just boot up for you? Did you run into some of these glitches with the system reflash or upgrade or whatever? did you run into that sort of thing or you know kind of give me you guys I know some of you guys already have it let me know what your experience was with it and then you know what I want to do I want to follow up in a few days and let's see if I can get this thing working I'll come back and kind of show you the app lab and the kind of cool little very easy demos it does and then the things that I'm not like really excited to sort of be forced to work in that you know in that framework. Okay guys, thank you to all the guys at Arduino that have made the world a better place. And I think it was the Arduino that really opened up the world of STEM and high-tech and microcontrollers and electronic projects. You know, I think it was sort of the thing that just opened the door in the floodgates. I sort of look at it like, you know, when I was growing up, there was Heathkit and the Arduino was kind of like the thing that came along after HeathKit that just opened electronics and microcontrollers up to the world. So, big thank you guys to uh big thank you to you guys out at Arduino. We love you. We're not going to give up, but we're going to continue to try to plot on through with this. So, I think that is way too much talking for me today. I'm going to close this out and then maybe I'll come back in a few days or a few weeks if I've got something new to show you or some new insights on this. Okay guys, love Arduino. Love it. Always love Arduino. And uh want to thank you guys, my audience for sticking with me. And hopefully I'll have an update on this in uh in a few days or a few weeks. But at this point, I'll be signing off. Paul McCarter with toptechboy. com. I will talk to you guys later.