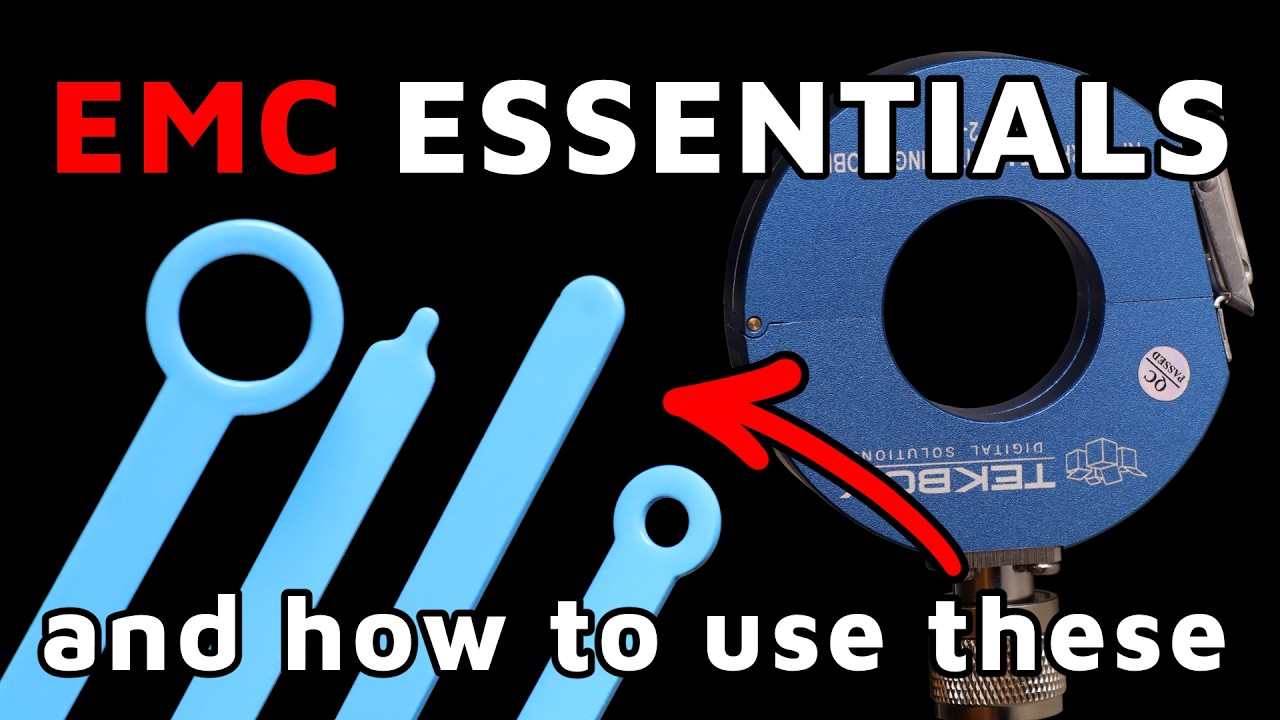
In this video, we are going to have a look how we can do EMC measurements in our own lab with some really affordable devices. This is what we are going to talk about, Karen. — Yep, that's the plan. — Okay. So, yeah, you can start. What are we going to do? What we will need? And you know. — Okay. So, yeah. So, this is really more fun than anything else. Um, but it's stuff that over the years I figured out, you know, if you walk into an EMC lab, right, you're going to see the racks of equipment. You know, it's all, you know, with the fancy brand names and the that cost tens to hundreds of thousands of dollars. Um, and you might think, oh no, you know, if I don't have that stuff, how could I ever investigate an EMC problem, right? And but at you know as I've been doing this over the years I've come to realize you absolutely need that stuff for regulatory compliance. If you need to know exactly where you are relative to limit you need that stuff. But if you're tracking a problem or you just want to know what's in your electromagnetic environment and um and you don't have all that stuff basically when you just want to know if I do this does it make the problem better or worse? you can do a lot with very little. Um, so the equipment that I'm going to show over here, um, it ranges from the, you know, few hundred dollars all the way down to free, you know, just stuff you can — scr up with, um, stuff you probably already have in your web or samples you can get from like, you know, um, expo shows. — Okay. So, uh, what are we going to do first? We are going to have a look at our setup like what we are going to measure or something like this. Okay. — So, let me switch videos and let me know when you can see my workbench. — Yes, I can see it. — Okay. So, I'm going to very delicately move my laptop over there because I'm going to need it for another part of this. Okay. So, in the workbench area, there's way too many things all plugged in at once over here. But fundamentally what we are looking at for folks who've seen any of my um you know uh presentations, seminars or what have you, uh this guy will look very familiar. So this is a very inexpensive function generator. — And right now what it's set up to do is generate a 5V 20 megahertz square wave. So something very like you'd have on a clock, right? And then it's um it's outputting that on a BNC coax cable. Uh the BNC right now is running through a current probe, an RF current probe. And by the way, that's kind of the first piece of relatively lowcost equipment. So this current probe I've got is from Techbox. And it is um when I bought it a few years ago, it was like in the three to $400 range. — It covers two megahertz to 500 — megahertz. and uh which is you know for a lot of core EMC problems especially the ones coming from cabling uh that's really you know that's really kind of a nice sweet spot. Um and the uh the current probe is currently reporting into a tiny essay. Tiny essay is just my absolute favorite. Um when I got this three years ago I was like $75. It's a fully featured um uh spec standalone spectrum analyzer. doesn't need to be plugged into anything else to work. You can see it's got the display, it's got a touchcreen. Um I know that this version has gotten more expensive, you know, inflation and everything. Um but they've also tiny SA the company has also come out with um you know more sophisticated versions. So if you want to pay a little bit more like the Tiny SA Ultra has a wider frequency range and better dynamic range. Um but uh you know just the basic tiny essay still works fantastic. — Mhm. — And then just to continue to the end of what the function generator is doing at this end it splits from a BNC coax to a two wire lead which you know this is just cable that came with the function generator — and it is just going across a 50 ohm resistor. So there's nothing completely passive on this end. There's nothing interesting going on there. But the setup is really nice because it's a 20 MHz square wave. This is the 20 MHz signal on the um on the tiny SA. This guy right next to it, the other big spike there, that's its third harmonic. That's the 60 MHz. Uh so the fact that this guy doesn't filter its output very well makes it fantastic for demonstration purposes. Um [clears throat] when I'm giving
Segment 2 (05:00 - 10:00)
seminars a lot of times I I'll have the current probe reporting into one you know kind of more official looking spectrum analyzer and the tiny essay will be looking at um a rod antenna you know off to the side of my um on my bench so that I can show conducted and um conducted and radiated emissions at the same time which is always you know a good thing to remember of how much especially when we're looking at cabling uh how much conducted emissions just instantly turn into radiate emissions. — Okay. So, what we can do with this uh setup? How is it going to help us with our measurement? — Yeah, exactly. So, the first thing is, you know, tiny SA plus the official RF current probe. Like I said, between the two of them, uh a few years ago, that cost me less than $500. Um, one time I actually took just these two out to a company that needed tr help troubleshooting a uh an EV, like a new prototype EV that they were working on. And with basically just this equipment, we track down and solve the problem in about two days. Um, so uh you know again sometimes it doesn't you don't need the fancy stuff. — Okay. So you basically use the cables which are coming out of your board for example and you put the probe there and then you can uh get idea what kind of frequencies are the possible problems. — Exactly. — Okay. — And the other thing is that it'll really tell you again I want to be able to tell the difference between if I change one thing did it get better or worse. So for instance over here if I change this to be a triangle wave you can see how much that third harmonic dropped down. It drops down about 12 dB when I go from square wave to triangle wave. — And so you know that's not a subtle distinction right 12dB you just do not need um you know very fancy equipment to be able to register a change of that magnitude. So let me set it back to the uh square wave. And again you can see okay when I did that it got worse. — If you use sinus sinos wave — oh yeah sine wave that third harmonic basically disappears. You still got the 20 obviously from the 20 mehz sine wave but yeah — perfect. So basically uh this means when we are doing this kind of measurement on our board and we do the fixes what we think should fix the problem then we will see we should see better results. — Exactly. Again this can't tell you know am I 2 dB or above or below a regulatory limit. — But what it once I know that I've got a problem this can help me track down that problem and again what makes it better what makes it worse. What about the frequencies? Like, do we need a bigger frequency range to measure the signal? Yeah, right now what I've got is it's going from 10 MHz to 120 MHz. Um, I do that so that you can also see how much FM radio uh here in the United States. Uh, this test cable under test is picking up a significant amount of FM radio just because my garage is not a shield room. Mhm. — Um but you can when it's all the way on its square wave function um you can see the harmonics go out to past 200 meghertz. Now the tiny essay and this is also a limitation with one of the other options that I'm going to show you. Um it's lower frequency range is pretty high. It's like 950 khertz. You don't want to take it too much below that. Um, so if you're chasing something very low frequency in the hundreds of khertz, you'd need some different equipment. — Mh. — U, but again, for that core sort of 30 MHz to 1 ghahz range, this works fantastic. — So it can go up to 1 ghahz. — Yeah, actually I think it can go I think mine can go up to about three. — Oh, okay. — 3 GHz. And then I know the tiny SA Ultra goes up to at least 6 GHz. — Oh, I didn't know that. That looks good. [snorts] I know. And like I say, it's so inexpensive. Oh my word, I just love this so much. — Okay, what else do you have? Or do we need to speak about this a little bit more or we can move to different tool? — Well, so Robert and I were talking before we uh before we started the recording that I'm a little worried about the battery life in my laptop and the next thing I'm going to show is the biggest battery hog. So, let me do that first and then I can turn that off and um and then hopefully I'll have enough battery for the rest of our interview today. Let's see if I can get
Segment 3 (10:00 - 15:00)
this on here. So, I'm going to turn off the webcam and go to a screen share. — Oh, you can Ah, yeah. Yeah, you can do that. Actually, is it better to keep the webcam on or — No, you can uh we can I would like to see uh Okay, — you — Okay, so we're going to share the entire screen. — Okay, so what we're looking at right now is I've got an a new smart SDR. So, an SDR is a software defined radio. — And um when I purchased this again a few years ago, it was 25 bucks and it came with three antennas. Can we find website of this uh device? So — pull up if I just go to Amazon. This poor laptop. I've got so many things plugged into it. Okay. Amazon Ego new elect smart. — Yes, this is exactly what I'm using. — Okay. — So, you can see the price has gone up, but — uh yeah, so SDR software defined radio. Most of these are sold. Oh, actually this bundle is what I originally got with the extra antennas. Mhm. — Um, so most of these are sold to the ham radio community. Um, with the idea that, you know, software defined radio, you can pick and choose what you're listening to and how you're listening to it. Um, you know, look for AM signals, FM, sideband, all those different settings. And because of that, the SDR community has written a lot of free software or sorry, the ham radio that will work with these devices. Um, so that's what I'm showing here is SDR++. So this is just freeware that you can download. — Uh, when I start this up, one thing I like about this that actually gives you something extra than your normal, you know, run of the run-of-the-m um, spectrum analyzer is this is giving you a waterfall plot. So for instance here I'm still remember I'm not hooked up to an antenna at this point. I'm hooked up to a current probe and that's so I can use this either in with an antenna to survey my electromagnetic environment or with a current probe to look at exactly what kind of you know uh things a cable is picking up. Um right now this is the FM radio signal that again that we saw before that my cable under test is picking up from the environment. And with this waterfall chart you can really see um the difference between the digital sidebands where you get uh you know sort of your meta information artist channel uh song title that kind of thing and the analog FM signal at the center of each channel. like it's really visually clear in a way that the tiny SA, you know, because the tiny SA had a was set for a 600 kHz bandwidth, it didn't have it wasn't resolving the FM signals in the same way. And even then, it'd be hard to resolve it to the point where you can see that very clear difference between the analog signal and the digital — signal. The other thing I really like about waterfalls and again you can get the same behavior from um some very high-end spectrum analyzers but you know very high-end uh waterfall plots like this are not common. If I go to um a different frequency area so now I've switched to 315 meghertz. — Mhm. — Let's see. So, it it's not showing up. Oh, it's not showing up as well because I'm plugged into a cable, not an antenna. Um, when I'm plugged into an antenna, you can really see the transient from when I hit my car keys, my car key fob. — You can only see these two little blips here because um, yeah, this cable is not good at picking up uh, 315 mehz. But let's go look at that um, third harmonic. Now that third harmonic is really standing out, right? And so again, if I just want to see is it better if I do this or this, it's very clear. — Mhm. — And again, if I go all the way down to the sine wave, — it dies down even more.
Segment 4 (15:00 - 20:00)
— Mhm. So it was square, triangle, sign. — Yep. And then if we go back to square. — Okay. And to be clear, you connected the current probe to the device. — Okay. — Exactly. So what we were seeing on the tiny SA before, it's the same input now just to my SDR. — Mhm. And so again, if all I'm doing is troubleshooting, then um you know, a $300 current probe and either a $30 SDR unit or a you know, $100 tiny essay gets me what I need for a lot of, you know, straightforward um EMC problems, right? — This is very nice. So, what is the frequency range for this one? — Uh thank you for reminding me. So, the biggest downside about using an SDR for this is that you can only look, and I've checked this across multiple um freeware versions of FDR software. You can only look at about 3 megahertz at a time. — Okay? — So, right now it's going from 59. 1 to um 62. 2 MHz. — And you can't see a bigger window than that. So, you kind of have to already know what you're looking for. Uh because if you just try you know like searching through that's a little awkward. — But uh so what is the full range? — So this will go from um 2 megahertz to 2. 5 GHz. — Okay. — Um and I know it actually I think the spec says 2. 3, but I know it can do 2. 5 because I've seen Wi-Fi with it. Yeah, no problem. Um, and then, uh, if you want to use an SDR to look for lower frequency content, they sell converter modules called, um, ham it up modules where it's an upconverter. So, it'll read in tens or hundreds of kilhertz, upconvert it to what the SDR can actually work with, and then go from there. — Oh, nice. Just for fun, can we go to 2. 5 if we can see some Wii? I would like to see Wi-Fi here. Well, we might not be able to see much just because again I'm hooked to a cable, not an antenna. Um, but let's see if we can — 245. I don't know what is the exact frequency. — I know I've got 2. 4 in here, — but I might again because I can only see three megahertz at a time, — right? It's just uh Oh, it's telling me that I'm starting to dip into the 13 cm ham radio band. That's kind of cool. Ah, yeah. — Okay. I was just curious if you can see Wi-Fi how it would look. — Yeah, I'd do better if I had a if I if this was hooked to a different a better a more tuned antenna, basically. — No, it's fine. Okay. Uh, so basically the problem is because we are measuring around the cable and the cable is not picking up correctly the 2. 5 gig. Well, to be fair, it's actually technically a bad thing that the cable picks up so much FM radio, right? Like that's not the behavior you want from your anti from your power cable. — So, it's good that it's not picking up Wi-Fi and, you know, everything else. It's bad that it's picking up so much 100 megahertz signal and just transmitting it straight back into the function generator. — Uh, okay. What else about this? or this is all about this device. — So that's the main thing I wanted to point out with this. So again, you can either um use it with a current probe, you can use it with um something like, you know, again, a very inexpensive rod antenna. This is an extendable rod antenna that came with my SDR. um you know so it's again you don't have to get fancy in order to um again especially once you know you've got a problem. — Mhm. — Um and you know then you can tell things like again does it look more like an analog signal or more like a digital signal. Um, does it have transient characteristics, which again is sometimes hard to see on a spectrum analyzer because the spectrum analyzer is sweeping through and if it doesn't pick up the transients each time you if the timing's off, you can it can be harder to see that. Um, so I really like this uh, you know, as an option. Now, am I going to go, you know, you my usual thing when I'm troubleshooting is I take my tiny essay or my handheld spectrum analyzer? Um, but again, for education purposes, for uh for quick and dirty troubleshooting, you could do worse than um than use a lowcost uh software defined radio dongle. You know, just plugs right into the USB port to my laptop and off I go. — This
Segment 5 (20:00 - 25:00)
I like it a lot. Maybe I should buy one. Like I said, I I'm not associated with any of these companies, I should add. Like I talk up the tiny SA so often, I'm like, man, I should reach out and see if I can get commission from those guys. Um, but you know, it's just equipment I find very useful. [snorts] Okay, but the next thing I wanted to show was what if you don't have one of the fancy current probes? Mhm. — So if I take this off, um start swapping cables out. So you know, again, this is not a particularly expensive current probe. It's tech box. Um but you know, it's very good at what it does. — Do we need to look at some parameters when we are buying this probe? Yeah, the main thing is the frequency range. So, um you know, mine's 2 MHz to 500 gig, sorry, 500 megahertz, but you can get many different frequency ranges, uh depending on what your you know, what your most common problem is. Uh and then every one of these comes with a calibration sheet. So whatever voltage it reports back to a spectrum analyzer or some other measurement device, you can translate that, you know, with very simple math into a current, you know, linear current measurement of how much current is it seeing on the um on the cable. — Mhm. — And by the way, from our little 5V uh clock signal, um I've done the math on this current probe. This poor thing has about 200 milliamps of two 20 megahertz noise on it on the outside of the coax. Okay. So, if I don't have a fancier current probe, what else can I do? So, still sticking with the tiny essay for now. Okay. And so now I've just got a male SMA. And this is actually uh the other end of this tiny cable is a female uh UHF connector. Again, I got this for like five bucks at a ham radio swap meet. If you ever get one of the fite people to give you a free sample of a clamp-on fite core and then you wrap some wire around it a few times. So, I've got just a loop of standard wire wrapped four times around this — uh cord. — And then you clamp it around the c the cable that you're wor wondering about. And you take the free end of that. Uh, so there, yeah, there's free end there of the wire that you wrapped around and you plug that into your tiny SA. — Oh, — and might I add the amplitude is not significantly different than what we got. — Same as we had before. — Yeah. The only main difference between the fancy blue one and my, you know, clued together wire wrap ferite core is that one of them has a calibration sheet. — Because now when you do it by yourself, you don't really know the frequency parameters, for example, for your probe. — Exactly. I don't have the transfer impedance. — Yep. But other than that, again, if I just want to know, is it better if I do, you know, if I have it — a square wave versus a triangle wave, tada, — you know, nice drop. And then if we drop it down to that pure sine wave, there it goes. — Literally free. It's just some wire and a, you know, a ferite cord that I got from, you know, a sample that I got from a vendor. Now, again, it's less convenient to work with because I have to have my hands on it to keep the connection, you know, uh, — and we all know that, you know, the physical presence of a human can affect EMC results. So again, um, this is best for when the thing that you're tracking is not subtle. — And you only connected the middle wire. — I only connected one end. Yeah. Mhm. — And this actually I know this has u I've gotten a lot of questions about this, but if you look at the connector of a re quote unquote real current probe, um the outer shield of the coax, you know, the center pin connects to the wire wrap on the inside of the uh
Segment 6 (25:00 - 30:00)
of the core. The outer conductor actually doesn't go anywhere. — Okay. Yeah. So there's no difference between again what I'm doing with my U wire wrap and what they're doing. Yeah. Topic schematically speaking. — Oh, this is nice tip. — And I'm curious and now I can see the other probe there. — Yeah, I've got a few others. I wasn't sure how much we'd get to today. Um, but you know, again, uh, finding out that the handmade current probe does just as well as the professional one. — I'm surprised. — Kind of blew my mind. — How did you come up with the number of uh, you know, rounds or something? So, in theory, it will be more effective the more wines you can get, but I honestly was uh completely driven by how much could I comfortably fit physically — in the um — in the fair core, you know, and still have room for the actual cable to go through. — Mh. — Uh because I did want to like try not to, you know, not pinch through the insulation or anything like that. So, yeah, that's the only thing I was going for there. And it just worked. — It just works. Again, I'm glad I have the official one. Um, you know, the connector is much more solid. I've got that transfer impedance calibration sheet. You know, I'll know exactly what I'm looking at, but when push comes to shove, man, you uh you know, it's hard to complain about getting those kind of results for free. — I agree. I I'm very surprised actually. it shows so good results similar to the expensive probe. — Now along those same lines, you know, most of the time when I'm again doing sort of teaching seminars with this setup, this guy will be plugged into that um that rod antenna I showed you — uh before. — But what if you don't have one of those? Well, if I want to see what the radiated emissions are coming off this cable, I literally just cut, you know, length of like 12 gauge wire. Let me tell you, and I can tell you straight up that it's about the same amplitude as I get from my quote unquote official antenna. — Yeah. But there is a little bit more visible now. I mean the — probably especially because it's so close to the wire. — Uhhuh. Okay. — You know, because the thing that's doing the radiating is this black cable and it's this red cable that's picking it up, — it it's almost unfair because I've got it so close. — Um, but again, if all I need want to know is can I tell the difference between square wave and triangle wave? And then, you know, can I tell the difference between triangle wave and sine wave? — Yep. There goes the rest of it. — Is it important how long is the cable? — Yes. Yes, it is. So, I again I kind of cheated. Well, no, I didn't cheat. I did my I did the math right. I cut this to be the same length as my cable under test. — I noticed that actually. I was thinking if that was intentional. — Yeah. So whatever the cable under test is good at radiating, this will be roughly equally good at picking up. — So that's um that's a good way of thinking about it. I could also have, you know, knowing that I'm looking at 60 mehz noise, I could have cut it to be exactly a quarter wavelength would have been another option. This isn't that far off of a quarter wavelength. It's about a fifth of a wavelength at 60 MHz. — But I think you made very good point because you are measuring the frequencies coming out of the cable. Then why not cut exactly same length and you know use it because uh maybe you don't know what frequency you are looking for. So you don't you can't really calculate the quarter length or something. It's easy just use the length what are the cables connected to your board. — That's a really good point. Yeah. If you are trying to do a survey instead of chasing a known problem, cutting it to be about the same length as your cables is going to be you're right probably about your best bet. — Yeah. Yeah. Nice. This again very good tape. Nice. — Um the other ones that I wanted to show just a little bit and you know you can decide how interesting this is. So after the current probe stuff now
Segment 7 (30:00 - 35:00)
when I'm um so many of the problems especially because so much of my troubleshooting experiences in EVs and automotive where you know what it's cables it's like it's always the cable. So, you know, current probe has kind of been my go-to troubleshooting device, but you know, nearfield probes for the people who are more concerned about the PCBs specifically, you know, these are going to be um you know, an absolute lifesaver. Um so, this set of nearfield probes is um the kind of set you can get. The one I've got here is Beehive Electronics. Again, it's a few hundred. It's got great calibration sheets, great customer support. Uh, it's got a set of four probes. Large loop, medium loop, and small loop. And then one electric dipole. So, I've got these, and these are great, but what if I don't have those? Well, I got this uh this loop antenna nearfield probe off the table at a uh at a basically a vendor was giving these away for free. — I think there are also some uh open source projects. Uh so people can just manufacture their own probes. — Yeah, it's not hard. I haven't had a ch like I haven't had time for you to just sit and do it yet. But all you need to do to actually make a nearfield loop probe is you cut off one end of a coax and then loop it around so that the outer shield gets soldered back to itself. — Mhm. — With a loop and then you weave the inner conductor open — and then that you know that's a near field probe. And now uh in one of my previous videos I talk a little bit more about these probes but I would like to point out if uh someone doesn't know which probe exactly use very quickly you can say there is difference this circle these are magnetic probes correct — right y — and the other one with the tip is the uh voltage — E field — yeah E field — and by the way if you don't have an E- field probe handy. Let's see if I can get a good angle on this. This is a male UHF connector. — So, it's got a chunky center pin. Um, the diameter on a UHF inner conductor is pretty big. It's like probably 10 or eight gauge, something along those lines. that o being open, you can plug this in. Yeah. The other side of this is a female N. Um, again, you can plug that into a cable and use it as an E- field probe. — This way you would use this guy. — Mhm. — So, these two are also roughly equivalent. — Okay. Can we make some measurements just you know? — Yeah. — Let's have a look. — So, the beehive probes are really nice. They use a uh an SMB connector. And I've got the adapter for this somewhere. Hang on. That's the one problem with doing these demonstrations. Like, wait, which adapter did I need to hook point, [snorts] you know, thing A up to port B. So, — so when buying these cables, so people should be careful about quality and this kind of stuff because not every cable is same quality. At least that's what I heard. — Oh, no. It's 100% true. Different cables have different qualities. Um, you know, with coax, uh, usually the semi- rigid is going to be your highest, you know, your highest quality, but, you know, flexible stuff like this, if it's got good overbraid, uh, can also be fine. Um, it the thing that has caught me out more than anything else is taking all my equipment somewhere and then finding out I just do not have like an end SMA adapter. So when I'm looking over an EMC test plan, I sort I go through every single thing that will be need to be plugged in to any other thing and make sure I've got both ends of that cable because that has what's has been what's uh what's bit me more than anything else. So Efield probes tend to be best for looking at what's on cables directly. So here you can see we got that — you can see 60 me m. Yeah. — And again it's not picking up, you know, the amplitude's obviously a lot less uh
Segment 8 (35:00 - 40:00)
than the other methods, but it's also picking up a lot less FM radio. — Mhm. — Which is nice. All of a sudden I don't have to worry about quite so much about noise ambience. — And then again, the great thing about the Beehive using an SMB connector is you can just pop off and pop back on. With the magnetic loop, FM radio has completely gone away. I'm still getting some 60 MHz noise. And that's from what's inside the box. It's just really bad in there. And I move There we go. You can see the hole. — Yes, I can see it. Yeah. And so again, if I, you know, move the, uh, nearfield probe out, uh, you can see how you can still get the 60 mehz. It's just that strong. Um, but you can see there's a lot more content uh, when you're right down into the board. — If you move it somewhere else on the board, is it going to be lower? Oh, — yeah. — Oh, yeah. So, this is the way how you can actually maybe um identify the source, — you can really start to localize it. Yeah. So, I know this chip back here is not, you know, this large chip is not a huge contributor. I strongly suspect that this ribbon cable that is connecting the uh motherboard to the display daughterboard — has a lot to do with it because whenever I'm near that ribbon cable — and when you rotate the probe I would like to see a difference. — Okay. So if I go that way, get some difference. And if I go the third orientation is kind of straight up and down, — and I get less I get significantly less that way. — Now, one other thing I'd like to note though, if you're using near field for pre-compliance, right? So if you haven't taken it into a lab yet, you don't know whether or not you're going to have a problem. Um, nearfield probes can sometimes be misleading. So, you know, I look here and I've got, you know, all this noise content and I'm like, that might be a problem. If I go along the edge, this edge of this board, the whole noise floor just comes up like crazy. And that's because there's no way you'll be able to see this on the camera, but they're routing traces right to the edge of the board, — which is insane to me because it's not like they were constrained for space. Look how much like there would have been no downside to making that board a centimeter wider, right? They've got nothing but spacing here. But because they've got components and traces — all the way to the edge of the board, you get just a lot of noise right off this edge. Yeah. Here we go. Um, it kind of goes up and down as you go on that edge. If I didn't already know that my main problem was at 60 meghertz, I might, you know, I might think that this is a problem that I need to chase. — Mhm. — And in this case, I mean, it's bad engineering, but it's not an actual EMC problem. — You see what I'm saying? — Nice. I should buy some new toys for my life. — Yeah. I mean, my goal here is not to induce people to go out and spend money, but um you know, again, you can do a lot with fairly inexpensive equipment and that's either official inexpensive equipment or it's inexpensive equipment that you make yourself. — Yeah. Even you know for playing with this it's just uh to get better feeling about the fields and what is happening around the cables around the board. It doesn't have to be like only to fix some problems just maybe to learn something new and you know discover all these EMC and ME fields. — Yeah. And that's what I love about both having a tiny SA and uh the software defined radio is because it's giving you two views of what's in your electromagnetic environment. So that can be um you know again like if I want a broader frequency sweep, if I want to see a broad frequency range, I'm going to go with my spectrum analyzer. But if I want to get a sense of like what the transients are like over time, that waterfall plot in the um in the SDR, that's a really nice visualization tool. — Also see again — well seeing the difference between digital and analog. — Oh, can we show also website of the other device so everyone knows which one
Segment 9 (40:00 - 45:00)
you bought? — Of which one? — The one what you have connected now? — This guy. Yes. Yes. — So, the logo. Let's see if we can get the logo on this. Or actually, I could just go to Amazon and show you. — Yeah. Yeah. Yeah. You can go to Amazon. — So, let's share again. So, if you go to Amazon and — Tiny SA. Okay. spectrum analyzer. Yeah. So, the Tiny SA Ultra again, it has a little bit more dynamic range. frequency range. Um, it's got some other bells and whistles to it. Oh, I had not realized it had a waterfall plot. — Oh, — you need to try. — Oh, that's so cool. Okay, that because that's a thing that had been, you know, kind of what I'd been saying was missing from my version. Um, so, oh man, I had not realized they added that. Okay, I think I know what's going on my next Christmas list. — But you have to wait for one year now. — Yeah. Now, the thing to um note is that there are knockoffs, so make sure you're getting the actual tiny essay one and not one of the knockoffs. Um, and for that you might want to start at their website which I believe is tinya. org or something very common or easy to remember. Um, but uh, yeah, you know, go for the original. It is dramatically better engineered than the knockoffs are. Uh, so just be aware of that. But oh yeah, here's the cheaper one. — The other one is not much more expensive. — No, it's not as much more expensive than I thought. Although again I' I'd want to make sure I'm looking at the real one and not knockoff. — Yeah. Yeah. Okay. You can tell a little bit more about uh yourself and your company what you are doing. — So I mean you you've kind of seen my quick and dirty approach to EMC troubleshooting at this point, right? Um once I know, you know, roughly what I'm looking for, then I know the right tools to use to track down that particular problem. And again, usually I'm not trying to get something that was just a few dB above the limit to be just like a tenth of a dB below the limit. Uh my approach is usually kill it with fire. You know, nuke it from orbit. It's the only way to be sure, you know, like I want to kill EMC noise that's coming out and causing problems. Um so troubleshooting is part of what I do over here at um uh EMC United. Can you open your company website? — Yeah. So, emcunited. com. — Um, most of what we do is or what I do right now it is still just me. Um, is we do um troubleshooting. Like I mentioned, I prefer to do design reviews to save people from having to do troubleshooting. Um, and I even offer a 20% discount if you bring me in for design review instead of waiting until everything's gotten into trouble and now you're doing troubleshooting. So, really try and encourage people to bring me in early. And then, um, we do a I do a lot of, uh, training and education as well. I just added a new, um, courses page on the website. Uh so you can see some of the different you know courses that I've got that I can give you know just right off the bat you know without uh having to develop new material or of course I can tailor uh classes to you know if you've got specific needs or specific problems that you that you're trying to figure out um some background education in you know this that or the other like aerospace and defense versus automotive versus consumer. Uh I'm happy to tailor courses as well. — You do it in person. Yeah. — Uh in person or online, either way. — Ah, okay. Okay. Ah, perfect. Thank you so much. I really like this because uh we could show that we don't really maybe we don't need super expensive equipment to see if we really fix the problem. And that's what is very important. Well, and I thought you in particular might uh might enjoy this because I'm pretty sure that you've already got most of the stuff you would need to just throw some things together, you know, on your own badge. — Uh not really. I — really I have very small lap actually and uh that's why I like these recommendations because they are in the price range which I can actually play with. I would not because you know it's not something
Segment 10 (45:00 - 46:00)
what I use every day. So it doesn't make much sense for me to buy expensive equipment which will be most of the time somewhere on the shelf. But buying something for $100 or $200, it's fine, — right? Yeah. It's a much easier investment to make. Like you say, if you're not doing this stuff day in and day out. — Yeah. So thank you so much, Karen. Uh and u — thank you as always for uh for hopping online with me. — Yeah, I I'm really I really hope this was very helpful also for other people. If uh they have any other questions, maybe they can uh leave comments and then we can make another video and uh maybe they should watch also our previous video which we did together. — Right. Back on shielding. — Yeah. Okay. So, thank you very much Karen again. — Wonderful. Thank you. — That's all for this video. I hope it was helpful. If you would like to learn more about electronics and board design, check out our online courses. You will find everything important there from basic board design up to advanced board design and highspeed PCP layout. We have courses in Altium, Cadence, Keycat, and also courses covering many different topics, for example, FPGA, EMC measurements, and so on. Visit our website at fedel. com. That's all for this video. Thank you very much for watching and don't forget to leave your comments. See you in the next video. Bye.