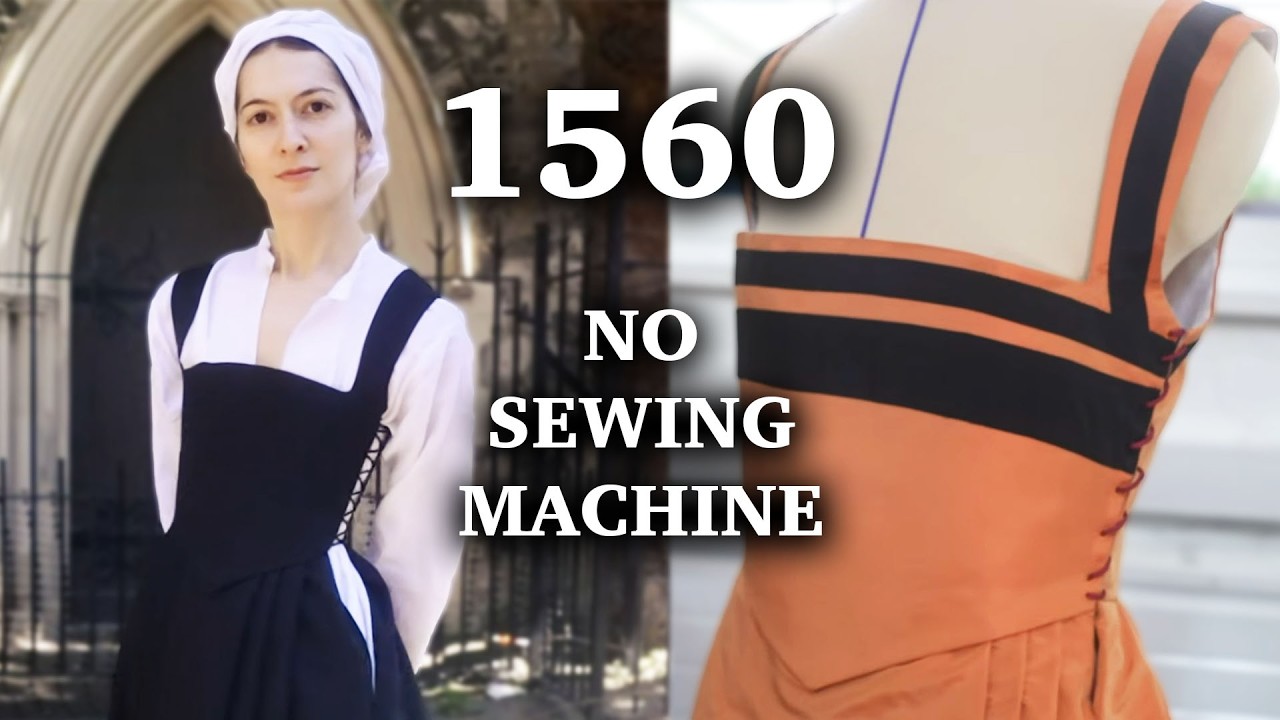
Dearest gentle viewer, the season is upon us and should you wish to attend a Regency ball, you'll know that you simply cannot arrive underdressed. But even today, it can take a village to make something as spectacular as a courtsuit. We took this opportunity to follow the process of three different types of makers. A specialist in historical reconstruction, a modern-day Broadway tailor, and a home sewist to compare our journeys and techniques. Three makers, one final look. So, I'm Bernardet. My focus in costume making is historical reconstruction. Looking at research, looking at historical garments and interpreting them using as many historical techniques, materials, evidence as we possibly can. And the purpose of this is primarily for research and education to get a better idea of what humanity was like historically. My name is Alexa. I'm a professional tailor for film and TV and Broadway. I specialize in men's jackets and vests. It's less about historical technique, although there's a lot of hand finishing vault, but it's more about perfection of silhouette and smoothness of the garment and how fast we can make these. And you are fast. — Yes. — Like the speed at which you work blows my mind. — I'm Danny. I would consider myself to be a hobbyist or a home sewist. I typically work on cosplay or historical projects just for my own entertainment. I've been editing for the channel for four years now. So, I would say I have more knowledge than the average person, but even in historical work, there is still that creative interpretation. So, we've got three different makers using three different historical approaches to this project. It's important to note that this is not a competition. Each method is valid in its own right and as a means to get to its desired outcome. However, for those of you who are into a bit of competition, you might be interested in the sponsor for this portion of the video, Matchmasters, which is a thrilling player versus player match three game. So, not only do you have the puzzle element that I know a lot of you out there really love in your mobile gaming, but you also have the element of testing your skill against other players through different game modes. There are loads of different boosts and powerups which make this more than just an ordinary match game and allow you to implement some skill and some strategy against your opponent. Match Masters already has a thriving community, so you can play against anyone in the world whenever you want or you can also recruit some friends and family to join with you so you can play against them. It is truly the ultimate way to settle the age-old dispute over who gets the last biscuit. Matchmasters is completely free to download. So, be sure to visit the link down in the description box below or scan the QR code right here on screen if you and your pals would like to join in the fun. And now, back to the video. Historically, when you were making an outfit for, let's say, a Regency ball, would you be creating all brand new pieces from scratch or adapting garments that already existed? — Depends on who you are. So, if you're like top fashion bro guy, got to have the newest, latest fashions, and you have unlimited money, you're going to your tailor and being like, um, I want a brand new waist coat. Uh, I need it for the ball tomorrow. — And the tailor had embroidered panels. And the client would just go through and pick and be like, "Ooh, I like that one. I want this one. " Not everyone had that sort of resource. So, you'd wear a waist coat that you already have. If your waist coat is slightly older in style, you would adjust the waist coat. However, the interesting thing about court dress is that it follows tradition. So despite the fact that by the Regency period, the waist coats are shortened quite significantly. When a person is invited to appear at court, there is expectation that you will dress in a more traditional manner. And by traditional in the Regency period, they tend to mean more 18th century. So the waist coat is actually cut a little bit longer than would have been fashionable in this period, but we're not going for fashionable. We're going for traditional. As the waist coats change, the coats also change slowly throughout the period. So if you're going with a specific length of waist coat, you want to ideally make sure the coat matches in period. So we have this gorgeous waist coat that right now it doesn't really fit anyone. It gets displayed sometimes, but I thought it would be nice to have the waist coat resized so that it could be worn to an event, to a ball, to a very historically appropriate event as it was meant to be worn. So, we did have a good jumping off point of the time period and the silhouette that we were going for, which was great. For pretty much all my projects, I start with a design sketch. I want to know exactly what I'm looking for cuz if I go into a fabric store without an idea of what I want to do, I will be in there for 9 hours. And you know this, we ended up splitting up the work process. So, you took the waist coat, you took the frog coat, and I took the breaches cuz we had about a month to get this fit together, which I'm very grateful for. You guys wanted to help with knew what kind of colors to look for. I
Segment 2 (05:00 - 10:00)
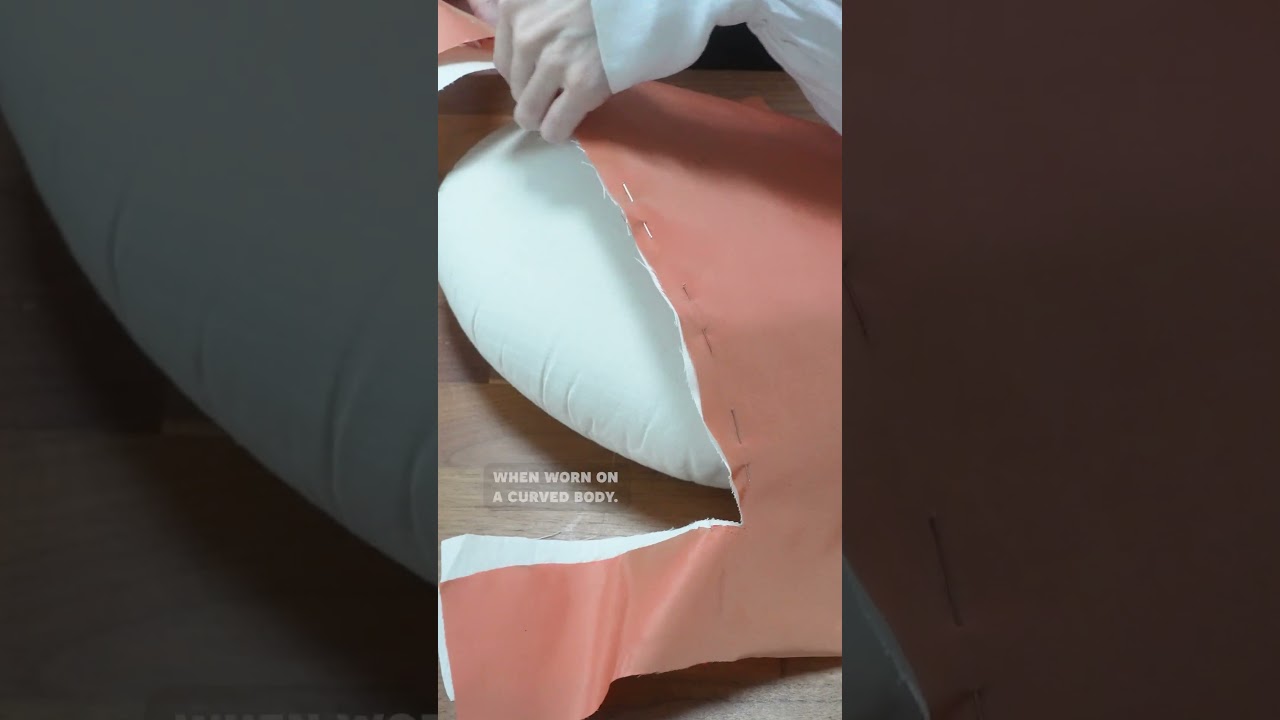
knew that I was looking for this very specific color, green, because it's my favorite color, green, — and it was also in the waist coat. I ended up finding one fabric store that had it like all the way in the back. I think it's a wool blend. — It smelt a little acryicky, but then I burnt it and it mostly got ashy, but there was a little bit of hardness. — Fabric often shrinks. So, putting a lot of steam in it before you begin working with it cut out pre-shrinks the fabric. So, this is just the pre-prep for fabric that you should always be doing. If you don't pre-wash your fabric, you should press and roll it. So, the waist coat as a garment already existed. It almost fit you, but there were some alterations that needed to be made. — Oh my god, it's so cool. — Okay, we have to pop open the seams. Oh, there's like no seam allowance in here. — Oh, there's not. — No. — Cool. — At Winterling, when you enlarge a garment, they you split the seams. — We do. And we use oak tags, which are the little cards that normally have like the written instructions of garment alterations on them, so it is easier to see like the exact amount that you need to widen something by. I thought it was an interesting experiment for me to work with a pre-existing waist coat and to alter it and adapt it as would have been a very common thing to do historically as well because we're making it bigger. It's more complex than making something smaller. You got to add fabric which is more difficult and it also comes with the challenge of deepening the arm size. And again, because there's no embroidery at the sides of the waist coat, you can really split the seams, take off the back, resize it, and just use the fronts again. So the fabrics that we chose for this waist coat are pretty much in line with the fabric selections that would have been chosen historically. So the fronts of the waist coats are done with a silk Duchess satin, which is a 100% natural fiber silk. The silk is backed with a heavyweight linen canvas to stabilize the silk for the embroidery, but it's also to give the waist coat a little bit of inter lining to give it a little bit of body. The embroidery for this waist coat is a whole journey in and of itself. And we did follow this whole journey in a separate documentary which was released on this channel actually probably about 2 years ago now. We worked with the incredible artists at Hand and Lock Embroidery here in London. And just getting to watch their process of bringing such an essential part of the history of these waist coats to life was just incredible to see. So, typically when I do patterns, um, I usually either find ones that are online like on Etsy or McCall's physical patterns or take patterns off of clothes that I already have. I started off by looking at a lot of historical references, fashion plates, illustrations, paintings, artwork. Yeah, I would say I'm mostly going for historical accuracy in the main look or silhouette, but not necessarily in technique. I watched a lot of YouTube tutorials, actually. Yeah, we love those. — Nicole Rudolph's breaches video was the most helpful, but there were there was a number of videos. I like to see how a few different people made their breaches and she suggested a really good patterning book. So, I took the pattern into Adobe Illustrator and scaled it to my measurements and then printed it. There was still a significant amount of changes that I ended up needing. I have made a pair of breaches before, so I did have a semblance of the changes that I needed to make. We have the longest femurss in the west and I had to make them a little bit longer. Especially when you're doing like cosplay or fantasy, those types of patterns don't are very specific and they don't really exist in real life. They're not frequently made items. So, I'm very much used to just modifying the hell out of my patterns. I think that that's something that I can do because I'm making it for myself and because I can try it on so many times throughout the process. But I think if you were to be making garments for other people in the ways that Alexa and Bernardet do often, it would not really be as feasible. But, you know, works for me. So, so I'm going to be cutting up the mockup in muslin first so that we're not going into our expensive fabrics when we're fitting and we're just making sure that all the seam lines are good and that it fits well on Danny. And also, professional patterns don't have any seam allowance on them. So, I'm going to have to draw my seam allowances myself. It was interesting patterning this one because I did lean more historical. I worked on Hamilton for 3 years in the men's wear department. So, I just kind of rechanled back to then. I was like, "Okay, this is the same as the officer coats that I was making for a very long time. " You know, when you're doing costume design, it's more about character — and the primary text is the text of whatever media it's going to become, whether play, musical, film, TV. So sometimes they will bring us things from like internet searches. Hopefully not AI. Um but I mean there's been times where research has been pictures of you or Zach. — Oh my god. — Don't do that. Never. No.
Segment 3 (10:00 - 15:00)
— I think it's more reliant on what knowledge the stitchers and the makers and drapers and tailor already have going for them. But it is the designer's job to direct what they want and me just to be the supporting factor in that. — Yeah. — Did you make a mockup? — No. — You don't do mock-ups. — I should do mock-ups and I really don't. — Story of every costumemer home sewer's life. So, I love this representation. — So, for those of us who did decide to do a mockup, now it's time for fitting. — All right, let's put the jacket on. I see — Eric Winterling and Alexa are working together to fit this mockup and decide if there's any changes needed to the fit or silhouette. — So, we're going to uh fold this out of the pattern. — Sometimes the swing just gets to be too much. And then you could take a little bit out of the front of the sleeve here. — Literally a little off the top. — That's better. It's not — much better. Yeah. — Looks great on you. Yeah. I'm going to do some bound button holes. — Mhm. — You know, my special key into what you do best, I tell you. And then what about the length? You would think it wants to be just a hair longer than your name. — Yeah. So, I feel like it just wants to be maybe 3/4 of an inch longer. — So, how many fittings do you usually do before you would call something? — I do two. — Two. So, one with a mockup and then one — one in fabric. A perfect world is three fittings, but that third fitting is always just no one ever has time for it. — Okay. Great. — Yeah, that looks great. — So, this waist coat was originally patterned by a previous assistant and was interpreted from 18th century historical tailoring diagrams. There is a lot of evidence of how these waist coats were cut, how they were drafted, and all the embroidery details and designs that went onto them. In terms of patterns, I try as much as possible to go back to a primary source. Sources like Norah W and Janet Arnold who take patterns of original garments. They are technically secondary sources because they didn't exist in the period. However, they're working with original garments, but you know, we try and do primary sources as much as we can. Internet searches are getting progressively unreliable today. So, find the names of people who existed in this period. You go to the library, you can read the original text in their original fonts. You can go to the museums and look at the original garments. You can see the slant, the direction of the felling stitches and understand how the maker was holding their hands. If they were going this way or way, that's going to change the direction of the stitches. It is very historically accurate to use as little as possible. So trying to reduce the amount of material as possible not only will save you cost but is also the more historically appropriate attitude to be working. Fabric was so expensive that if you're getting what you need, that's luxury. I think something really interesting about modern costumeuming in comparison to that is that it arguably is very divorced from the socioeconomic time that it came from. We're doing these recreations that don't necessarily have regard for like the fabric waste that would have been a bigger deal when fabrics were just exponentially more expensive or time that it took. I would argue sometimes we overengineer and it is necessary especially for theater to make sure these garments last for a very long time. I definitely do the piecing is period when I'm doing my own stuff because I have to be more economical about it. But when these productions are buying us fabric, they are expecting a level of perfection that you should not be piecing. A front panel would have to be recut rather than pieced. — That's so interesting cuz historically you see like front panels of court gowns full of piecings. No regard for grain. Like it just is the way. I now have all of my wool and cotton lining pieces cut out. And I'm going to go ahead and cut a couple pieces of fusible interfacing just of the waistband just to make that a little bit stiffer. I think that's all I'm going to do on the interfacing because the wool itself is already really thick. Yeah, that should be good. Tailoring specifically is use of inner linings inside the fabric to elevate it and make it more couture or more tailored. You put things in between so that you have structure. So, there's going to be a special kind of canvas inside your collar to make it stand up because we want to hit your cheek like this. And if it's just two pieces of fabric like this, it's just going to flop. So, the himo is tailoring canvas and it creates really smooth fronts. So, this is very modern tailoring and you start to see versions of this in Regency. However, it's not going to be as heavy of a canvas. And if you put this in the washing machine, I will kill you.
Segment 4 (15:00 - 20:00)
There's so many canvases that go into tailoring. That's like my nerd I want the front of this pattern to be canvased. And it's good for it to go at least a bit under the armpit to support the front of the sleeve because then you get this nice kind of dip of the sleeve. And I want the entire front edge into the tails to be canvased. And I'm also going to draw something for my strong shoulder that is going to be cut out of horsehair canvas and needle punch. So there are details like in the Regency period there is a lot of extra fabric in the butts in the pants that I don't think necessarily looks good. So, I will take liberties in redesigning the patterns because I think at the end of the day, when I feel like something fits me in the way that I want it to look, I feel the best. So, it's okay if it's not super accurate. The saggy bottom was a thing that was done historically because the britches, the style of the britches is to have the legs be so like skin tight, but you can't sit in that. So, you have to leave extra room in the butt, which makes the butt look really saggy, doesn't matter because it's covered by the coat. But if you don't like that look, maybe you're going to cut the britches not so skin tight so that you can still sit in them and you don't need to do — zaggy bot. — Um, the first thing I noticed though is that they are too tight on the legs. Unfortunately, I do have a good bit of seam allowance in both sides. So, thankfully I think I can take them out a little bit. I also still have all the seam allowance like stuffed in here. So, I think when I cut this, it will also feel looser. But other than that, like the uh the shape is pretty good. The butt has a little bit of extra fabric here. It's definitely all fixable things. — So the sewing machine becomes widely available by the middle of the 19th century. Regency and 18th century is too early for that. So everything in this period in both periods 18th century and Regency is constructed by hand which is how we have done the original construction for the waist coat and is how I'm going to be handling the alterations for the waist coat as well. It was really just a matter of taking out the back of it and then retracing the pieces but adding that additional — width to the sides on a new piece of linen. Silk satin is today very expensive as it would have been historically. So the parts of the garment that aren't seen tend to be made from cheaper fabrics. In this case just a plain white linen like as densely woven as we can possibly manage and then it's lined with a lighter weight linen. So just recutting all those pieces. It's also important to match your thread to your fabric. And I don't mean color. I mean color is probably important especially on cordress. However, silk thread which is very strong. However, it's also very expensive in this period. Anything stitching silk fabric together you want to be sure that you're using some nice beautiful silk thread. Especially for top stitching where it's going to be seen. For the back of the waist coat where I'm stitching the linen pieces together. This is not going to be seen. And it's also a linen fabric. So, we don't have to waste our good expensive silk thread for this. I'm going to use a much quote unquote cheaper. Historically, it would have been cheaper linen thread. Wax linen thread can be very strong. So, this will do quite nicely for this seam. Hand stitching, much to the surprise of people who have never handstitched in their lives, is very strong. There is nothing inferior about historical quality structural handstitching in relation to machine stitching. In fact, when I was first being trained in historical reconstruction, I was told by my mentor to forget everything I knew about sewing and to learn from the ground up because the techniques that you have to employ when you're hand sewing for structural means rather than for decorative means are different. You've got to handle the material differently. You've got to pull the thread more firmly. You've got to regulate your tension and be aware of that. We are working with very, very small back stitches. So, I'm taking up about two to three threads in the weave of the material for each stitch. The thread then needs to be pulled tightly enough so that the stitch really sinks into the fabric, but not so tightly that you end up puckering the seam. There is a very delicate balance between the two. Especially when you're working with lighter weight fabrics, you've really got to nail that balance between having your stitches be tight enough and not buckling the seam. We have got a lining on this waist coat, so thankfully that saves me a step of having to finish all the seams on the inside. But in this case, we've got a nice lining that's just going to be handstitched all around. In this period, we're not bagging out lining. So, we're not sewing garments inside out and turning them out. We are then laying the lining on the inside of the garment fully right side out and then turning in those edges and whip stitching it all around with a very, very fine, small, delicate whip stitch. So, I'm doing the button holes for the
Segment 5 (20:00 - 25:00)
cuff right now, and I've already finished the ones for the pockets. And then I have one more cuff to do. And then I'm going to do your coat fronts, which is scary because that could mess up the coat fronts if I mess up. — No pressure. Essentially just making modern welt pockets without the pocket bag. — And how many do you have to do on the jacket? — 18. — Easy. — Tailoring is like 80% pressing. Yeah. You should always be working with your iron and especially with wools like this. Sewing is incomplete if you're not working with your iron at the same time. — Ah, that's how the pros do it. — Yeah. That's how everybody should be doing it. — That's how everyone should be doing. — That's how your grandma does it. That's how you should be doing it. — You heard it here first. — Okay. So, the next step is to add a little welt pocket to the band of the pants so I could put my little pocket watch and fob. Uh, I don't actually know how to make a welt pocket, so I'm going to be learning how to do that today. was supposed to do this like two days ago and I ended up procrastinating by making this instead. So now it's been two days later and I need to actually learn how to do this now properly. Not bad for the first try. We're going to keep going. So the well pocket looks good, but the pocket is upside down now. No. Yes. No. Yeah. Oh, okay. Wait, hang on. No, it's still technically upside down. This one is just really thick. Also, I think I could just do it cleaner. Ignore what's happening in the background. I think this could be cleaner. — My technique is — screaming, swearing. — Yeah, bleeding on things, and screaming. — Actually, I think that's like that tracks for me, too. — Oh my god. Well, just based on you texting me, it's a lot of trial and error. Nice way to — That's a really good way to put it. If I don't have to do everything twice, it's not a sewing project for me. — I am willing to do things, see that I don't like it, unpick it, do it again. — That's a learning process. — Yeah, for sure. — From garment to garment, you learn so much and you employ that your next garment becomes better. — Okay, cool. That looks good. I'm going to go ahead and sew up the sides and then that will be done. You know, even if you're a hobbyist or home sewer, that doesn't mean you should neglect the actual techniques. Even if you're not making things professionally or for other people, it's still a good habit to get into, which I've definitely been guilty of not doing for a really long time. Sometimes it is just taking things out and doing it again. And thankfully, fabric is pretty forgiving. So, I have my fronts and I've done all my button holes and I've made my pocket flaps that are going to go there. I still need to base my tailoring canvas to my fronts. Um, and that's so that we have nice and smooth and stiff fronts. Many people do the chest shaping by hand and that's what they still do on Savile Row to this day and also very fine tailor. It's just we don't have time for it. Ultimately, I think it's weighing up what makes sense for the time that you have. And the nice thing about the himo is I'm only grabbing it instead of the front. So you're not seeing any of my hand finishing. A lot of the tailoring techniques that are still used in fine tailoring on Savile Row today, such as patterns of interlinining, such as pad stitching and shaping the garment, very closely match the process of tailoring in the 19th century, in the 18th century, all the way back to the 16th century even. So, it's always so fascinating to see modern tailoring techniques and how actually similar they are to the historical techniques that would have been used — for Broadway costumes. Do you also give them full pockets? — Yes. Very rarely do we do fake pockets because really it's the same amount of effort you're just putting on a pocket bag. Yes. Today I'm doing a lot of hand sewing. I now have some seams on the inside that I need to finish and then also the waistband as well. The waistband is now attached on the outside and the lining just needs to be attached on the inside. I am a little bit rusty on the different hand sewing techniques like knowing what stitches to use in what areas. So I am using none other than Bernardet's hand sewing book. Here it is actually helpful. Thank you.
Segment 6 (25:00 - 30:00)
Oh yeah, this is going to be good. So, I'm just pressing the seam allowance down. There we go. I don't know exactly what the cost difference would have been between modern day and the Regency period, but we have a lot of ways to make things faster. — Yeah. So I imagine it would still be worlds cheaper to make this courts suit now than it would be in the past. — You'd have to be like a at least a millionaire if not one of the billionaires like that. This is what we're talking about when you're hearing about Bo Bremel and like the king of France. These are the like the Kim Kardashians of these time periods. These are the sorts of people that we're dealing with here. And when we're doing historical re reconstructions or we're doing costumes of like it's just helpful to have that in mind. The cost of the materials for me. It's part of the information that I'm learning. The person that was wearing a gown of 10 meters or yards of handwoven hand dyed silk was royalty. She was elite. She was noble. — And it's like okay that becomes part of the story. But again like in the Regency period you wouldn't be purchasing garments at the rate that we do today. Like this would be something that you would pass down in your family. — It's an heirloom. — Yeah, it is. — And we see this reflected in the wills, you know, when people bequeath things. We see this uh historically people kept inventories of everything that they owned because their items were so precious and important to them and expensive that like you see people's inventories of like this many embroidered waste coats. because everything had value. And when you're making something, you're making something with the knowledge that it's in the world now — indefinitely. — Yeah. I like they were made to be investments. They were not made to be worn for one event. — Yeah. — And then discarded. They were kept. They were passed down. They were resized. — They were taken apart. They were reused for fabric. And you know, that's the nature of valuable things. Seeing everything come together yesterday was the first time that we put everything together and were was able to see how everything fit together. That was really neat. — And it's a relief when the bridges come high enough to like the waist coat covers it and the collars. — It all worked out. We normally don't work that way, but it was kind of serendipitous because it was a little bit of a guess. I was like, "Okay, I hope that my collar is taller than the waist coat, but not — so extremely sad that it starts looking goofy. " One of the biggest historical sins that you can make on men's wear is having the gap between the waistband and the waist coat. Never, never. — I'd argue that's a sin now. Like a sin now, obviously, but like especially when you're doing historical costumeuming. Like, make sure your waist coat covers your waistband. Man, — I learned so much doing this. — Yeah, I use your book. — Amazing. Link down below. Link in the merch shelf down below. — Yeah. Yeah. I use techniques that Alexa has shown me in past projects like the welt pockets. That is such a hard one. I make mistakes. I had to redo your entire collar because it just wasn't sitting right. — I mean, my whole process is learning. So, I'm like, you know, I'm never going to be — Oh, no. If you stop learning, you die. Like, — is if you don't believe in ghosts. Yeah. — Cuz I will absolutely be haunting some museums — and still learning things. — Yeah. — I have technically been sewing for 10 plus years, but only very recently am I learning how to do things the correct ways. — Oh my god. This is why I have such beef with the 10,000 hour thing. It's like, — yeah, sure, you can — do one machine stitch for 10,000 hours and you're still not going to be a competent. — Also, what if you're doing it wrongly? — Exactly. Yeah. Exactly. If you're not receiving feedback — and trying things and experimenting
Segment 7 (30:00 - 32:00)
with methods and interacting with a community of people who you can trade ideas with, like you're never going to improve. — My biggest thing is having mentors. There's always people who know more and have more experience and it's good to learn from those people and like I've been very fortunate to be able to work around those people every single day. I learn from the tailor that have been doing this like as long as I've been alive. — This is like the crux of humanity I think is passing information from generation to generation. — As this video proves like there are so many ways different methodologies to achieving the same goal. I think having a community of people has been so invaluable to the whole process. Like having people like you guys who I can ask for questions. Eric was the one who gave me the tip about the elastic on the, you know, on the knee bands and um that's not something I would have even thought of. And it is so rewarding to see that I have something of good quality that I made myself that I'm like, — "Oh my god, like this is such a cool representation of the things that I've learned. " And if you would like to jump in and feel involved in this project yourself, Hand and Lock actually have an embroidery kit of this waist coat, which if you would like to learn some of the historical gold work techniques that have been used on this waist coat, they've got gorgeous embroidery kits over on their website if you would like to go check them out. You also might have noticed throughout this video that Danny, Alexa, and I all sat down and had a conversation about our processes as well as our methodologies and opinions on historical dress. That sitdown chat ended up being about an hour and a half long, an hour long or something. And so we've decided to release the podcast version over on our Patreon. So if you are curious about costume making and want to hear more about any of our processes, do go to our Patreon and check that out. You can access that on the lowest tier. And thank you for supporting this channel. We cannot do projects like this without your support. The only thing I have achieved is successfully making a string bean because this wool is so thick. I made it worse. This is a Denny Hana classic. — So, I'm using a zipper, but Oh, it's already gone bad. Broke a needle. — Oh, no. — Day two. — She's Press that back princess seam open. And you're pr Sorry, professional.