Hello!! Here's how to make a rolling ball animation in Blender 5.1 using Rigid Body physics and Geometry Nodes
00:00:00 Starting soon
00:03:05 Hello!
00:14:12 Tutorial: Simulating a rolling ball in Blender 5.1
01:20:27 Quick bathroom break
01:22:41 Tutorial: Simulating a rolling ball in Blender 5.1
01:58:01 Rendering
02:14:39 Final result
02:16:54 Q&A
Оглавление (7 сегментов)
Hello!
— Hello. Okay, finally, we are back with the after some settings. How are you? Generator 29, audio perfection. Still on Linux? Yes, this is on Linux. I am on Kubuntu 2510 still. So, it's not uh I had some audio issues and I was very lucky that I was able to figure it out because it would be so painful to not be able to have a live stream on Linux since I've turned everything into that right now. And also, if you're watching this in the future, by the way, this is going to be a um video that will be public later. So, you can see the time stamp for when the tutorial actually starts. So, it's a live stream. Um Joe Vial JMD, is this live? Yes, it is. Um Oliver, you have to leave. That's okay. The video will be live after as well and you can watch it in your own pace because it will be like a tutorial. So, once the tutorial starts, I think I will maybe read less comments unless there's something very important and then I'll try to like get in the tutorial flow because we have something very cool we're going to create today. So, today, hang on, let me change the music here. Yeah. So, today we are going to use Blender version 5. 1. This is uh the new Blender version. It's been out for almost a week now, I think, but I haven't been able to use it until now because I've been working on stuff. But now, I'm finally installing Blender 5. 1 and I love this uh thumbnail or this splash screen image. I love this so much. Very, very nice. RD1234, what's your specs? You can see here. I have uh an RTX 4090 and an i9 13900KS. Still laggy audio though in the previous one. So, I don't know what's up with that, but uh yeah. And I'm also using uh Kubuntu. So, here you can see my system monitor uh yeah. I need to update my Blender version. Yeah, I think I can recommend this uh version. So far, the only bad thing I've found is that if you set the window to toggle window full screen and you set it as the save startup file and in your settings, can I show it here? Display configuration. Here, if you have the scaling changed to something else than 100%, then Blender just really struggles with placing the frame uh really in the correct place. Linux task manager or something else. Yeah, that is completely true. You can customize this so much. Here I've added like this own customizations where you can see the CPU graph over time and the GPU. And as you also, you can see the programs I have here, but that you can also do that on Windows, but yeah. I really love this. And this is the most programs I've been running at the same time, I think, because I'm actually doing a live stream. So, usually I wouldn't have this much stuff going on in the background. Yeah. Kubuntu rice when? I don't know. I I'm actually I think um the most difficult part about the transitioning to Linux is that um it's very tempting to just start testing out new distros immediately. And I have this feeling that if I start doing that, then I'll just be one of those distro hopping people that just can never settle. And while it's probably very exciting to try a new distro every week, I just I'm so worried that I will never be able to settle down. So, I'm actually going to try and just go all in on uh Kubuntu because I feel like that's like that it's yeah. I feel like I should try that at least for maybe 3 months or something like that, you know? Echo3D, I've never made it to live stream before. I'll be seeing this super late. Love your work. Nice. Arch Linux next? Yeah, I don't know about that. I had a conversation yesterday with a friend that knows a lot about Linux and he was like maybe Arch Linux isn't the best if you're doing what you're doing. And uh and he I think he's a really smart guy doing a PhD, so uh he's I'm not sure if he's watching, but if he is, I appreciate his uh Linux knowledge. Can you do someday a procedural walking system for a human? Um no, most likely not. I don't think humanoid walking movement is uh something I can do. But I will be doing more walking movement for quadrupeds and hexapods. Like uh robots that have more legs than two. Because I think animating something with two legs is so extraordinarily difficult to get right because there's something so different about the weight balance. Like the way you shift If you have a human being, you have two legs, right? And then you have to decide what leg should have like the force on it. And then you kind of have to shift the balance over when you're walking. But if you have a creature with many legs like this, oh, now it's just a 2D drawing. But then it's so much easier because you're kind of stable all the time as long as you have uh at least two legs connected at the same time, then you can kind of have a little bit more freedom. So, it's much easier to animate a creature with more legs in my experience. I tried to animate something with one leg in my uh three robots uh video and that was uh it very interesting because you really get the feeling of the balance. Denim Pirate in the chat, hello. How are we doing? I've had two friends crash out in school trying to set up their Arch Linux machine. Yeah. Probably. I can see that happening. I already did it without uh knowing, accidentally deleted Windows while testing Linux Mint. And uh also, it's nice to see you streaming. Yeah. Hello, Infinity CM. How are you? Joe Vial JMD, the walking path of a human is known and simulation was run by Theo Jansen to determine the best path. Yeah, I think uh I think in theory, it's very easy to look at a human walking and go like, "Oh, yeah, you have to do the thing and thing. " But the second you start giving a creature intention in the 3D software and you start planning for where it's going to move and what it what you want it to do, I think you very quickly will notice that the torso of an animated human is just it's just being pushed by an imaginary force and it's very difficult to actually get like a center of gravity that is moving properly. Yeah. Vivid and hi poly, how are you doing today? I'm doing fine. I had some audio issues earlier, so uh I spent I don't know how long it took, maybe 30 minutes or 40 to try and fix that because I was so determined to go live today. So, if there are any more audio issues now, I will just record this as a um local tutorial or like an offline thing and upload that. But I think we should be good. Yeah, and the tutorial is about to start any second now. So, get the get your drinks ready or something to snack or something. Danny part, I installed Arch with Arch installer and it was so easy. I know that cheat method I know that's the cheat method, but it works and that's what matters to me. Yeah. Hello from Spain. Hello from Norway. Nikki Legang bup bup, long name. You ever had an idea of making games? Yeah, I've had I've attended a few game jams. Maybe I think three. And what's so interesting is that um when you make a game, it's so I think everyone should make a game or should try to make a game because it's so interesting when you try you have an idea of a game in your mind and you think like this game is going to be the best game ever. And then you actually try and implement the rules and you try to like shape it like the clay kind of behavior that it ends up being. You have to like make this rule and you have to kind of like shape your game. Then you very quickly understand that just because something sounds fun, it it's nowhere near guaranteed to be fun to play. And that is so interesting. I just that came as a shock to me and it's probably a little bit uh arrogant to think that I would be able to create a game, but no, I probably just a little bit naive that it was I thought it was going to be but uh yeah, to answer your question, I have tried to make some games and I really enjoy it uh especially if you're like just doing some vibe coding and just throwing some things out and see what works. That can be really fun, I think. And I think game design is um on the surface, you might be thinking oh, that's easy, you know, or maybe any field can be seen like that. But when you start going like into it, you might be thinking that it's actually surprisingly difficult and it's so resource demanding to test as well because you get so many opinionated people that are testing it and yeah, I think game design is very interesting and I kudos to people that uh go into game design. That applies to animation results as well. Yeah, I think so, too. You have something that you want to see animated and then you actually try to animate it and it becomes very difficult, yeah. Interesting. I'm studying game design as a course in uni. It's so fun learning about psychology just as much as if the technical and creative aspects. Uh or I'm not studying, but really cool to hear that you're studying. But I also think that it's cool that the psychology is so important because you would assume almost that you could just figure out a good game like in your mind. I heard Michael Stevens from Vsauce had this really cool quote that I can't really remember, but he said that or his approach to video game is that it's like a something about deliberate obstacles or like obstacles that you have placed them voluntarily. Or something like that. Ah, maybe someone remembers the quote. It's from their new Your Rusty Science podcast. Danny part, yeah, I agree. Your brain smooths out all the fine details of the game while it's still a concept and then you're faced with reality of make decisions for every eventuality. Yeah, true. I scored a 96 on my essay analysis, The Art of a Level. Nice. Is 96 good? So, is if is 96 out of 100? That's amazing. I'm having issues rotating a mesh in geo nodes. It's rotating each face individually no matter what I tried. Oh. I I'm I don't think I'm the geometry nodes expert you're looking for. Oh, wait, here's the quote. Yes. Games are a voluntary attempt to overcome unnecessary obstacles. That is a good quote. It's by Vsauce, Michael Stevens. That is amazing. It's a fantastic quote. Okay, let's um let's start transitioning into the tutorial now. I think we should have a look at the final result first. Not necessarily the final result of this video, but the result I would like to try and make. So, in this tutorial, we're going to create this uh Oops, there we go. It's a live stream issues. No, we're good. Okay, so in this
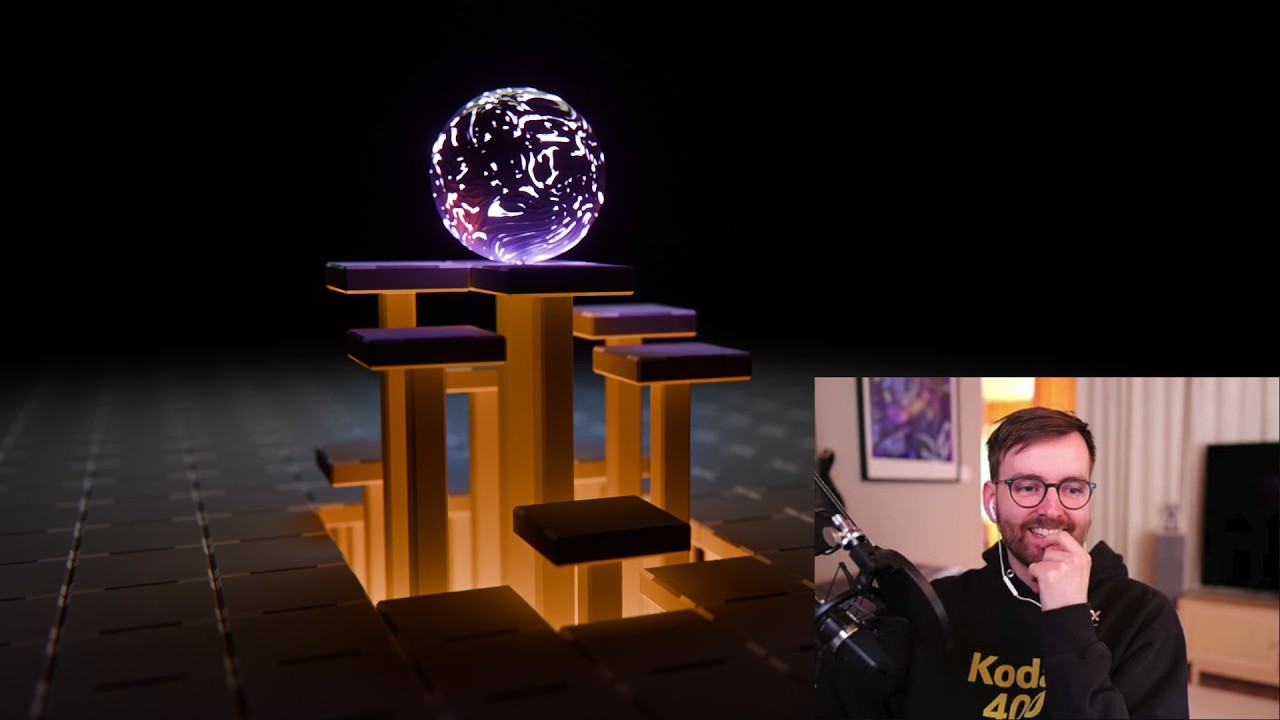
Tutorial: Simulating a rolling ball in Blender 5.1
tutorial, we're going to create this animated ball that can roll around in your scene and whenever it meets this panel or these columns or pillars, they kind of rise up and it helps it out. And it's kind of like a wholesome animation where this ball can roll wherever it want and no matter where it goes, it's always supported by this floor that kind of comes up and helps it and it's kind of nice. I can I find myself just sitting here watching at this and you start thinking about all the people that are helping you in your life, you know, and it gets kind of deep and I might be reading too much into it, but sometimes it it's nice that people are there for you and they are helping you so seamlessly that doesn't even feel like they're there, you know, they're just it's just so smooth. So, that is the theme for this tutorial and also I've made a dark mode version. We can see here. Because I was try Hang on, I can actually move my face around. So, this is it has a light source at the bottom or like below. So, you can see that it's kind of changing the colors as well. So, oops, I should be up here. Yeah, so it's something really magical happens when you have this light that is kind of coming out of the ground. But I might actually be leaning towards the day night um No, the day the day version. Yeah, so this is what we'll be creating today and we'll be using Blender version 5. 1. So, first of all, we're going to create this ball that is rolling around. And um this is one of those things that is kind of easy when you first start tinkering with it, but then if you want just a little bit more control, it just gets so much more tricky. So, let me show you what I mean. So, I'm going to open up Blender version 5. 1 and I'm going to start off by just saving my project file on my desktop here. So, I'm going to call this tutorial version one. And then I want to delete everything, but before I do that, I'm going to enable my screen cast keys. So, now you should see all my keys. Yep. So, I'm going to press A to select everything and then X to delete all these objects. And then I'm going to go shift A mesh icosphere. And then we can increase the subdivisions if we want, but I'm going to keep it low poly for now just it's a little bit easier to see which way it's rotating and stuff like that. So, let's press F2 to rename this. I'm going to call this ball so we know exactly what it is. And now you can see that in the top right corner here, we have the scene collection and we have the collection with ball. So, we can actually double click on this collection here and just call the collection um Hmm. Is it a spoiler if we give it a name yet? Yeah, I'm going to call this physics because we might end up having to do some simulations today. And it will be apparent why in a second. So, if we take this ball now, I want to press G and Z and just move it up by 1 m on the X axis. So, I can press one and then enter. And now you can take this ball and here's what I want it to do. When I move this ball on the X axis, I want it to rotate like this. So, it can move and it can rotate. That will create the rolling animation. So, it we want it to move and roll on this axis and then this axis. So, let's select the ball and let's head over to the object properties. Here you can see you can move the transform like this. So, by the way, just a tiny little spoiler. I'm going to show you a method now that just doesn't work. And it's very interesting to just try to wrap your brain around it because it's interesting why it doesn't work because it almost works and it's very frustrating, but it's very interesting as well. So, if you take the X location here and you move it around, you can see that this is the data we want to capture. We want to convert this into rotational data. So, we can just right click on the X location and let's go copy as new driver. And then you can see if you rotate it on the Y axis, this is the correct rotation. So, now you can take this rotation Y axis here and you can right click on it and you can go paste driver. So, now if you press G and X and you move this, it will roll across like this. So, now if we go to the view port that goes here, if you press G and X, you can see that we are actually rolling super smoothly. And this is Hang on, I think I can zoom here. Yeah, this is actually really nice. And if we have a higher poly count on the ball, you should be able to see an even smoother rotation, but we can increase the poly count later. Okay, so now we have the X axis done. Now, let's rotate it on the Y axis as well. So, let's do the same thing. Let's copy the location of the Y axis. Let's go to Y axis, right click, copy as new driver. And then when we get to the X locat- X rotation here, we can right click and we can paste driver. But now when we move it on the Y axis, look at this. It's spinning the wrong way. And already we are entering a territory of wait, I just want this to work. Why isn't it working? And this with drivers is a very familiar thing. You have something you want to achieve. You think that wait, hang on. I think it should be like yeah, that, right? And then oh, it didn't really work, you know? So, to fix this, you could go to uh you could right click on the X rotation here and go to edit driver and then you could set the type to scripted expression and just say location — multiplied by minus one and then press enter. So, now if you press G and Y, it should work. So, now we have a ball that can rotate on the X axis. It can roll like this and it can roll on the Y axis. But the problem is if we start moving it on both axes at the same time, this entire system breaks. So, let's press G and then shift Z so I can move it on the X and Y axis at the same time. Look at this. Now we move over here. This works and it works like this. But I'm moving it in a very specific location. The soon As we start moving it diagonally, look at that. We are sliding around. We are doing all kinds of weird stuff and it just doesn't work. And now you might be thinking, I can actually already see a suggestion here, next stop Z axis. Yes, this is unfortunately not the solution. And no matter how far you try to push this in the driver settings here, you will find that we need to come back to the spoiler I created at the beginning here, physics. We need to do a simulation. And a simulation is basically, if you simplify it a lot, it is an environment where you have access to the previous frame, for example. what has happened earlier. So, for example, with geometry nodes, you have simulation stones. Or in Blender, you also have the rigid body physics simulation. So, we are going to use a very clean setup that uses the rigid body system to move this sphere around and it is so robust and it's so stable and I highly recommend doing that. So, I think I actually want to get rid of all these drivers now because I've proved my point that we might be struggling if we want to use drivers here because we need access to data from the previous frames. So, let's right click on this driver and let's just go delete drivers. So, now we will get rid of both of them and now we can move this around without any rotation is happening. I think I actually want to lower the music just a little bit. Yeah. Okay. So, how do we do this with physics using rigid body simulations? This is so much fun because it's so intuitive because you can add a magnet that is like this invisible magnet object. Let's actually do that. Let's go shift A and let's go to force field and let's go force. I know I said magnets, but don't click in magnetic. That's super different. But if you click force, this will create a force field where our ball will be dragged toward us like this because of something similar to gravity. It's like a force. So, if you press play now, nothing happens. That's because we haven't assigned a rigid body simulation to the ball yet. So, let's select the ball and let's go to object, rigid body, add active. But now when you press play, this will just fall down because we haven't added a floor. And this is what I love about rigid body simulations is that it's so intuitive. You can kind of tell that, wait, it's falling down. We need to add a floor. So, let's add a floor. Let's go shift A, mesh plane. And I'm going to press F2 and I'm going to call this floor. And now you can select the floor here and you want to press tab to go to edit mode. And then you want to scale it up so it's bigger. And the reason why I want to scale this up in edit mode is because if you press N here to bring up the side panel and you go to item, here you can see that the scale of this plane, if you were to scale this up in object mode instead, so let me actually do that. Let me scale this down. And now I scaled it up in object mode by 10 times, so it should be the same. But now you can see that the scale of this object is 10. That is dangerous when we're working with simulations because of how the underlying engine in rigid body works, it will treat it differently than if it has a scale of one. So, your object should always have a scale of one when you're working with rigid body simulations. So, here for example, our ball has a scale of one. That is perfect. But now our floor, if you scale it up in object mode, it will have a scale of 10. So, what you can do to be just be perfectly sure is you can select the ground floor. You can go to object, apply and then scale. So, now we will have applied our scale and you can test this by going object, clear scale and nothing changes. That's good. Okay. So, now let's set this at the ground floor. Let's go object, rigid body and then let's go add passive. So, now if we take our ball here, we can press G and we can move it up. And when we press play now, it will fall down and we have a ball on our ground. And now you can see that our force field is actually working, but it's very weak, so we have to increase it. So, let's go to the physics properties and select the force field and then let's increase this. So, if you set this to maybe 100, we're going to show you something really cool. If you press play now, it goes away. So, what we need to do, we need to invert the force of this force field. And you remember what I said about rigid body simulations, it's so intuitive. So, do you have any suggestions? How could we make this force field make it attract instead of pull it away? It is so intuitive and it's so beautiful. You just set the strength to minus 100 instead. Oops, that's minus 10. It should be minus 100. So, now this force field that is supposed to be pulling it away, it's pulling it closer. And we have a very cool situation where if you take this force field, you can press space to play the animation and you can press G and you can move it around and the ball will kind of always go toward the force field. And this is how we will be animating our ball that is rolling around. We'll just be animating the force field. It's actually super simple. So, let's just do that. Let's take the ball here. I'm going to reset the location by pressing alt G and then I want to press G and Z and one to just make sure it's at the top of the floor here. And now as you can probably tell, if you press play here, this ball is kind of bouncing around a little bit. It's kind of wobbling around. And one thing that we can do, which is actually really fun, is that instead of having this being like an actual geometric shape like this, if you think about it, we want this to be a ball kind of regardless of what the mesh count is or how the poly count is in this ball. So, we can actually Excuse me. We can actually override this. If you go to the settings of the ball, physics properties and you can see you have the collisions and shape. So, you can change this from convex hull to sphere. And now you can see we get a little bit of a different I don't know what it's called, gizmo around this, which indicates that this is actually a sphere. And what's so cool is that now this is rolling around super smoothly and it is a lot easier to animate it because it's a little bit more predictable. So, we can change Yeah, we should probably do that. We can change the resolution of this if you want to. So, if you press tab to go to edit mode, you can press X to delete the vertices and then let's go shift A and let's go icosphere. And then you can see you can take the add icosphere here and then Z location and crank it up to 1 m since it's below there. And then you can increase the subdivisions. So, let's for example do four subdivisions. I think that should be good for now. And then let's go back to object mode by pressing tab. So, now we have a ball that looks a little bit more high poly and it's rolling around really smoothly. So, let's start animating this. If you view this from above here, you can see that we can animate this ball by moving this force object here. But you can see it's kind of slippery. It The ball has so much weight and it's kind of unpredictable to kind of make it go where you were trying to make it go. So, a setting that can be really nice to use for this is in the force field's physics properties, select the force field. You can see here you have force field's settings and under flow, you can increase this value. And this is one of those physics values that is surprisingly difficult to explain, but it is really intuitive once you start playing around with it. It's actually super intuitive. So, let me just try and increase this value. So, let's set it to three, for example. Now if you press play, you can see that the ball has a lower max speed, but as soon as we start changing the direction of the force field here, it kind of it reacts more quickly. So, this can be a really nice way to get like more um control over the ball. It is difficult to explain. This is one of those things that you can just play around with. And what's so cool is that everything we're doing so far is possible to do on an actual potato PC. So, these real-time rigid body simulations is it's trivial for the CPU to do at the 30 frames per second or whatever frame rate you're at. Yeah. PolyWorks3D says flow is basically reaction time. Okay, that's good to know. Yeah. So, what I want to do is that I want to increase the strength of the force field a little bit more. So, we want to set it to minus 250, for example. So, now we have a little bit more control. Oh, you can see we are spinning a little bit. See that? Not sure how well you can see that with the sphere here. Let me try and show you. Yeah, it is spinning a little bit. I don't want that. I want this to roll very intentionally. So, let's select the sphere and let's go to the surface response and we can crank up the friction here. And we can also do the same for the ground floor, crank up the friction on the surface response. And now we should have Yeah, we should have a ball that kind of looks a little bit like it's it has its own will. Yeah. Okay. And um maybe the flow can be 2. 5. I shouldn't spend that much time tweaking the settings because that is something that I can do in my spare time. I'm not going to bore you with that. Okay, but one big problem if you're trying to make an animation here is that the first of all, if you view this from above, it's a little bit annoying that we're seeing this ground floor like super bright in our face. I don't like that. I like to keep things like in a dark mode. So, you could change the material of this floor, but we are probably not going to be seeing this floor in the final render anyway. So, or at least we don't want to. So, I wouldn't bother adding a material to this. We can simply go to object properties and under viewport display, you can go display as and set it to bounds or wire. Doesn't matter actually. I'm going to set it to wire. So, now if you view this from above, you can very easily see that we can move this around. And also keep in mind that if you're moving it too far over here, then the ball will fall off this floor. But, our force field is actually so strong that it's levitating the ball. So, yeah. Oh, that's crazy actually. Okay, so that's probably that tells me that we should probably keep the force field at ground level when we're animating this. So, the ball is kind of pushed down towards so we don't have any jumping ball situation. So, let's make the floor a little bit bigger. You can press tab to go to edit mode and let's scale it up by maybe four. So, S and then four. And then enter. And then press tab to go to object mode again. So, our floor here will be like super big and it's doesn't actually really matter that much. But, one thing yeah, I think I said that it was two things that was difficult. So, the second thing about the force field is that once we start animating this ball now, you can see here is very satisfying. We're kind of moving this around. But, at some point we get to the end of the animation. Look at this. Boom. It just get teleported to the beginning. That can be very frustrating if you're trying to make like a really fun animation where it's moving around and you have all kinds of stuff you want to achieve. So, what I want to do is that I want to increase our frame range. So, if we make a little bit more room here, you can hold down control and middle mouse button and you can drag your mouse like this or you can use this little slider here to zoom out. And then if you zoom out to for example maybe 1,200 frames. If you want to know how many frames per second that is or how long that is in like real life time, not frames, you can hold your mouse here and then press control T. So, now you can see this is 40 seconds, which should be plenty. So, if you want to set this to be the end, you can go control end. And now this is our frame range end here. So, and then if you want to kind of center this, you can press home and now this [snorts] is our entire floor. Sorry. This is our entire uh timeline here. Yeah. — [clears throat] — Novamax saying locking the axis. Yeah, that could actually be an idea if you have a sphere that you don't want it to move up and down. You could definitely lock the axis. But, um I don't want to lock the axis when we're doing the physics simulation because I feel like I want to control this in a more natural way. So, the natural meaning that as long as the force field is always below the center of the ball and we have no sliding, it should not be possible for the ball to go up in any way. At least according to my monkey brain logic. Okay, let's actually add some animation to this. So, now we're going to use a principle that I have showed earlier. So, maybe we can go to youtube. com/polyfjord/videos because I am really into this real time animation techniques. So, if you go down here to this video, tutorial making a procedural trail simulation. In this animation, we are doing some real time animations, but now I'm starting to think that I'm actually pointing to the wrong tutorial. It's uh it's the one right next to it. Wait, where did it go? It was just here. Okay, there it is. Yeah. So, the what is the fastest way to animate in Blender? You should watch this video. This is very powerful because now we're going to use a new feature in Blender 5. 1, which makes this effect so incredibly powerful. So, first of all, let's take our force field here and let's view this from above. Oops, above by pressing the Z on this gizmo here. And now we want to animate this in real time. So, what we can do, we can click this record button here, the auto keying button. Now, you can see it returns red. If I zoom in here, oops, too far. It's this red record button. If you enable this, now we have auto keying enabled. And this will, as you can read here, automatically insert keyframes on modified properties. So, that means that when we move this force field around, we can press play and then we can move it around and we will actually get a force field that is being animated in real time and we can just bake the animation like that. It's very cool. So, let's say go to the first frame here. I'm going to select the force field. I'm going to press alt G so we start off in the center. And then I've got to view this from above by pressing Z. And then you can press play to start the animation G with the force field selected. And now when we're moving this force field around here, our ball is following it. And what's so cool oops, is that we're recording the animation of the force field. But, the simulation stops and that is because after 250 frames, you will reach the default cap of the rigid body simulation. So, I forgot about that. So, let's go to the scene properties and then under rigid body world, you can see here under cache, you have the simulation start and simulation end. And our simulation end is at the 250 frames. We need to set this to 1,200 frames. So, I wonder if it's possible to set up like a driver, copy as new driver, paste driver. Yeah. Okay, nice. That worked. So, now the cache here will always be the same as the end frame. Wow, I didn't know that worked. That's actually really powerful. Okay, yeah. Should we have a driver for the No, I don't want to take any chances because I haven't tried it before. But, you should be able to set the simulation end to be the same as the frame range at least. That's important. Because now we have a we're no longer limited by the 250 frame duration. So, if you want to, you can continue off of this animation, but I want to just make a new one. So, let's select our force field and let's press A down here to select all the keyframes. And then let's press X and then go delete keyframes. So, now we can try it again. Let's view it from above and let's select our force field and let's press play and let's press G and now we are animating our ball. So, I want to move it a little bit to the side here. Want to stop a little bit, maybe think and then it keeps going. Then it rolls around a little bit and then it stops around here. Maybe we should try and stop it at where it started so we get a loop. No, that's not going to be possible. Yeah, we'll stop it there. It's not going to be possible because it has a different rotation. Here you can see it's rotated like this. If you enable the rotation, you can see this is the rotation when it stops and at the beginning. So, we won't be able to see that. Or loop it perfectly. But, that's a project for another time. Nice Kodak hoodie. Thank you. — Okay, so I'm going to disable. Yeah, this is very important by the way. You want to disable auto keying because if you do anything now, it will create a keyframe. Basically, any movement in the 3D viewport, it will create a keyframe and we don't really want any more keyframes than this. So, now we are Yeah, now we are moving this around. And we can see that if we turn off our overlay here, we have a ball that is kind of rolling around with its own intentions. Look at that. Really fun. So, now the problem is if we scrub on our timeline, things just doesn't work. Things are stopping. Things are starting. So, we want to bake this simulation. So, first of all, I can see that it takes around 1 second before we start moving our force field. So, I want to speed that up a little bit or I'm not going to speed it up. I want to move it a little bit. So, select the force field and press A to select all the keyframes. And then let me just zoom in here so you have the keyframes are selected when they change color like this. So, here you can see they are not selected and now they are selected. And now if you press G, you can move them to the beginning like this. And then left click to confirm. So, now when you press play, we are starting right away. We don't waste precious render time on a ball that is just standing still. Okay, so to bake the physics simulation, you can select the ball or the force field. No, it actually doesn't matter what you select. You don't need to select anything. You can simply go to the scene properties and under rigid body world and cache, you can just click bake. So, if you click bake here, now you can scrub through this and you can see that we have a rock solid bake. Very nice. And you should not I feel like I should tell you that if there's something laggy or buggy, this is like glitching around or doing weird stuff, you should try and just click delete bake, move to the first frame, select the ball, press tab to go to edit mode, tab to go back to object mode again and then click bake. And this is like a quirky little trick that allows you to completely delete the bake and just be sure that it's deleted. So, now I want to see where we ended up our animation here. Should be here. 21 seconds. Yeah, so I want to set this to be the new end frame. So, I'm going to go control end. Yeah, 630 frames. That's good. I'm going to press control T so we can see frames again. And then I want to press home. So, now this is our entire timeline. Okay, good. And at this point, remember to save. So, file, save. And [snorts] then we might as well do a save incremental because we are starting something uh bigger now. We're about to start a geometry nodes setup. So, we're happy with this. I'm going to go file, save incremental. So, now we have tutorial version two. So, if I go to my desktop here, hang on. If I go here, desktop, you can see that we now have tutorial version one and tutorial version two. And then you have this blend one file. But the most important part is tutorial version one contains whatever we created up until this point. And then tutorial version two is now our active blend file, which we can continue doing geometry node stuff in. So, if we break anything or if you mess something up, we can always come back to tutorial version one and import scenes or objects from that. And by doing it this way, we don't need to go up in the outliner here and create collections that are called like backup Oops, backup and they are hidden and we are kind of like feeling our blend file with blood. It's so much easier to just have your blend file um cleaner and then you have just multiple backups. I think that's really nice. What even is a blend one file? Is just a naming quirk? Very good question. So, here you can see you have tutorial version one. blend, one. blend1. And this is like a built-in safety feature to Blender. You can disable it if you want to, but it's there. And what this does is basically just saves your blend file with just the value one next to it. It's that simple actually. So, the name of this file is blend one. But if I were to um make a copy of this and paste it, for example, I need to call it something else. Yeah, let's call it test here and then continue. Now, what you could do, you could literally take this file and you can rename it and you can change the extension. So, instead of it being a blend one file, it could be a dot blend file. And suddenly you have restored your old project file. So, what happens is that every time you press um save in Blender, it will remove it will move your blend file from Blender to blend one, basically. So, this is like the previous time you pressed control S. So, in this case it's 25 minutes ago, which probably lines up with how long I've been streaming. Yeah, so this was at the beginning of our project here. So, if you go to edit preferences, you can see that you have this in the system here. Uh no, where is it? Interface? Yeah, I don't know where it is, but it's probably to Yeah, save and load. Here it is. Save and load blend files one. Here you can read about it. The number of old versions to maintain in the current directory when manually saving. Okay, that was a little bit of digression. It's uh It's time to get on to the juicy geometry node stuff. — [snorts] — You're actually using Linux. Wow. Yes, I am. It was a little bit of pain, but now it's worth it. Okay, so we have our ball and we have our floor and we have a force field. Those are the three things we have in our scene right now. So, now we want to create a system that allows us to create these I don't know what to call it. Columns? Um bars? It's like a support system. Maybe you can leave a comment what you think we should call this. But now we're going to animate these so they respond to the movement or their location of the ball in real time. So, we already have the ball that is moving around like this. So, how do you make all these objects that are rising and falling like that? So, first of all, let's make the object that we want it to be standing on top of. And then we're going to duplicate that a bunch of times. So, let's go shift A and let's go mesh cube, for example. I'm going to press F2 to rename. And we want to call this platform. Yeah, platform. Good. Wait, I think the entire thing will be the platform. But each thing will be a block or something. No, we can call it a platform for now. Okay, yeah, so this is the platform. So, if you press tab to go to edit mode or hang on, if you go back to object mode, you can actually hide everything else. So, you press shift H. Now we are basically soloing this. And if you see here in the outliner, you can see that all these three the ball, the force and the floor, they are all hidden with this eye icon. So, that means that we can only interact with the platform here. So, now that all of these are hidden, you can press A to select everything and we're only selecting this platform. So, let's press tab to go to edit mode and let's press G and then Z to move it down by 1 m. So, now this is below ground because our ball will be rolling around on the surface here. And then we want to take all these four vertices at the bottom here and we want to move them up a little bit. So, let's press G and Z. Let's move them up maybe You can hold down control and shift to make it a little bit more snappy. Doesn't actually matter. We can do here maybe. And then we can press I to insert mesh here or a face, I don't know. Vertices. And then once you have left click to confirm that, you can press E to extrude it downwards like this. And you can just make this really long. It doesn't really matter how long it is. So, if you want to keep going after you've confirmed, you can press G and Z and just make it longer. Doesn't really matter how long this is. The most important part is that we have this object that is placed flush with the ground floor like this. Oh, I got a comment here that the dash icon. So, if you do this No, hang on, let me search instead. This Um this is not the same as pressing shift H. So, when we press shift H, we can see that we got all these hide in viewport things, right? But if you press dash on your numpad, I think it's uh object. No, is it view? Local view. Yeah, this it is. View local view, toggle local view. So, this is completely different and this is actually super confusing because even if we have all our objects in our scene right now and you take this platform object and you go view local view toggle local view with numpad slash like this. Look at this. Now this is in local view. But if you see here up here nothing has changed. How do you get this back? Alt H, nothing's happening. I'm unhiding. What am I doing here? And if you go in here and you go to the disabling viewports, everything's still there. You can even enable every single toggle and nothing is changing. What is going on here? This is like a hidden way to hide things. And I think this is very confusing for beginners, so I definitely don't recommend that you do this because it's so easy to just suddenly click it and you have no idea how to get it back. Where are all my files? I can see them there. Yeah, so then you have to go local view and then toggle it again. So, and then that's the only way to get it back. So, I do not recommend that you do this. I recommend that you select something and you press shift H instead because then you can just press alt H to bring it back and you can also see it in the corner what you are missing out on. Okay, I hope I wasn't uh hard on you, by the way. It was a very good suggestion to use that hotkey. Okay. So, now we want to multiply this platform a bunch of times. I don't know what you're thinking. We are probably going to use the array modifier, right? And just make a bunch of copies and now we're getting this grid. That is very difficult because we want to use geometry nodes and we want this to be able to be animated procedurally. That's going to save us a lot of time. So, we're not going to use the array modifier. We're going to use a geometry node setup. So, let's go in the outliner here and clean things up. Let's hold our mouse up here and you can press C. And now you can have the new collection here. It's called collection two. Let's double click on this and let's call this geometry nodes. Enter. And then we want to make a third collection. So, press C again and let's double click on this. And let's call this um original platform. Because we want to take this platform here and we want to hide it away. We want to put it in a platform collection so that when we need it, we can bring it back. We don't want to see this because we're going to instance it in the geometry nodes collection. So, let's take this platform here and let's just click and drag it into the original platform collection. And now if you want to, you can actually hide it by just excluding it completely from the view layer. So, if you click this now you can no longer see the original platform. It will not be rendered. in the memory of your computer. It's very nice to just get it completely out of the way. But it still exists in our blend file and we can bring it back later. So, let's add a geometry node system to our scene. So, we already have Sorry, I'm moving lots back and forth here. We already have a geometry nodes collection. So, we can select this collection. And now if you go shift A and you go mesh cube, for example, now you can see we have a cube in the geometry nodes collection. And if you want to, you can actually hide the physics collection for now. Just click this exclude from view layer if you want. And now we only have the geometry nodes cube here. So, let's take this cube and let's press F2 to rename it and I'm going to call this geometry nodes. Um maybe even call it ground {parentheses} geometry nodes. So, we're a little bit more specific. And I highly recommend naming your objects properly because if you're sending a file to a friend or something, then it's so much easier for them to understand and also for yourself in the future. You would be You don't underestimate how much you can forget. Okay. So, we have our geometry nodes collection and we have a ground object in the geometry nodes. Let's start setting up our platform that is our moving. So, let's select our ground object here and let's press tab to go to edit mode. And let's just go X and just delete all vertices because we don't need to see this. Just this can just be an empty object. This is technically unnecessary, but I just like to have it clean. So, now we want to split our viewport in half here. So, let's just right click and do a horizontal split. Let's move it up to the center here. And then let's select this editor type here. You take this button here. You can click on it. You can change the editor type to, for example, geometry node editor. And now we can click new to make a new geometry node system. And now here you can see we have our Oh, by the way, I'm pressing N to get rid of this panel. So, it's a little bit more space to see. And now you have a group input, and this was originally the cube data that we just deleted in edit mode. So, we can just delete this group input. We don't need it. And we want to create new geometry here. So, whatever geometry we feed into this group output here, it will be possible to see it because we have a geometry nodes modifier to our geometry nodes object. So, let's go shift A, and now you can just search for grid. And now you can go mesh primitives grid like this. And if you take this grid and you connect it to the geometry, now we have a grid. And now you can increase it in size. So, for example, if you set it to maybe you can click, by the way, left click and drag down, and you can adjust both at the same time. So, if you set this to maybe 15, now we have a 15 grid. It should be 15 by 15 m. Yep. And then if you go to wireframe view, no, wireframe view like this, and now you can increase the vertices X and Y. So, you can for example set this to 15 or let's just leave it at three for now because I'm going to show you how to um make things happen here. Okay. So, now we are going to be doing some um scattering of objects. We're going to be instancing objects on the points in this grid. So, let's go shift A, and let's search for instance on points. And let's place it here. And now everything goes away. And that is because we have to select what object do we want to instance. So, if we go shift A now, we can search for object, and we can instant a constant object like this. And then we can take the object, and we can set it to be the platform. Remember that platform that we created? This is the object we want. So, object platform. Hang on, this might be the wrong one. Object. Oops. Yeah, it's object info. Yeah, sorry. It's not the this one, it's this one. Object info. It's a little bit confusing. So, if you set this to be the platform, now you can take the geometry of this and plug it into the instance. And look at that. Now we have a bunch of these platforms. I set it back to solid view, by the way. Now we have all these platforms that are created in a 3 by 3 grid that has a size of 15 by 15 m. So, that is such a procedural way to do this. So, or such a procedural way. A dumb thing to say. — Okay. So, now you can change the amount of vertices here by doing, for example, eight. Yeah, we can start by eight because we can increase this at any point because it's procedural. And I'm happy about this so far, so I'm going to press control S to save, by the way. I recommend that you do that. Okay. So, now we want to make these change their height. So, what we can do I am sorry. I'm messing up my um Yep. What we want to do is that we want to change the position of the objects in this grid. So, if we go shift A and search for set position node, we have a node here that allows us to control the position of this grid. So, for example, if you change the offset here, you can move them up and down. So, let's um take this offset here, and we want to separate the X, Y, and Z axis, so let's pull this out, and let's search for vector math. And then yeah, it says to add by default, but we can just change this to multiply. And then as you can see here, now you can take the Z axis of this vector, and you're changing the scale of that. So, hang on, sorry. I have the node tree here because I don't want to get it wrong. Um Yeah. Okay. So, now what we want to do, we want to make sure that we have the Instead of animating all these columns at the same time, we want to make sure that only the one that is closest to the ball is moving. So, let's bring back our ball for a second by enabling the physics collection again. So, now we can see our ball. And then we want to import the ball to our scene. And what's really cool is that instead of adding this object info node that we just did, you can actually take the ball in the outliner, and you can just pull it into the geometry nodes. But, you have to do a little bit of a trick first. You have to select the geometry nodes object, and you have to pin it like this. So, no matter what you're selecting, this will always stay in our current geometry nodes scene. So, now you can take the geometry nodes, and you can pull the ball into the node tree here. And now you can see we have the object info node. Let me just see that I got this correct. Yep. So, now what we can do, we can take this geometry here, and we can plug it into a geometry proximity node. And now if you take this distance, and you plug it into the vector math multiplier, you can start changing how much are we actually impacting the movement of this. See that? Now we're getting here. Now you can see that this ball is affecting the location of these pillars. And this is so powerful. Because this allows us to move the ball around and see that things are changing. However, if we press play in our animation now, it doesn't update. Why isn't this updating? Now, this is because we need to change our object info from original to relative. So, if you set this to relative, now you can see that we have all these objects, they are moving towards the sphere. Look at that. And what's so powerful about this procedural workflow is that we can take this grid, and we can make it a lot bigger. So, you can take and scale it up on the both axis. Let's for example do 40 m like this. And then you can increase the vertices as well. 20 is good, for example. Now you can see that when this is moving around, we have this effect where we are kind of following the sphere. Very cool. But I think it's a little bit boring that it's uh so uniform, and also it's levitating quite a lot. So, we need to tweak this a little bit. Oh, I can see Mix 3D design here in the chat suggesting um uh map range node already. That is a good idea. So, we are going to do something very similar to that because we could use the map range node. So, basically, if you think about it, what we have here, we have an object info node that uses geometry proximity. So, based on the proximity to this ball, or specifically the proximity of the faces in this ball, we are moving these objects up and down based on that. So, if we move the ball over here, you can see it's actually responding to us. It has does nothing to do with the physics simulation. It's simply looking at where are the vertices. And instead of having this being like this linear falloff, or I'm not sure if it's technically linear or if it's some other equation, but instead of it having just going in a straight line like this, that's the language I want to use. Then we can add a map range node, or color ramp. I love using color ramps because they're so intuitive. They kind of they feel so intuitive. The map range node, I've given up on that so many times. So, let's go shift A, and you can just search for CRA. That's a really nice trick, so you have everything on the on one hand. If you think uh that is cool with those kinds of things, you can watch my video where I'm using a hotkey to move all the Yeah, just super quickly. I just want to show you this video. Um This video. Yeah. I made a free Blender add-on to work for percent faster in Blender because you want to move your hand less when you're working in Blender, basically. So, yeah. So, that's one of those tricks. You can go shift A, CRA to get the color ramp. So, let's place a color ramp here in the geometry proximity in the middle of this, between the geometry proximity and the multiply like this. And now look at this. Now you can start moving this color ramp. You can move the color stops here, and we are actually changing when is this reacting. And you might be thinking that is completely useless right now because it's kind of you need to move it all the way until you start seeing a result. So, what you can do to complement this, to make it a lot easier to control, you can go shift A, and you can search for add math. So, we can add a math add node here. And now if you lower this value, you can see that you can start changing this. So, now if we lower this multiply here to something much lower, you can see that we have the possibility to change the falloff with this math node here. We have a very, very cool effect already. And now get ready to have your mind blown because I'm going to show you something that is just so beautiful about this workflow. So, you see this color ramp, right? This color ramp controls the influence of these objects, right? And I can probably see you Yeah, you prefer a map range. Amazing. Uh the map range is amazing. It's really good, and it supports floating values, as you say. I love it. But, the power of the color ramp is that if you set the linear here, if you set interpolation to, for example, ease, and then you start tweaking things, you can see that we now have this little bit of a smoother animation on this. And you can actually even add color stops, and you can start kind of animating with the color ramp. It's really powerful. So, you can start kind of moving these around, and suddenly you have like a Yeah, I messed it up but that didn't look really good. My point is you can kind of tweak things around and you can make like this much more organic vibe to this by adding these stops to the animation. So I think a big change is to just have it at ease or even at B-spline and then you set this to black like this. Now you have a very smooth animation. Kind of yeah, it just looks so alive. I really like it. Yeah. So now this becomes all about making sure that these um what did we call them? Platforms are just completely lined up with the movement of the ball. So you want to make sure that the ball is always being touched by these. So you can actually lower the add value here if you want to be sure. You can see I think maybe you want to make sure of that the diagonal movement is correct. Yeah, there we go. I think it should be good. And what's so powerful about this is that you can take this grid and you can increase the size or you can even increase the vertices here. Okay, that's uh yeah, we need to um have a conversation with our ori- original platform collection again. Yeah. So let's head over to the outliner here and let's have a look at the original platform. You can uncheck the exclude from view layer. You can take this and you can just move it to the side here. It doesn't matter where it is because we have the relative uh object info. I think original. Yeah, I don't know if that matters. Anyways, we have this um platform here now and whatever change we do to this like if we go to edit mode and you for example move this up, you can see this is being instanced all the time. So what we can do is we can go to modifier properties. Sorry, modifier properties with the platform original platform selected, add modifier and search for bevel for example. And then you can see you have this beautiful bevel here. Look at that. And this just does so much when you have a bunch of these. And then since this is quite a geomet- geometric simple object or geometrically simple, what you can do is you can go to the ground uh which is the geometry nodes object and then you can see here you have the instance on points and if you want to, you can change the scaling of this. So if you the X axis for example and the Y axis, you can actually make these a little bit smaller if you want to. This will make um the bevel modifier a little bit weird though. So I'm not sure if I want to do that. You can also take the original platform, press A to select everything, S and then shift Z to scale it on all axes except for the Z axis. So we can make it a little bit smaller maybe. 7 and then you can come back to the geometry nodes selection here and we can increase the vertices. So we're back to a more smooth looking number. Maybe 29. Yeah, that actually looks really good. Cool. Look at that. That is so satisfying. This ball has this like its own support network that is helping it. You can make a simple math formula to control both of verts at the same time so it's automatically adjust. Yep. That is what I ended up doing on my um uh in my testing. So what the sorry, I'm going to get your name. What the silent slayer uh is meaning is that if you for example use a value input you can actually do integer like this. If you set this to 29 for example, you can connect it to both of these and you can change them at the same time. Or you can even better, you can do like uh math multiply and you can take this value into here and you can find what value is nice for this. And then you kind of do this. So if you start changing yeah, it can kind of end up looking kind of I think I'm actually going to keep that. Yeah. Like this maybe. Maybe 39. Yep. So now we have these objects that are kind of following our cube. And now one thing that you might not notice, I don't think it's that big of a deal with this particular sphere, but what I ended up with is that I found it a little bit um difficult to get it to be super narrow this animation here. And by narrow, sorry, this is very difficult to explain, but what if you want to make it really close this proximity to the ball here? So maybe something like this. You want the animation to kind of be sure that it's only registering the center of the ball. What you could do is that you could go to the very first frame, select the ball and you could go shift A mesh plane for example, press F2 and let's just call this geometry proximity. Then you can press tab to go to edit mode, press M like this M and then merge at center. So now this is only one single vertex. And then if you take this vertex and then you set it as the object info for the proximity. So if you take to geometry proximity, now you just have this single vertex instead. Which doesn't work because as instance uh I forgotten why this doesn't work. Okay, yeah. Well, the point is you can get a different type of falloff. So I'm just not going to bother with that. Let's just uh yeah, let's just ignore that. That's just a different type of uh of look you can get to it. You can get a little bit more control if you have like an a proxy object to control the falloff. Or you can probably use an object instead of geometry proximity. You can use like object proximity. I'm not really sure. Oh, you need faces for it to work. Yeah, so if you want to use a single point, you can set it to points instead of faces. Yeah. Yeah. So we'll keep it at the ball for now because uh I like that. Okay, now what I think is so cool is that if you are unhappy with this uh force field animation, you can actually come back to it and just do it in real time again. So if we close this geometry nodes for now, you can um um what's the easiest way? I can just right click and just go join down. Now if you want to, you can re-record the ball and it actually looks really cool in real time. So let's take our force field here and press A in the timeline and press X to delete all the keyframes. And then go to the scene properties and then under rigid body world you can go delete bake. So now if you select our force field, at this point it might actually be nice to lock the location of the force field to not be able to go on the Z axis. So let's select the force field, let's go to the object properties and then on the Z location here, you can set it to zero and you can click this little uh lock here, lock location. So now if you enable the move gizmos for example, you can see it's no longer possible to move it on the Z axis. Just doesn't work. So that means we can press G and you can just move this around and it's kind of really easy to use. So if you want to, you can split your viewport in half again. So right click and do a vertical split this time. And if you view this from above, it's right here and you set it to wireframe view, this can be the place where we animate this object. So I guess it doesn't really matter that you disable the Z location if you're viewing it from above. Yeah. So now if we select them the force field, we can start animating it again and it actually works in real time. Yeah, let's actually not animate it. Let's just do a dry run before we start auto keying. So now if we Hang on, I actually want this to be a little bit more wide angle. So if you press N to bring up the side panel, you can go to view and you can set the focal length to be a little bit wider. So maybe 20 28 mm or something. Just a little bit of a wider viewport so you can kind of get a better feel on what it feels like. Then let's take our force field here and then let's press space and then G. And then you can move it around here. Now you can see we have a real time ball animation and the ball is always following our force field. So much fun. And I think this effect is actually best if the ball is a little bit slow. It's kind of wiggling around and trying to figure it out. Yeah. So I think I want to do that. So let's start recording auto keying. I want to move a little bit closer. And I want to see am I on the right axis here? No, it's the wrong one. There we go. So I'm going to view this from the front. Which is here. Yep. And then I'm going to start the auto keying and press space and then G right after. So space and then G. So now we have it moved to the side like this. Stops, forward and you have all these beautiful platforms just helping this sphere just move around. And it's kind of like a wholesome little animation. And then you go back to the beginning. And then stop. And then you make sure that you press space before you get to the end of the animation because if not, you're going to get some trouble when you start out with this keyframe at the beginning here. That is actually such a big problem when you start doing that I can definitely recommend doing that. So now that we have recorded this, we remember turn off auto keying, very important. And also I want to go file, save. So we just saved our recording. And then you can select the ball. Sorry, you don't actually need to select the ball but I like to do it. And then you can go to scene properties and then you can just bake the simulation again. That took a lot longer than the last time. Anyways, now we have baked the physics. So now we can see our animation in real time and our ball is kind of moving around. Look at that effect. That is so cool. And remember these are separate. So our geometry nodes object is actually Wow, you can actually move that. That's really cool actually. The geometry nodes object can be moved around like this. It is really cool. But we're not going to do that. We're going to open up geometry nodes again. So I'm going to right click, join right, and then right click horizontal split, and let's bring back the geometry nodes editor, and let's pin it. So make sure that floor is selected or the ground is selected so you can get back to geometry nodes. You can also use a curve for the movement. Yeah, I tried to use an RGB curve or like a curve uh curve this one. It should actually be possible to use that to control the movement. I found it just a little bit difficult, but you should try that. You can use a curve, map range. You can use uh pretty much what you want. Oh wait, you meant the curve to control the movement of the force field. Yeah. Yeah, you can do that. I think what I would recommend doing then is to view it from above and then you go shift A and you add a curve object, bezier, and you press tab to go to edit mode, X to delete the vertices. And then you press T to bring up this menu here and you can go down to draw like this. You can also press shift space and go down draw. And then when you click the draw thing, you can just draw the curve you want the ball to move on. Press tab to go back to object mode. And then you can set this curve to be or you can set the force field to follow the movement of this curve. The reason why I'm not doing that is First of all, it's slower than using real time animation technique, but secondly, it's very difficult to control the speed of the curve. Like object on the curve. It's not that intuitive in a weird way. I find it easier to work with keyframes, but uh Yeah, I think working with a curve is an excellent alternative if you want to see where the ball is going. If there's a client work with a logo or something like that and you want to make sure that you have the exact movement then a curve is a lot better because then it can be refined like this. By the way, to get back to the regular selection tool, you can press W in the edit mode while selecting curve. Yeah, so you can always come back and you can kind of change where the curve is and stuff like that. Yep. Okay, so I think we are ready to start adding some materials to this to make it look really good. So first thing I want to do is that I want to select our ball here and I want to increase the poly count. So let's select our ball and let's right click, set the shading to smooth, and let's go to the modifier properties, add modifier, and you can just search for subdivision surface. Press enter. And now we have a much smoother ball and depending on how much you smoothed it, you might want to take a look that you are still connecting to the ground. We are actually levitating a little bit over above the ground now. So um not sure what the best thing is to do. Yeah, you can actually just take the geometry nodes ground, just move it a little bit up on the Z axis if you want to. If you want it to have that connection. It's not a must, but uh Yeah, some people like to really ground their animations like that. And I think yeah, I like that too. So now we have a much smoother ball and just keep in mind that when you're doing the physics simulation, you should probably lower the uh subdivision count before you do the physics simulation. Before because that's going to just make things instant instead of a little bit slower. And now by the way, now you can see that this subdivision is actually impacting our geometry nodes simulation here. So if you set this to two, oh, still still not laggy. Yeah, very powerful. I like it. Okay, so more rendering things. Let's um I want to reset the position of my 3D cursor, so you can press shift C to reset that. I can see that my screencast keys is gone. There it is. So shift C to reset the 3D cursor. And then we're going to make an area light. So for Hang on, before we add a light, we should go to rendered view. So if you go to rendered view, viewport shading set to rendered. At this point I'm very much hoping that my stream is not crashing or lagging because I'm using my GPU to encode the video, which was the audio issues I had an hour ago, and now I'm using the GPU to render this scene. So please let me know if the audio starts lagging because then I need to figure out something else. Okay, now we are seeing this in the render view. And super boring, super gray, very boring. I'm using the render properties, I'm using the cycles render engine. I'm using my GPU to render. If you go to preferences, sorry, that's F4 and then preferences, you can see under system, you can set it to the GPU you have. And then Yeah, cycles render view. But now this is just really boring and gray. So to add a light source, let's go shift A, light, area light, which is my favorite light source. Nothing happens. That's because the light is actually below the ground now. So if you press G and then Z, you can move this up. Then you can right click, you can increase the power. And you might be noticing that we have a plane in our ground or we have a ground plane here, a visible plane. Where is this coming from? Where is our objects? You can actually see them a little bit here. So what's happening here is that we are actually seeing the physics floor from the rigid body simulation. So to get rid of this, you can go to the scene collection here. You can hide it for example here. But remember you also need to hide it in the renders. But something that I like to do actually is to keep it visible in both places or we can actually keep it uh Yeah, to be clear, it's this button is the render view button. And then what I like to do is select the floor here. And then if you go down to the um object properties and you scroll down to visibility, you can just uncheck all of them. Boom boom boom. So now you can see that we have no ray visibility for this object, but we can still see it in the 3D viewport and we can do changes to it and we can interact with it. And that is so powerful to be able to just ignore it in the render. But if we were to disable it up here with this eye icon as well, if you were to click this eye icon, then we would no longer see it. And I just really like being able to select it and kind of having that interaction. So that is um that is a really nice trick is to use the cycles render engine to just hide the ray visibility. Very important. Okay. You can probably tell that I'm talking really fast. That's because I have to pee. So I'm not sure if I should do that or — No, I can wait a little bit more. Okay. So now we have our scene set up in render view. By the way, if you press Z, you can go straight up to render view. Super fast way to enable that. And now I want a little bit softer light. So you can right click uh adjust area light size. Look at that. Now we have this really beautiful area light and you can disable the overlays here, which is alt shift Z. If you're playing World of Warcraft, you're familiar with this hotkey. Alt shift Z. No, wait. That's alt Z. Yeah, never mind. And also with the lamp selected, you can see you have this little dot here. I want go to viewport gizmos and just disable look at. So now we no longer have that little dot there. Now we actually have a really cool scene already. And if you press play, it actually moves around and it just looks so cool. And I really like this. So we're basically just seeing the ambient occlusion with the lighting here. But this just I just think this looks really good already. So we can make our world a little bit darker if you want to. So let's go to the world properties and let's set the surface strength to zero like this. And then we can enable the or we can disable the show overlays again by the way. Look at that. Oh. We still have this little platform over here. I think we can hide this now. So just get rid of the platform by excluding it from view layer and we can still see it. We're probably going to bring it back later. Just uh to do some rendering tests. Okay, so if you set this to render view, now we can see that we have this um animation here. So let's give our ball here a little bit more of an interesting material. So now we want to change this um editor down here. So let's disable this pinned here. And then let's set the editor type to shader editor. And let's give our ball here a new material. Hang on, before we do that, let's just save an incremental file. So save incremental. And then now we can click new. So now we're on like a This is like the last blend file before we started doing the materials. So here we have the principled BSDF, which is the default material for our ball. And I want to change this to something else. I want to start out with something more spicy, maybe uh I'm going to delete this by pressing X. Maybe we can try to search for a glass shader. So shift A and just type glass. Plug this in there. That actually looks really cool. But uh if I'm being completely honest, using the glass shader is a little bit of a waste because we spent so much time making this ball actually rotate like this. Like our ball is rolling around. See that? But if we use the glass shader, you can't tell that it's rolling. It will look like this no matter what you do. So that means that if you want to be really fast to do this method, you can just set this to be the glass shader and you can just animate this ball around like this and you don't need to make it roll because you can't see that it's rolling. The same goes for the um glossy shader like this. You can't see that it's rolling. You can just move the sphere around and you're actually good. Same goes for the diffuse uh diffuse and subsurface scattering. Basically, any shader that is just a clean shader, you can't see it. Yeah, here we go. Comment from Neon Wave Official. Little bit displacement. That is correct. That is what I want to do because as soon as we start adding texture to this, you can see that it's rolling and you get these really cool um movement, basically. You can see the movement. So, if you have watched my tutorial that is quite old now, you can watch uh um it's so old. I won't be able to find it, probably. This one. Procedural textures in Blender. I think this holds up like pretty good well, actually. I'm not sure if it's technically possible to copy the node trees exactly, but we can make a material that looks kind of like this. It's kind of like this um shader that is very wavy and intriguing. So, hang on. I'm actually just going to
Quick bathroom break
super quickly go to the — bathroom while I'm showing you the results on this previous tutorial. So, can I just add like a text? Uh text. Where's this? BRB. BRB. Yeah. I will be right back. So, please just uh have a look at this video while I'm leaving. Yeah. Um BRB. This. It's auto playing my next video. Oh, what's Hope you had a
Tutorial: Simulating a rolling ball in Blender 5.1
good time without me. I'm going to delete this. Hang on. I'm actually just going to hide it. You know, I don't want to delete anything. Okay. Hang on. I I like to have these on me. It's like these slippers that my uh in-laws, parents-in-law, got me. Very, very nice. Wool. I always have these on when I'm making a video. So, if you see me making a video, I always have them on. So, it's so nice and cozy on my feet. — Also, Norway is a very cold country. What do you use for your live stream overlays? I'm using OBS, free and open source streaming and video recording software. Welcome back, Commander. Well, I don't know about that. Okay. So, is there anything else I need to unmute or prepare before I can keep going? No? We're all good? Audio is good? Yeah. I think the Yeah, this looks okay. Yeah. Okay. So, now we want to add a displacement to this object here. So, first of all, I think it's easier to see the displacement if we are using the glossy shader, so I'm going to delete our diffuse shader here. And we're going to go shift A and search for glossy. And then take the BSDF and connect it to the surface. Then let's lower the roughness here. And now we can start making some stuff. And before we add our next nodes, I want you to go to edit, preferences, and under add-ons, you can search for Node Wrangler. You want to enable this because that allows you to take the glossy BSDF, for example. You can press control T and now you can add an image texture or you can change the texture coordinate or mapping or whatever. You probably shouldn't click the glossy. You should click the material output and press control T. And then let's get rid of the image texture. And then let's connect the mapping vector here to a Voronoi texture. And then let's set the distance to be the displacement. Look at that. So, now we can take this Voronoi texture, we can increase the scale. And this is way too harsh. So, if you want to make this a little bit more subtle, you can go shift A and search for displacement. And if you connect it and you hold on control and you connect it to the height instead. So, yeah, basically, this is our current node setup. Should look like uh this. Yeah. And the key here is to kind of get this Voronoi texture into displacement into the displacement of the material output. Because that means that now we can start tweaking these subtle Oops. Subtly says and cranks it up. These subtle kind of values in this ball here and it looks especially nice at the bottom. And then the trick here that I like to use is if you go shift A and search for noise texture, connect it before the Voronoi texture. Then you get this crazy pattern that you just saw in the video I am I am when I was away. So, now if you hold down shift, you can lower the scale here. And you can kind of start tweaking this kind of like the uniformity of this. You can lower the scale. Maybe even increase the scale. Yeah, there's all kinds of stuff. So, I'm going to set this to 0. 02. I'm not really sure how much I should be tweaking this, but I just love it so much. Maybe even F1 smooth. Ooh. Ah, it's a little bit disgusting. F2. F1. This is the kind of stuff you can just go crazy with and start tweaking because it's a lot of fun to kind of dial this in. Okay. So, now we have a glossy shader. Here's the setup I ended up with. And now what you can do is you can add a diffuse shader on top of this, which I really like to do. So, let's go shift A and let's search for diffuse shader diffuse. And then let's go shift A and search for add shader. And then you can connect the diffuse to the add shader like this. Take the glossy, connect it to the add shader. And then take the add shader and connect it to the surface. So, now we have both a diffuse material and a glossy material on the same shader. And you can lower the strength of the diffuse. glossy. And if you want to keep the glossy just a little bit more dramatic, you can into the color here, you can search for Fresnel or it's written Fresnel like this. And now you have kind of like a more evil-looking uh glossy shader here. Look at that. It's kind of more of like a rim light situation. Look at how evil this ball suddenly becomes. Is there a seam on the sphere? Yeah, it might actually be because we're using the UV setting. It's a good catch, actually. Here you can see we have the seam because the texture coordinate is set to UV. That is It's so good that you said that. Hushcup77, thank you. So, we need to change the texture coordinate here from UV to generator. So, hold on control. Then you can take this noodle here, apparently that's what it's called, and set it to generated. And now you can see it no longer has any seams. So, that means we have to scale this down a little bit. So, you can take the scale here, click left click and pull down. And then you just go to the left. You can hold on shift as well. Now you can see we can kind of scale this down, so it's a little bit more of a uniform sphere. Yeah, so now we have no seams. That's so glad you said that. Okay. And then if you want to have a little bit more glossiness, you can go shift A and you can add a math add node, for example. Math add node add math node. I don't know. And then hold on shift and you can just tweak the add value here. Maybe just a little bit more. That is good. Really liking these reflections here. And maybe we can give this diffuse color a little bit of a tint. Maybe we can write a hex code in the chat here and I can add that to the color of the ball so we can get a nice color here if you have a suggestion for that. Okay. Yeah, so I'm actually going to attach a noodle here, call it color color color, this one. And now here we can paste the hex code. Does anyone have a hex code? It's a Oh, there's the first one. Copy. Oh. Retracted. I'm going to paste it anyways. Oh, no. I for- Why can't I paste? Oh, I didn't Yeah. The message got retracted. Oh, there's a new one. Copy. How can I copy? Control C. Copying is a little bit difficult on Linux sometimes. There we go. Ah, nice. Yeah. Is that uh Can you make it less red, maybe? Less red? I just changed the color. Sorry. I feel like No. Hex code of my face. Ah, okay, so that's why it's so human. I'm going to try this one. Sorry for not picking the one you Ah, yes. Now we're talking. That's really deep and good. I like it. Okay, so now we have a ball that is going around. And then if we want to, we can add another add shader and we can go shift A emission. And then we can take this Voronoi texture here and plug this into a color ramp. And then we can take the color ramp into the strength of this and we can take the strength into the add shader. So now we have this add um this emission being added into the mixer. And we can take this color ramp and we can move this over here. We can add a new color stop, set it to black, and move it to the right there. So now we get these kind of rings like this. Which can be a really cool effect. Or can it? Hmm. I am not so sure anymore. Let's try and reset that. Uh Maybe just a little bit. So I feel not very happy about this. Oof. — [sighs] — What if we take a color from here and we add a hue saturation node and just uh lower the saturation and increase the value or I don't know. Maybe? That's uh it's a very cool contact light there. What do you think about that? It's like crying obsidian from Minecraft. Huh. I mean, we will be able to say that it is rotating. So maybe we can keep it like this for now and we'll see. Perhaps it's the scale of this can be tweaked a little bit. Uh point two. We can come back to it. Yeah, Okay, looks good. Nice. Or wait, you did say it looked good before I changed that. So I'm going to change it back and then we are sure that it looks good according to Sukana. To Sukuna. Thank you. Okay, just uh to tidy things up. Oh, I got the Yeah, to tidy things up so you can see the entire node tree here. Um like this. So feel free to take a screenshot. I will turn myself off. So feel free to take a screenshot of this. Okay. Is there a little No, okay, never mind. Yeah, so now we have the ball material. Now I want to make a material for our original platform. So let me get down here and let's unhide the original platform. Let's take this and whatever changes we do to this original platform here will be copied to the rest of them. So if we take our original platform here and then we give this a new material and then close this. I want to give this a diffuse shader like this. And I want this to have a texture on it. I want it to have like a something symmetrical or I don't really know. So maybe we can uh What's the easiest way to get symmetry here? Maybe we can use the mirror modifier. Yeah, so let's select this, press tab to go to edit mode, control R, just uh add a loop cut here and then escape and then control R escape. And then if you view this from above like this, you can press uh tab to go to edit mode, shift H to hide everything else and then press tab to go to object mode again. And now if you see this here, what if we could take all of this, box select these three faces here, and then you can press control I to select inverted, and then X to delete these vertices. So now we only have this shape, right? And now if we go add modifier and you search for uh mirror like this, we can mirror it on the X axis. Sorry, axis and the Y axis. And now we're back to the beginning. But now if we press alt H to unhide everything else, press Z to go to render view, you can see we haven't really done anything. However, if you press tab to go to edit mode, you can move this and you can see we have this symmetrical thing here. So now we can start doing stuff if we want things to be symmetrical. For example, you can press three to view faces, you can select this one. You can press I to insert a face like this. And now you can for example press control R to do a loop cut here, here. And now we can press three again to do this. You can select this one and maybe this one. And then if you go to the material properties now, you can see we have this material here. Let's just call this platform base and then let's click this little plus sign here like this and then let's make a new material. Let's call this platform detail. Or maybe even accent. So now if you click assign on this, you can see if you press tab to go back to object mode, it is a little bit different. See that? So here we can take the principal BSDF, get rid of that, shift A diffuse shader. Plug it in here, maybe make it a little bit brighter. Look at that, we have kind of like a little bit of a detail already. Really nice way to just get some symmetry in there. And then let's take the platform base and then we can maybe make it a little bit darker. So now we already having this interesting uh kind of more like a sci-fi experimental look. I don't know. I think maybe I want these pieces to be a little bit uh more narrow. So maybe we can take press three and select this one. Should we just scale this up? Is it No, that's illegal. Uh we can press one to select vertices and then select the one in the center here, press shift S to bring up this snap menu, and then let's go cursor to selected. And now you can select these three points, hold on shift, select these three. And then if you set the transform pivot point to 3D cursor, you can press S and you can scale this up. Now we will kind of make this a little bit more narrow like this. And then left click to confirm. That was a really bad idea because now we have basically made this really uneven. So I'm going to press control Z on that. And I want to select all of these. Yeah, so let's just select hold on shift and select all of these. And then you don't need to set this to transform pivot point, you can be median point and you can just scale it up regularly. Yeah. Sorry about that. Okay, that should be good. Press tab to go back to object mode. Look at that. Now we actually have a really cool design on this. I really like that. Yeah. Okay, and the best part is it's still animated. So if you look at it like this, look at that. Really cool effect. And then if you want to, we can add some emission to this. So if you go um shift C to reset the position of the 3D cursor, can go shift A mesh plane for example, and you can scale this up. And you can move it down. So G and then Z, move it down far all the way down here. And now if you take this plane and you go to the material properties, new material, we can call this um ground light. Oops, ground light like this. And then surface, let's set this to emission. But uh you can't see it because it's behind my image. So you're going to do it here in the shader editor instead. Delete the principal BSDF, shift A emission and then enter. Now we can take this emission, plug it into the surface here. Look at that, now we have this really interesting and magical light coming from below a little bit. We can actually move it up so it's kind of closer. I think that's good. You know what? I don't want to see this light. I only want to see what it's hitting. So let's go to the object properties and then under visibility, no, sorry, under ray visibility, you can disable camera. So now we can't see the light anymore, but it's kind of lighting up things and something is happening below there. And then should we do with this? Maybe we can give it a gradient texture. Yeah, let's select the emission here, press control T, and let's delete the image texture, shift A and search for gradient texture. Let's connect this here and let's set the gradient to set the factor into the strength. And now you can set it to a spherical gradient. And if you press shift H, we are soloing this gradient. Hmm, and we can't see anything because it doesn't have a texture coordinate UV. Maybe we can set it to object. Yeah, take the hold on control, set the UV to object there. Why can't we see anything? Is it the factor? Color? What am I doing wrong? Is it just too weak? No, we can't see it in the camera. Oh my god, that's so stupid. Yeah, if we enable the camera again, now we can see it like this. Oh, that's so incredibly stupid. Yeah, so by default it's set to linear, but then we change it to spherical. Yeah, just so you can see it like that. That was so stupid. And then if you want to have it a little bit better falloff, you can go shift A and you can search for um color ramp. And then you can give it a B-spline and you can just move this. So, it's kind of starts out like Yeah, it's a little bit smoother. And then now we can scale this down. So, if we scale this down now and press alt H and we bring back our project here, now we can take this uh this light down here, the plane light. I'm going to press F2 and I'm going to call it ground light. If you view this from above here, we can place this so it's straight below the ball. And if we go to the first frame, yeah, now it's not below anymore. Let's place it so it's straight below the ball like this. And now I want it to like this plane is always following the ball here. So, we can go shift A and let's go a math multiply node. And then let's increase the math here. So, now it's a little bit stronger. And then we can give it a color, maybe like an evil color. If you get a black body node, you can set this to I mean, you could set it to 666, but that's too evil. So, let's do 2,300 maybe. And multiply 12. Yeah, look at that. So, now the problem is that once we start moving this ball around, we're kind of we're losing the center here. center. Also, we can see the plane again. Yeah. So, let's disable the ray visibility for the camera. But what I want to do is that I want this plane to follow the sphere. So, let's just take the geometry nodes and let's hide it for a second and let's also hide the platform by using H. And let's take this ground light and I want to parent it to the ball. But if we take the ground light here and you hold down shift and you select the ball and press control P, parent to object, um look at that. We are rotating this light around. This is not what we want. We only want the location. So, let's press control Z to undo that. And now what you can do, you can select this ground light here. And if you go to the um constraint properties, object constraint properties, you can go add object constraint and you can go child of relationship child of and then you set the target to be the ball. But then you can disable rotation. So, disable all of them. You can disable scale as well if you want, but that doesn't matter. So, now if you press play, this plane will always follow the ball like this. So, now if you press alt H to bring back everything and you press Z to go to rendered view, now we have this evil light that is kind of always following this ball. Very cool. And I think this looks even better if we lower the strength of our top light a little bit. So, we have kind of like a an evil light coming from below there. And then we have this stupid platform staying there. It's not to have it so we can edit it. So, it's okay that it's there. And by the way, this looks so much better when we have it playing in real time like when it's actually smooth. So, when we see it in the viewport here, the rendered view, it looks cool, but it's I mean, it's so much better when it's actually high frame rate. Okay, maybe we should actually start trying to render this out as an animation. So, to prepare for that, I wanted to add a little bit more of um some compositing glow in the viewport here. Because when we can see here, it's kind of naked right now. We don't really have any glare. We don't have any chromatic aberration. depth of field. And we want to add just a little bit of um impracticality imperfections. Sorry. Also, impracticalities, but yeah, imperfections. Then in parent, the motion blur is going to look great. Yeah, it is. And also, the motion blur actually works with geometry nodes, which is so cool when it's actually moving these objects around. That's amazing. Geometry nodes is just so powerful. Okay. So, let's add a camera. I think I want to have the camera at this angle because I really like this effect when the ball is kind of going this way. So, when you have like this animation, sorry, it moves like this. I think that's a really cool effect. Also, I think this might actually be going up too early. Maybe we can be a little bit uh Oh, yeah. Now it's like super clutch. That looks so much better that it's Oh, it's just like touching what it needs. Really like that. Yeah. Okay, so I think we want to view it from here. Now we can take the original platform here and we can Sorry, and we can disable it again. I don't think we'll enable it again. Feel like I've been going it doing it all the time. Um Yeah. So, we can actually right-click on this and click join down. And then let's go shift A, camera. And now if you want the camera to see what you are seeing and you don't have a numpad, you can go view Oops, view align active camera to view. And the hotkey for this is control alt numpad zero. So, if you click this, now the camera can see what we are seeing. So, now we have a camera in our scene and you can select the camera by pressing this selecting this edge here like this. So, you can see it lights up in the outliner, the camera here. And now you can right-click and go adjust focal length and you can zoom out a little bit. And then you can also scroll to kind of zoom in, but this is just the effect of the camera I'm seeing. This is just what we are seeing. Then you can hold down shift and middle mouse button to kind of navigate like this. And now to move the camera, you can actually press G and then Z and you will move the camera down a little bit. And at this point, I think we can turn off the ground floor. So, in the overlays here, you can just go guides floor and disable that. And you can also disable the X and Y axis because I don't think we're going to need that anymore. Then I want to save it and then select the camera, maybe press R and then X to kind of rotate it up a little bit. And then I want to go to solid view. I'm just going to scrub through the animation to just see that we are getting everything. Yeah, that's good. Maybe we should actually start at center here. So, the camera can be centered like this. That's uh select the camera G and then X by the way. And then let's set it to rendered view. And now I want to um set the depth of field to just be on the sphere. You could make a depth of field object and do some fancy stuff. We don't need that. We're going to keep it simple today. So, let's select the camera and let's go to the camera object data properties here, the last one. And then enable depth of field and then let's set the focus on object to be the ball. And here you can lower the F-stop. So, if you set it to for example um. 6, too little... 1 maybe. Yeah, now we have a really narrow depth of field here. And it's just updating and it's always following the ball. You should notice that if you zoom far in here, you can see that it is actually targeting the center of the ball, which is like here. Or it's Yeah, it's like um I've forgotten where what the hotkey is. Uh there we go. Yeah. So, the there is the focus. So, if you go in here, nope. Here you can see this is where the focus is. So, that means that you can't you don't really have the focus on the point that is closest. So, if you want to have a nice focus, you could actually go shift A and you can make an empty sphere and you can press F2 and call this focus. You can press G and then shift Z and move it so it's at the front here and then right-click adjust empty display size. So, you like you have this object that is right here. And then um since we already have our ground light here, if you take the ground light, remember we added the child of constraint to prevent the rotation. So, you could just select the ground light like this. And then No, first select the focus and then hold on control and select the ground light in the outliner here. And then you can click this little drop-down arrow and just go copy to selected. So, now this little um focus object here, if we move this back at where it's supposed to be, like there, now it should follow the ball. And it does not have a rotation. So, that is why it's uh completely stationary and it's why it will look in focus. So, now we can move this a little bit closer. And also, select the camera like this and then go to object data properties and change the focus on object from ball to focus. Look at that. Now we have a really sharp focus there. Okay. This is actually starting to look quite good, I think. Okay. So, let's do some um compositing, some really uh quick stuff. Oh, CG matter in the chat. Parameterized hesitation if platform isn't quite there. Oof. I mean, I'm already solving problems you solved 6 years ago. So, I don't think uh — Yeah. I don't think I'll be able to even understand what that question is about. But I really appreciate that you are here. And uh yeah. Uh I wish I was smarter so I could understand that. Sorry. Okay. Um Yeah, compositor. So, let's right-click and let's go a horizontal split. Let's move it here. And then we can take this top here and we can set it to be the compositor. And we can zoom out a little bit, maybe. No, we can keep it here. And let's go new to add a new compositor nodes. And I want to save it. And then we have the render layers here and now we can basically add filters to this. And everywhere I close this, we will get a bunch of filters or a bunch of um effects on our image, which is really cool. So, if you were to go to my shift A and you can search for bloom. You get a glare node like this. And we can't see anything because we have to update it. So, let's click this little down arrow here. And let's set the compositor to always. That's good. And then now if we start increasing, no, lowering the threshold here, you can see we now have a glare on this. So, I'm going to increase the size. I'm going to lower the strength until we have something a little bit more tasty. Maybe 0. 1. Yeah, sorry. Oop. Here you can see we are at the 0. 13. Maybe 0. 12. That's good. And you know what? I think the ball here, I think it should be a little bit stronger in light. So, yeah, remind me about that. We should increase the strength of the light of the ball a little bit. Okay. And then we can um Here you can see you have some presets. So, if you take the chromatic aberration, you can pull this in here. And you can maybe set it to directional blur and with a factor of uh 0. 5 like this. I could also zoom like this. — Yeah, I should probably do that. And then we also have a node. I really like this one, the tune image node. And then I just like to click and drag down. Oh, sorry. Click and drag down and just type 0. 1. I really love that. Here you can see what it looks like without and with. So, focus on the ball here. Here's what it looks like with and without. It's just this extra little pop, you know? And little zap. If you take that office reference. Okay, maybe a little bit more color boost and a little bit more clarity. Um is it zap or is it pep? Pep and zing? I don't know. Maybe someone has watched that episode more recently than me. Okay, now we are actually getting uh What I like about this is that I feel like it looks cool as a still image. But it looks even better as an animation. So, it's kind of uh It's a really cool concept, I think. I like it. Was there anything else we should do then? Oh, we should definitely fix the camera. You can see it's not even. Yeah, so what I want to do is uh if we select the camera and we can set this to be Oh, I just did something stupid. Yeah. We can set the camera to be the um 3D viewport, this one. And now if we select the camera, press alt R to reset the rotation, alt G to reset the location, and then we can press G and Y. Move it over here and then R and then X. And rotate it up. So, now we know we are exactly perfectly rotated. And if anything is wrong now, it should be Yeah, now it's perfectly sym- symmetrical. Which can be very nice sometimes. Oh, yeah, I was going to increase the strength of the sphere. There we go. And if we go to the material properties emission shader multiply. Yeah, why am I here? I should be here in the shader editor. Then let's set this to rendered view. And then here we go. So, this is the material of our sphere. As you can see everything here. And we want to increase the strength of the emission. So, let's zoom in here. Let's go to the multiply. Let's maybe try 25. Yeah, now you can see it's significantly brighter and it's kind of lighting up the ground there as well, which I really like. Yeah. And then also we might want to just experiment a little bit with the Oh. Is the chromatic aberration really strong or something? Have I gotten the wrong value? That is really strong. Maybe 0. 3. Yeah. Okay, and I also want to take the camera and I'm going to go to the object data properties and under viewport display you can increase the best belt two or the pass apart two pass part two. I don't know. Increase it to max and then it kind of just disables everything outside. And by the way, this makes it faster to render as well. That was a update to Blender a few years ago. Very nice. I think this is good actually. I think it's like a fun animation to look at. We can make it a little bit more Yeah, we can select the camera and make it a little bit more wide angle actually. And then maybe move it up a little bit. And then R and then X. Like that. I think that's nice. And I want to just render one frame and see if that's even possible. So, American accent from Polyfjord was not on my bingo card. Yeah, not mine either. If you go to the output properties, we can start dialing in the settings to render this out as animation. And I want to do a test frame just to see if it is possible to actually render out while we are streaming today or if I should just uh post it on Patreon or something like that. So, if we go to the um output properties, you want to render this out preferably as an image sequence. So, I'm going to set the image type to image and then I'm going to set the file formats to open EXR. codec to DWAB lossy. And also, we also have a new codec now, HTJ2K. I haven't tried this yet. Maybe if you have, please leave a comment and see if you have enjoyed it, if it's cool. I mean, it's a new one, but could be fun to play. Yeah. So, this is my settings. I want to render out in EXR. And if you're wondering why, I do have an um video on EXR if you want to check that out. So, now if you go to output, you can select this folder here. And you go to I want to save it to my desktop. I'm going to call this tutorial result version one. And I also want to save it in a folder. So, ren uh EXR seq- Hang on. EXR underscore sequence underscore version one. Yeah. So, tutorial result version one. Accept. And then let's just do a still image. So, I'm going to go render image. I'm going to see how long this takes. And also going to see if my stream starts crashing while I'm rendering. Okay, 4 seconds on one frame. Let's try and do uh 75% and 256 samples. Okay, that's 1 second frame. 1 second per frame. So, 600 frames 600 seconds. 10 minutes. That's too long. We could just do a Yeah, let's just do render some frames. And then we can see if we want to do the entire animation one day. Um Oh, interesting question. What is your current color management? Cuz I think it would be better if it you used ACES 2. 0. Let me ask you this. What do you mean when you say better? I really need I want you to think about that. It's a very important to think about uh when you're using the word better and you're talking about color, what does better mean? And I'm not avoiding the answer here. I'm just uh um Yeah, I am avoiding the answer. I really like to use AJX and I have a great results with it. And I think ACES is great for those who like that. Okay. Mm. Should we just try and render this out and see what happens? Do I have on persistent data because we might actually crash the entire PC. But that's okay. Let's just We can start rendering and see how long it takes. So, if I go render animation and I'll just see. Persistent data. Is the stream lagging now or is it okay?
Rendering
Yeah, okay. So, follow up. Not better is more what I like more. Yeah. So, if you like it more, yeah, I think you should use it. The reason why I haven't used it and I'm talking about the ACES by the way. The reason why I haven't used ACES is because it's just so um it was so overwhelming a few years ago with all these submenus and all this crazy setup to get it to work. So, I tried work and I was like, it's not for me. So, uh since that, I should probably have given it a new chance, but I really haven't. But at this point, I'm just so happy with everything like in Blender right now. So, I wouldn't want to change the default settings. And also, a very important part of my Blender setup is that since I'm making tutorials and I want them to be accessible for everyone, I want to use as many default settings as possible. So, I For example, the most the add-ons I've installed right now. Can I even see add-ons while I'm rendering? Yeah. So, right now I only have installed the Yeah, there are some default add-ons, but I only have quick trigger pie menu, which is my add-on where I can press Q instead. This is on GitHub. You can search for Polyfjord on GitHub. And that is like a very nice hotkey add-on, basically. So, I just installed this, and then it has all my favorite hotkeys for Blender. Why did I start talking about this? Yeah, default settings. Yeah, so I want to use uh um AGX, which is the default color space or view transform that Blender is currently using. So, my GPU is uh the RTX 4090 is currently rendering out this animation, and my CPU is the Intel i9 13900K S, and I have 64 GB of DDR4 memory. But yesterday, my entire uh Blender crashed because I had the memory cache limit set to something really high when I was exporting a video. Yeah. Drift to 163, hey boy, hey bro. Was just making your robot tutorial. Nice. There might be more robot stuff coming. Uh that I can say that. Yeah, so I'm really happy that you enjoyed that. Or you just said that you watched it, but uh I am uh happy that you watched it. Okay, so this is taking 1 second per frame. So, that is that 6 minutes? Or is it Yeah. I think we can chill a little bit while we're rendering. We can talk about my Linux installation that I'm very, very happy about. I've uh recently con- converted to uh Kubuntu, which is um a really cool uh distro that I use. It's a free operating system. And I can recommend it if you have an old uh computer. I actually made uh a video on how to install it as well. So, uh youtube. com/polyfjord two, I think. Or do you have to put an at sign in there? Yeah, how to install Kubuntu. This is a uh tutorial that you can check out if you want to just see how much work is it, how do you actually install a new operating system on your computer. I can recommend uh checking out Kubuntu because it's uh it's a lot of fun. Yeah, and also I made a video about how you can use open code. So, I'm also using oops, open code. I've also been using this a lot to um get like a um large language model agent. You can either plan or build or get help with things on your computer. But the way I'm showing it in the YouTube videos probably a little bit dangerous, so I recommend that you set it to plan instead, and then you then it can tell you what command you should run. Because if you set it to plan, it's not allowed to execute anything. But if you set it to build Oh, sorry. Press tab, yeah. Build, then it can run commands on your computer. Uh oops. Is uh Is Kubuntu faster at rendering also? Yes, it is a little bit faster at rendering. It feel I feel like it's just using my computer more. I played the Teardown, that voxel game, a few days ago, and my computer just went crazy. It just The fans on my computer just went like you know? And I think it's because Linux is just so much better at just getting the resources from my computer. So, when I am rendering, it's actually using a lot more of my GPU, it feels like. Right now, we don't really get that feeling because it's um rendering so short on every frame. But if you have like a 20-second render each frame, then you can really hear that the GPU is really cranking up. Kubuntu means you don't use any Adobe things? No, I unsubscribed from Adobe many years ago, maybe four or five years ago now. And it was uh it was the best creative decision I've made, I think. It I mean, not only is it nice to not be like owned by corporation, but it's really nice to be able to uh If I have a new computer, I can set it up so quickly. I don't need to log in and download all kinds of proprietary software that needs updating in that kind of way that Adobe does. And also, they're not going to increase the prices because I use DaVinci Resolve, so it's just a one-time payment. But what's interesting about unsubscribing from Adobe is that it just really changed my workflow. I used After Effects for 10 years, but now I'm just I'm just not using that workflow anymore, and it has changed how I work as an artist, which it felt good to kind of be a little bit more elastic in my uh Yeah. I remember you mentioned you had a company called Polyfjord. Can you talk about more that Can you talk more about what that is? Is it just a YouTube channel? Yeah, it's just my YouTube channel. It's just um The company I have is called the same as my YouTube channel. So, when I say that I have a company, it's just so I can uh do the taxes thing. Because if you in Norway, if you get money from someone, and it's more than I think 50,000 Norwegian kroners or 5,000 uh dollars, roughly, then you need to be like registered with like VAT. And I'm already being bored just talking about this, but that's uh you basically need a corporation to do that. Yeah. That is one of the fastest Cycles renders. What GPU you use? Okay, so first of all, this is a very low sample count. It's just 256 samples. And also, I have persistent data enabled, so we might get artifacts, which is why I'm just monitoring this and seeing that none of the images are broken. And then thirdly, it's a lower resolution. So, if you go to the output properties here, it's 75% resolution, which means that it's actually half the amount of pixels. Because if it's if you double the X and Y axis, then you quadruple the amount of pixels. So, 75% resolution actually goes twice as fast as HD, but it doesn't look half as bad sort of. På motte, it's a Norwegian word. Do you ever Will you ever shift to Maya? No, probably not. I mean, it's uh No, it's I I'm already so invested in open-source software at this point, and Blender is more than good enough for me. So, I think I'm going to be using Blender until uh Yeah. Currently rendering five layers each at 10 minutes per frame. Jealous. Oh, by layers, do you mean um like a multi-EXR layers? That sounds crazy. Hey Polyfjord, you have mentioned multiple times that you should use Nvidia GPUs. You should try Pop! _OS. It's way easier to update Nvidia drivers and just overall an easier user experience. Is it easier than sudo uh Wait, sudo apt uh update. No, wait, I forgot the command. So, it is probably easier then. Yeah, but you can update drivers with just like uh Wait, update. There is a command on Linux, at least, that you can just write. I've forgotten it already. But Um way easier to update. Yeah, I don't think it's easier to update drivers on Pop! _OS. Because I mean, on Kubuntu, it's been no problem. I just did the Kubuntu drivers install auto thing. Just I run it once, and I had all the drivers, and everything's been working perfectly fine. More like 56% of the pixels. Interesting. Crazy, I would have thought it was 50%. Huh. Okay, sudo apt update. Yeah, so it's sudo apt update drivers or Ubuntu drivers or something like that. Yeah, sorry guys, I can't run commands that you send in the chat. I'm way too noob on Ubuntu to do that. That would be too dangerous. I'm doing separate elements, so the comp is easier. So, that's five to six layers each with a few multi-passes. Oh, yeah, so you're doing Yeah, I see. Yeah, I think this is one of the consequences of me moving away from Adobe is that I no longer composite that much. Or I just do as much as I can in camera, and I treat Blender as like a cinematography stage where you show up with a camera, and you film what's happening, and you do everything there. You do the motion blur, you do the glare and the everything, basically. And it renders so much faster that if the render If something's wrong with the render, you can just re-render it, basically. Instead of having a slower render, and then also doing a heavy compositing uh at the end. Even though I can 100% respect that you have so much um control and power and flexibility in the composite, I just like to have that control earlier in the process. So, that is how my workflow has changed since I broke up with Adobe. What video editing software do you use? I use DaVinci Resolve. Uh here, this is it. This I've actually been using the free version of DaVinci Resolve for the past uh two or three weeks now. And if I'm being completely honest, I can't tell the difference. I don't know what the paid features are anymore. It's crazy. It's wild. I Should I just stop using the paid version? I mean, I only paid for it once, like 6 years ago, and I haven't paid for it since. They just upgrade every version. It's super nice. Uh what is your go-to Photoshop alternative? Um I think uh I wasn't really that interested in Photoshop earlier. I mostly just use Camera Raw to just dial in my pictures, and that was it. Just some subtle like touch-ups that you could do in Camera Raw. And then So, yeah, so Photoshop wasn't that difficult. But what about your After Effects alternative? Yeah, that's the thing is that I changed my workflow a little bit. So, instead of being so dependent on compositing in After Effects, I just do more uh mm do it more in camera in Blender instead. And also, there's one thing I really miss about After Effects, and it is uh Effects Deep Glow. Yeah, this one. Oh my god, it's a paid glow thing. This one was I remember I used this so much. I'm not sure if I used number two or number one, but this was just so good, you know? If someone can reverse engineer this and make it work in Blender, I mean, I'm not encouraging copyright infringements, but just like the capabilities of this uh plug-in here, very nice. I love how it's uh Yeah, it has some lens dirt and stuff like that, but specifically, I really like how they does how they do the exponential glare thing, where it's very smooth. Yeah, you remember I told you about this, yeah. Yeah, this is so good. So, uh Oh, nice, the render's finished. Yeah, but I think it the current glare node in Blender is actually really good. Okay, let's open up a new Blender instance so we can uh render this out as a video. So, video editing. Um wait, hang on, I should probably do this slower. So, if you are uh following along with the tutorial, you can do the same. So, now that our render is finished, you can see here, um if you hold down Alt and you click this folder icon, you can open up you can see you have a bunch of EXR and these won't really open on your computer. Or I haven't tried double-clicking on it. Well, of course it works. Of course, Linux has a native EXR viewer app, Okular. That is fantastic. Tools, do we even have uh view transform? No, we probably don't. I should try this uh configure. Yeah, this is something I would uh do some other time. Let me just see. Uh view transform. No, never mind. Okay, so you have a bunch of EXR sequences EXR images on your computer now. What you can do, you can go to another Blender file, delete everything in your scene, and go to add workspace video editing video editing, and then let's set the scene to be this scene. And then let's go shift A image sequence, and then on our desktop we have the EXR sequence version one, double-click on this, and let's take the first frame, and then you can press A to select all of them, and then add image strip. And now you can take this and you can move it here to the beginning, this point. And now you can zoom out with this here, and you can see that we have our animation. So, I want to go to the end here. Yeah, now it's just a 250 frame long animation, so let's go to the end, hold on control, and then let's use the left arrow, so we are at here at frame 607, it's the last frame, and then control end. So, now this is our entire timeline. Amazing. And we should probably render this out in a lower resolution, because this was not uh full HD, so let's go to the output properties. What happens if I set this to 75%? And then I go a render image. Is that uh cropped? No, that looks good. Okay, yeah. So, now to render this out as a video, you want to go to the render properties. Oops, no, output properties. Output, I'm going to save it to my desktop. I'm going to call this tutorial result version one {underscore} Oh, what happens to the rainbow colors when it's moving? Yeah, that's a little bit tricky to set up. So, um I can show you the final node tree of the original project file, but it is a little bit um Yeah, it requires a gradient and some other stuff that I didn't want to do today. Yeah, so uh tutorial result version one, and then accept. And then we want to change the media type to video, and then color management is good, encoding is good. Oh, by the way, super hilarious, if you're rendering a video, you still get the option to choose the pixel density. I think I've complained about this before, but this is so weird. Why would a media format support like a printing value? Are you printing a video? It's so weird that this is a default setting in Blender, or like a visible menu if you're setting it to video. Very weird. This is like this kind of stuff should be an add-on, or an extension that you have to enable. Same goes with stereoscopy. Like who has used stereoscopy in 10 years, you know? Or I'm not a hater, I'm just saying that this can be confusing for beginners, these settings. Okay, so now under encoding, you want to set the container to MP4, and I video codec to Yeah, I think H264 is good. Output quality high quality, and then no audio. Okay, so to render this as a video now, you can go render animation. So, now we're exporting this as a video, and it will be playing at the same frame rate. I forgot to change the frame rate, by the way, so you have to remember to do that. Oh, good question, or good point, from Anton Muenninger. I think you started rendering on frame 24. That is correct. I did change the render to frame 24, as you can see here. But in the image sequence, the first image is always like the first image. You can't really import an image sequence, and it just has blanks before. So, here you can see that the image sequence does actually start on frame 24. You can see it here in the metadata as well. Uh yeah, here you can see, the first frame is frame 24. So, it doesn't it Blender takes that into account. So, this is okay that we did. But uh good that you are paying attention. Okay, so now we can have a look at our tutorial result, which should be this one.
Final result
Very nice. Look at that. Look at that motion blur. That looks really clean, I think. Nice. I think maybe it could move a little bit slower. And it's not going to loop seamlessly. Oh, it's Yeah, I have to put it in a separate folder, I think. Because then it's not auto-playing the other stuff. Or I can probably just save I don't know. This is better. Yeah. So, that is the final result in this video. I'm going to be posting the um project file on my Patreon if you want to see it. I'm also going to show you some node setups right now, and then if you want to check out the full project file, you can check it out on my Patreon, which is a very nice way to support my channel. And someone is getting time out here. Yeah. So, um let me know if you um actually end up recreating this, because it's a really fun effect, I think, and it's something Yeah, as I said in the beginning, I really like how this effect is kind of like uh it's kind of supporting this ball, like your friends are supporting you in real life, you know? I think that was my original idea at least for this animation. That no matter where you are, you will always have people there like that can back you up, and yeah. Feels good to look at it. And by the way, if you're on Linux, it's super easy to set this as an animated desktop wallpaper. If you go to settings, system settings, and you search for display configuration. Nope, this is the wrong place. You can right-click and go to desktop and wallpaper. Yeah. And then wallpaper type, you can set this to uh you can click get new plugins here. And then you can, for example, use smart video wallpaper, which I want to use. And then if you set the wallpaper type to smart video wallpaper reborn, uh okay, then pick a file, desktop video this one, and then let's click okay. So, now this is the desktop wallpaper on Linux. That's how easy it is. Really, really powerful.
Q&A
Yeah. Is there an add-on that gives notification when done rendering? Yes, there is. There is an add-on that I used to do when I'm rendering, and it is called B-Render-On on Super Hive. It is a very, very powerful uh Yeah, I need to search for it here. B-Render-On. Oops. Render-On Render-On. This one. This is a standalone render manager program. It is very powerful, because you can get basically queue your render times. It's very, very cool, and it also supports adding a custom audio file when the render is finished and stuff like that. But it's most powerful is that it you can just drop a bunch of project files into this, and it will just keep rendering for you. So, it's very nice if you have one computer that is just on, and you can just dump Blender files basically into this, and it will just keep rendering and rendering. And it's very cool, and it also renders a little bit faster, because it's headless. So, I really enjoy this. And uh Yeah, I think you should um I mean, it's not sponsored or anything. I'm not an affiliate, but I really recommend this program. I use it so much. Very nice. What software do you use for 3D tracking camera for your work? I don't do that much 3D soft uh 3D tracking, but uh when I do, I use um You have my YouTube video on uh Oops. Yeah, let's just do this. But Oh, there's my There's me right now. What was the YouTube video I did with uh glow map? Or cold map. Yeah, you can watch this video, it's on my second channel. It's uh a video I show my um 3D tracking workflow. I recommend that you watch the main channel video first, I think, this one. But I'm using basically uh this um uh photogrammetry workflow, which is very powerful. What's my favorite animated movie? It's a good question. Um I remember I really liked the How to Train Your Dragon when I watched that, but I haven't watched that again in years. So, I can't really tell how good that is still. Does that hold up if you're like an adult? I don't know. Okay, how long have I been streaming? 2 hours and 19 minutes. That's nice. Oh, yeah, Wall-E. Wall-E is really good. Yeah. I think Wall-E is good. And I also really like that see that one scene in Monsters University when there's this huge build-up and eventually they end up like scaring them. It's very nice. Have you watched Flow? No, I haven't. I probably should. It's a Blender uh Blender movie. Yeah. Okay, I think uh does it loop? No, it doesn't loop. Okay, wait, hang on. Question about Linux. How's Linux been treating you? I don't know how it's been treating me because uh but we are friends. We're treating each other with respect. Mutual respect. There are some quirks here and there. I'm having some problems with uh my monitor that is kind of weird. When I Hang on, let me actually show you. Maybe some of you can fix this problem for me. I'm using Linux and Kubuntu 25. 10 and I'm using Wayland. And if I'm in Blender and I set the window to toggle window full screen and I go file uh default save startup file. And this is my startup file now with the toggle window full screen and I close Blender and I open Blender again. Look at that. It just it's completely wrong. And you can't really fix it. You can't use the meta middle mouse button thing. You have to toggle window full screen and then toggle window full screen again. You have to do it twice. And I think it's a problem with um the um Nope, that's the wrong setting. I think it's a problem with the display configuration because I have my monitor set to 125 % scaling. So, if I set it to 100% it works. So, there are some weird things going on with Wayland and Blender and the scaling, I think. So, uh yeah. So, that is my request if someone knows what could possibly be wrong there. I've been chat GPTing that for so long and it just uh it doesn't seem to be a problem that is easy to fix. And what is so weird is that I have an exact replicated setup on my other computer and it's not the problem there. And also, I do have two monitors on this one. So, I have one monitor here and one monitor there. And all the time this monitor is the one where I type in my password and I do the like the login. What is the lock screen? Uh yeah, the SDDM lock login screen. Everything related to this is always on my second monitor even though like this is my main monitor. So, I don't really know how to fix that. Have you ever thought about using window manager like i3? I've never heard about that, but that I'm going to write that down. Uh what is it called? Uh i3 window manager. How can I save? You know what? I'm just going to scree- — screenshot. Yeah, window manager. There we go. Yeah, that's how uh much of an idiot I am. Okay. Control X. Okay. Yeah. I think that's it. Um No, wait. I was going to show you a node tree. Why do I keep forgetting this? So, here is the original uh node tree I ended up with. This is the geometry nodes node tree where you can see you have a geometry proximity object that you can move around. So, if I go in here uh here you can see I have a proximity controller object. This setup is actually a little bit difficult or different. So, I'm not going to use this node tree. I'm going to use the one that I showed in this video right here. This is going to be something else. But I wanted to show you how I got this gradient underneath. And the gradient is made with a shader. So, it's actually not that advanced, but it's a gradient texture shader. And this texture coordinate node is set to a gradient controller. So, if we have a look at this, here you can see uh I can take the giant gradient controller. And here you can see it has some colors to it. So, this is basically a gradient that I can move around. So, when this object is moving towards it, then it starts lighting up. And then it's using a math uh node with a gradient over here. So, it's kind of um Yeah. So, that's the setup. Basically using the gradient to get the RGB gradient there. So, using a gradient texture and the color ramp, the trick is to set the color mode, switch it from RGB to HV HSV, and then you set the color interpolation to clockwise for example. And then you can set the color to be something that is See that? How that works? It's very powerful. It's a way to make this rainbow. And then you can basically get the super smooth gradient. This is amazing for HDR because it's super yeah. Um Okay, just some more Linux questions. That could be caused by the physical location you plug the monitors in. I have tried for the Linux problem, I have tried to kind of switch the monitors and it just doesn't seem to update. It seems like my computer is remembering. And the weird part is that on Windows it's okay. But on this particular Linux installation, it's not that okay. So, kind of weird. But uh yeah, I'm going to upload this tutorial file to my Patreon so you can get that and you can also get these two animated wallpapers uh on my Patreon. I'm going to upload them. So, if you're using Windows, you can use lively wallpaper to view use this as an animated wallpaper or you can use um uh on yeah, on Linux the um Wallpaper Engine animated thing. Is this going to be a long-form video eventually? Yeah, this video that you're watching right now will be live on YouTube. So, this is or it will be saved publicly. So, you can watch this for the rest of your life. Are you not on Windows? No, I'm using Linux right now. I'm using Kubuntu um 25. 10. I'm not sure where I can see that. About this system. I don't think I can click this button without showing something stupid. So, yeah. But I'm using Kubuntu 25. 10. As in my latest video. Uh Okay, that's it. Now, I think I'm going to go on a walk. I got some new running shoes, so I'm going to try them out. And I also um Hang on, wait. Okay, one more thing before I leave. I'm going to make a review uh of a product that I bought. It's the first product I'm ever returning in my life because the quality was so bad. It's a tech product. Uh I'll be right back. There we go. So, this is an object. It's something I bought. A RodeCaster Duo. I'm going to be returning this because it's just so bad. It's such a weird product. It has uh I've been Googling myself to death to see if there's something wrong with this. But it's not It's just the way uh Rode or Rode has decided to just make their products. And it's this uh very unfortunate bug when you're listening to it with a headset. Could be any headset. There's a very metallic sound on like the real-time feedback of your voice or like the monitoring of your voice. And it is insane. I just can't believe that they're shipping that project product. If you start making like a certain noise like a mm sound, there's very metallic noise. And there's no way to disable it. I've tried everything and I'm Googling and a lot of people have the same problem. So, don't uh uh it's actually the second Rode product I've just stopped using. I also got the Rode mics. But I have to stop using them because they were so bad. And then I got the DJI Mic 3 and it's such a superior product. So, I don't think I will be buying anything from Rode anymore. It's just uh yeah, that's the RodeCaster Duo. I don't recommend buying it. I'm going to return it. So, I just feel very passionate about audio and when I put it when I put the headset on and I put the mic on, it's a really nice mic. It just sounded so bad. But in the saved audio file was amazing. Yeah. So, that was my review of a product that no one asked for, but I'm just very passionate about uh letting you know that you shouldn't buy that if you're looking for a an audio device. Yeah. Okay, a lot of good comments here to help me solve my Linux problems. So, I will be reading this chat when I end the stream. Yeah, I appreciate that. Okay, now I will uh actually leave and I will uh that's a 2 and 1/2 hour stream. Thank you for watching this video. Mhm. Yeah. Thanks for watching. How do I stop it? It's I don't have the button anymore because I'm on Linux. Yeah, thanks so much for watching and I will see you next time. Also, if you're watching this in the future, leave a comment what you want me to stream about because I get inspired by that. Really inspired. Okay.